

Sometimes, you just need that pure, unadulterated comfort food, right? But let’s be honest, the freezer aisle nuggets just don’t cut it when the craving hits hard. That’s why, even after leaving the corporate world, making homemade chicken nuggets from scratch was one of the very first things I perfected here at Seventh Flavour. Forget dry, weirdly shaped sponges; I want that perfect, audible crunch followed by the juiciest, tenderest chicken interior. The secret weapon? We’re ditching deep frying most days and relying on either a hot oven or an air fryer. I promise you, these incredibly satisfying nuggets are what make a Tuesday night feel like a celebration. It’s about bringing that familiar, satisfying texture right into your own kitchen for a fantastic quick weeknight dinner.
- Why You Will Make These Homemade Chicken Nuggets Again and Again
- Essential Ingredients for the Best Homemade Chicken Nuggets
- Step-by-Step Guide to Perfect Homemade Chicken Nuggets from Scratch
- Cooking Methods for Crispy Homemade Chicken Nuggets
- Tips for Success with Your Homemade Chicken Nuggets
- Variations: Making Healthy Chicken Nuggets Recipe Versions
- Storage and Making Freezer Friendly Chicken Nuggets
- Serving Suggestions for Your Quick Weeknight Chicken Dinner
- Frequently Asked Questions About Homemade Chicken Nuggets
Why You Will Make These Homemade Chicken Nuggets Again and Again
When I tell you these are the best homemade chicken nuggets you’ll ever make, I mean it! They tick every single box we look for when we need an easy family meal that everyone actually enjoys. Trust me, once you try these, the drive-thru is permanently off the menu.
- The Crunch Factor: We use Panko here, and it makes all the difference. They come out unbelievably crispy, whether baked or air fried!
- Juicy Interior Guaranteed: Because we process the chicken just right and don’t overcook them, the inside stays wonderfully moist.
- Kid-Approved Simplicity: They’re the perfect size and shape. This is the ultimate chicken nugget recipe for kids.
- Versatile Cooking: You get that iconic texture without making a greasy mess!
Essential Ingredients for the Best Homemade Chicken Nuggets
Getting the right texture starts right here, with what you put in the bowl. Don’t feel like you need to run out to a specialty store, though! Everything here is super accessible, which is perfect for keeping things simple. The key to success in this recipe is really about having three distinct stations ready to go for the coating.
The star, of course, is that chicken. We’re using breast here because it’s lean and gives us a nice blank canvas, but the preparation counts! For the coating, the absolute game-changer is the Panko breadcrumbs. I’ve tested regular breadcrumbs a million times, but nothing gives you that shattering, light crunch like Panko does. It’s how we guarantee these homemade chicken nuggets feel professionally made.
Here’s what you’ll need all laid out:
- 1.5 lbs boneless, skinless chicken breast, cut into 1-inch pieces
- 1 cup all-purpose flour
- 1 teaspoon salt (divided)
- 1/2 teaspoon black pepper (divided)
- 1/2 teaspoon garlic powder (divided)
- 1/2 teaspoon onion powder (divided)
- 2 large eggs
- 1 tablespoon water
- 1.5 cups panko breadcrumbs (Don’t skimp here for that super crispy coating!)
- Cooking spray or oil for brushing/spraying

Step-by-Step Guide to Perfect Homemade Chicken Nuggets from Scratch
Okay, this is where the magic happens! Making homemade chicken nuggets from scratch sounds intimidating, but don’t worry, we aren’t rolling out anything complicated here. We’re using the food processor to create that classic texture you expect, not something mushy. The process is simple, but attention to detail, especially in the chilling phase, is what separates good nuggets from *great* ones. If you’re ever looking for some other great ways to flavor your chicken, you should check out my guide on the best all-purpose chicken marinade for juicy flavor.
Preparing and Shaping the Chicken Mixture
First things first: grab your chicken pieces and toss them into a food processor. You want to pulse this—and I mean *pulse*! We’re aiming for coarsely ground chicken. If you run the machine until it’s smooth like baby food, you’ll end up with a softer texture, which isn’t what we’re after for the ultimate crunch.
Now, season that meat mixture right in the bowl, mix it gently, and then form your nuggets. Make them whatever size your family loves! Here’s the expert tip I learned early on: place these shaped nuggets on parchment paper and pop them in the fridge for about 15 minutes. Chilling firms them up so beautifully, making them way easier to handle in the breading process. You really don’t want them falling apart when making your homemade chicken nuggets.
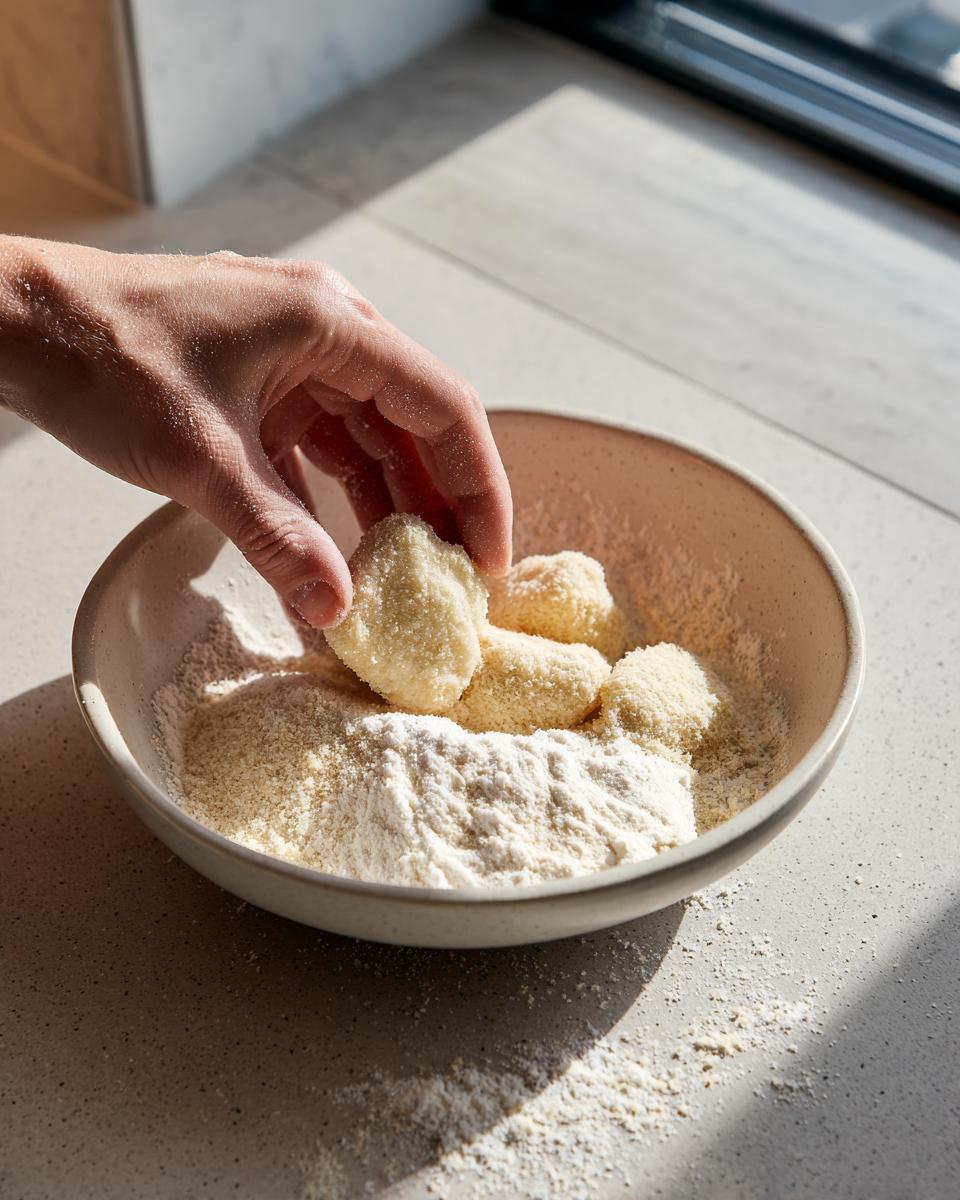
Mastering the Three-Step Breading Process
This is the classic three-step dredge, and it locks in that coating so it doesn’t fall off when cooking. Set up three shallow dishes side-by-side. Dish one holds that seasoned flour mix, dish two holds your egg wash (just the eggs plus a splash of water whisked up), and dish three gets those Panko breadcrumbs.
Take a chilled nugget, shake off any extra flour if you coated it too heavily, dip it completely into the egg wash, let the excess drip—seriously, let it drip!—and then immediately press it firmly into the Panko. You need to press the breadcrumbs onto the nugget so they really stick. This robust coating is what keeps them tender inside no matter how you cook them. Repeat this for every single one!
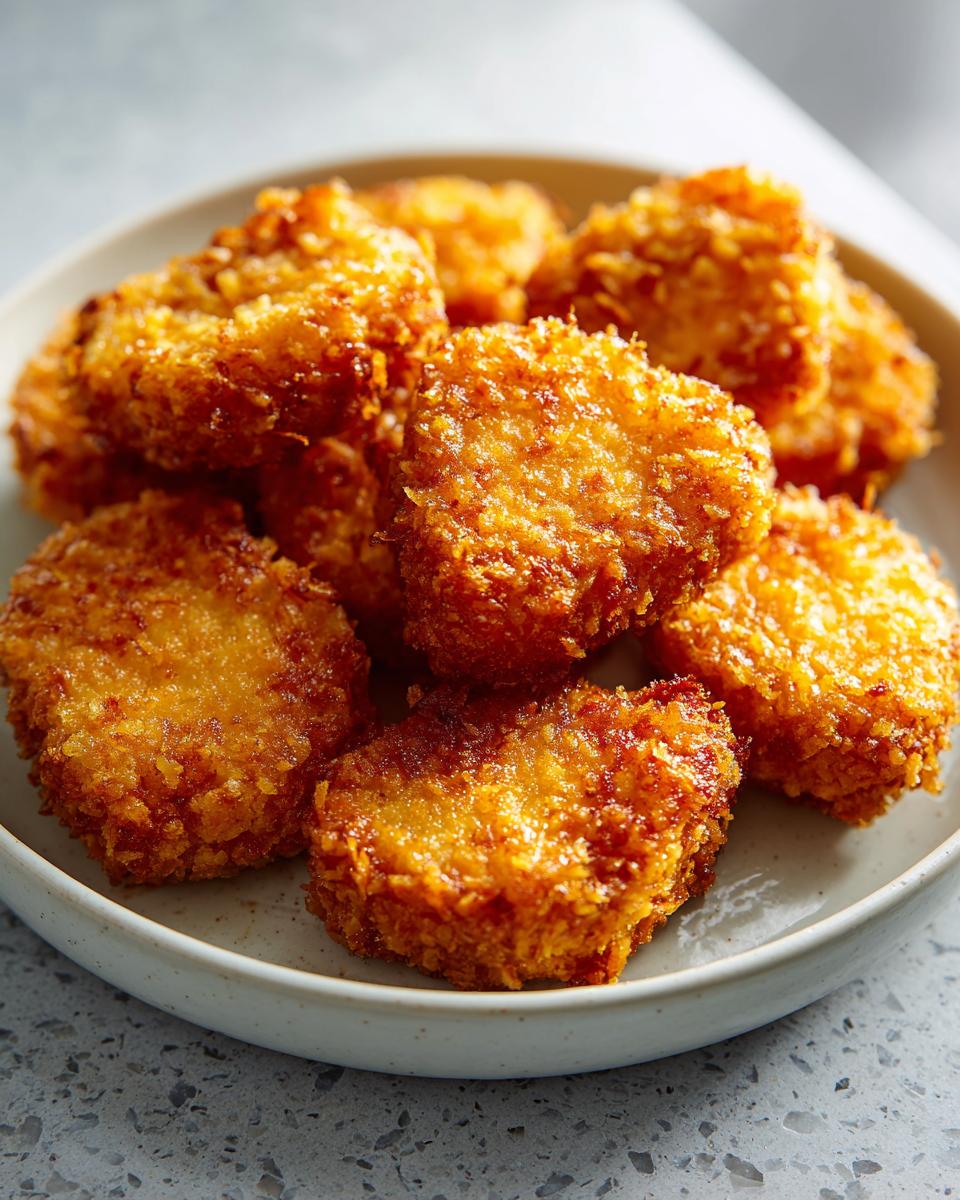
Cooking Methods for Crispy Homemade Chicken Nuggets
You’ve done the hard work shaping and breading, so now we need to nail that satisfying, crunchy finish. Since I’m all about making things practical for a quick weeknight chicken dinner, I always offer both the oven and air fryer routes. Frying is classic, sure, but these methods give you that amazing crisp without all that extra cleanup. The best part about these homemade chicken nuggets is they hold up beautifully to both heat sources!
If you’ve already mastered getting your wings perfectly crunchy, those principles apply right here. We just need high heat and a bit of spray to help the Panko brown!
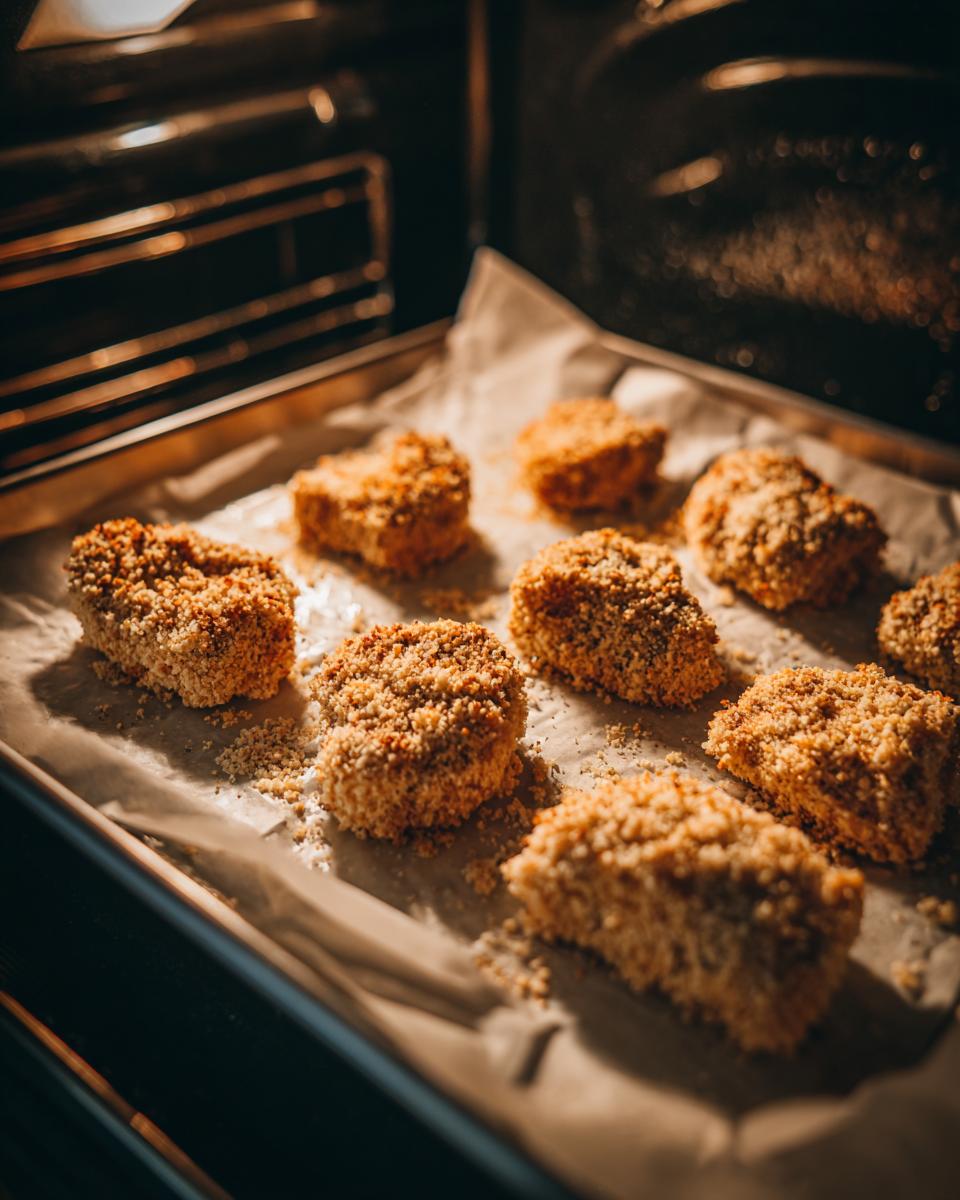
Achieving Crispiness in the Oven
Preheat your oven to a nice, hot 400°F (200°C). I know baking can sometimes lead to soggy bottoms, so you absolutely must lightly spray the coated nuggets with cooking spray or brush them gently with oil before they go in. This helps signal the breading to crisp up instantly!
Slide them onto a rack over a baking sheet if you have one—this allows air to circulate all around. Bake them for about 15 to 18 minutes total, but make sure you flip them over halfway through. We’re looking for that beautiful golden brown color and an internal temperature of 165°F for safety. That’s my trust test!
The Air Fryer Chicken Nuggets Recipe Technique
If you have an air fryer, this is honestly the fastest way to go. Set your machine to 375°F (190°C). Remember, air fryers work by circulating hot air, so you can’t jam them in there. Make sure you arrange your nuggets in a single layer in the basket. If you overlap them, they’ll steam instead of crisp!
Spray them lightly with oil, just like you would for the oven, and then let them run for about 10 to 12 minutes. Giving them a quick flip halfway through ensures even browning on both sides. You get maximum crunch with minimal fuss. If you want even more baking tips, take a peek at my guide on how to properly bake things until they are crispy.
Tips for Success with Your Homemade Chicken Nuggets
Listen, I know cooking can feel like walking a tightrope sometimes, especially when you’re trying to get that perfect fast-food texture at home. But these little pointers, gathered from what felt like a million test batches, are going to make sure your homemade chicken nuggets turn out perfectly tender and crunchy every single time. Don’t skip the chilling step—seriously!
Here are the things I swear by:
- Use Cold Chicken: Once you have your shaped nuggets chilled in the fridge, keep them cold right up until they hit the hot oil spray or the preheated air fryer basket. Cold meat hitting hot oil equals less moisture loss and a crispier crust!
- Season Every Layer: Notice how we season the chicken, the flour, *and* the Panko? That’s intentional. If you only season the meat, the coating tastes bland. We want flavor right through to the center.
- Don’t Crowd the Pan: Whether you’re baking or air frying, give your nuggets space. When they touch, they trap steam, and steam is the enemy of crispiness. Work in batches if you have to—it’s worth the extra five minutes.
- Panko is Not Optional: If you want those beautiful, jagged, super-crispy edges, you simply must use Panko breadcrumbs. They absorb less oil and brown faster than traditional fine breadcrumbs.
Variations: Making Healthy Chicken Nuggets Recipe Versions
You know I’m all about comfort food, but I also love making things work for whatever our week looks like. One of the great things about these homemade chicken nuggets is how adaptable they are. If you are looking for a healthy chicken nuggets recipe, swapping out the chicken breast for ground chicken is a fantastic move—it makes them even faster to shape, like in the classic homemade chicken nuggets approach.
If you’re trying to keep things lighter, stick to air frying or baking, as detailed above! We also got great results when we made a copycat fast food nuggets version where we finely ground the meat and skipped the chilling step entirely; they were softer, sure, but still delicious for the young ones.
We even tested using almond flour in place of the regular flour for a slightly different texture if you’re gluten-free, which is perfect if you’re planning some healthy lunch recipes for later in the week. There are so many ways to tweak this reliable base recipe!
Storage and Making Freezer Friendly Chicken Nuggets
I love making big batches of these homemade chicken nuggets specifically because they freeze so well! This is essential if you want to have a backup ready for a night when cooking feels impossible. The trick here is freezing them *before* they ever see the oven or air fryer.
Just follow the coating steps exactly as written, arrange the breaded nuggets in a single layer on a parchment-lined baking sheet, and pop that sheet into the freezer until everything is hard as a rock. This prevents them from sticking together in one big nugget clump—oops! Once they are totally solid, transfer them to a sturdy, labeled freezer bag.
When you cook them from frozen, don’t try to thaw them first! Just add an extra 5 to 7 minutes to the cooking time we discussed earlier for both the oven and air fryer. They’ll come out just as crispy and delicious. This makes them the perfect freezer friendly chicken nuggets for busy days!
Serving Suggestions for Your Quick Weeknight Chicken Dinner
These homemade chicken nuggets are the star, but a great dipping sauce makes the show! Forget those sad little packets. A quick homemade honey mustard or a smoky BBQ sauce elevates this meal instantly. If you need a fantastic sauce recipe, my guide for easy homemade tartar sauce recipe works surprisingly well here too, if you like that tangy kick!
For sides that keep the ease factor high, I usually pair them with sweet potato wedges baked right alongside the nuggets, or just a big bowl of crunchy coleslaw. It’s a perfect, balanced, ultra-fast family meal!
Frequently Asked Questions About Homemade Chicken Nuggets
I know you might have a few last questions popping up, especially if this is your first time making chicken nuggets from scratch. It’s totally normal! We all want to ensure we nail that perfect balance between crispy outside and juicy inside. I’ve gathered the questions I get most often from folks trying out this recipe at home.
How do I make sure my homemade chicken nuggets stay tender inside?
That tenderness really comes down to two things we talked about. First, make sure you don’t over-process the chicken in the food processor! If it turns into a sticky paste, it cooks up dense. You want that slight chunkiness so it feels like a real piece of meat. Second, watch your cooking time closely. As soon as you hit that 165°F internal temperature, pull them out. Overcooking, even by a minute too long in the air fryer, can dry out the center, no matter how good your homemade chicken nuggets are!
Can I use chicken thighs instead of breast for these DIY chicken nuggets?
Oh, absolutely! If you prefer the extra flavor and richness, feel free to swap the breast meat for boneless, skinless chicken thighs. Thigh meat has a bit more fat naturally, so they will stay incredibly moist—maybe even more so than the breast cuts. The texture will be slightly richer, but they work perfectly fine with the grinding and breading steps for these DIY chicken nuggets. Treat them exactly the same way!
What is the secret to crispy baked chicken nuggets?
If you are avoiding the air fryer and sticking with the oven, the secret rests entirely on the Panko and the spray. You must use Panko breadcrumbs; they are lighter and flakier than standard breadcrumbs, which helps them crisp faster in dry oven heat. But the biggest helper? A good, even coating of cooking spray or drizzling them with oil. You need that fat on the outside to essentially “fry” the coating slightly as it bakes. This is the magic trick for your crispy baked chicken nuggets!
Print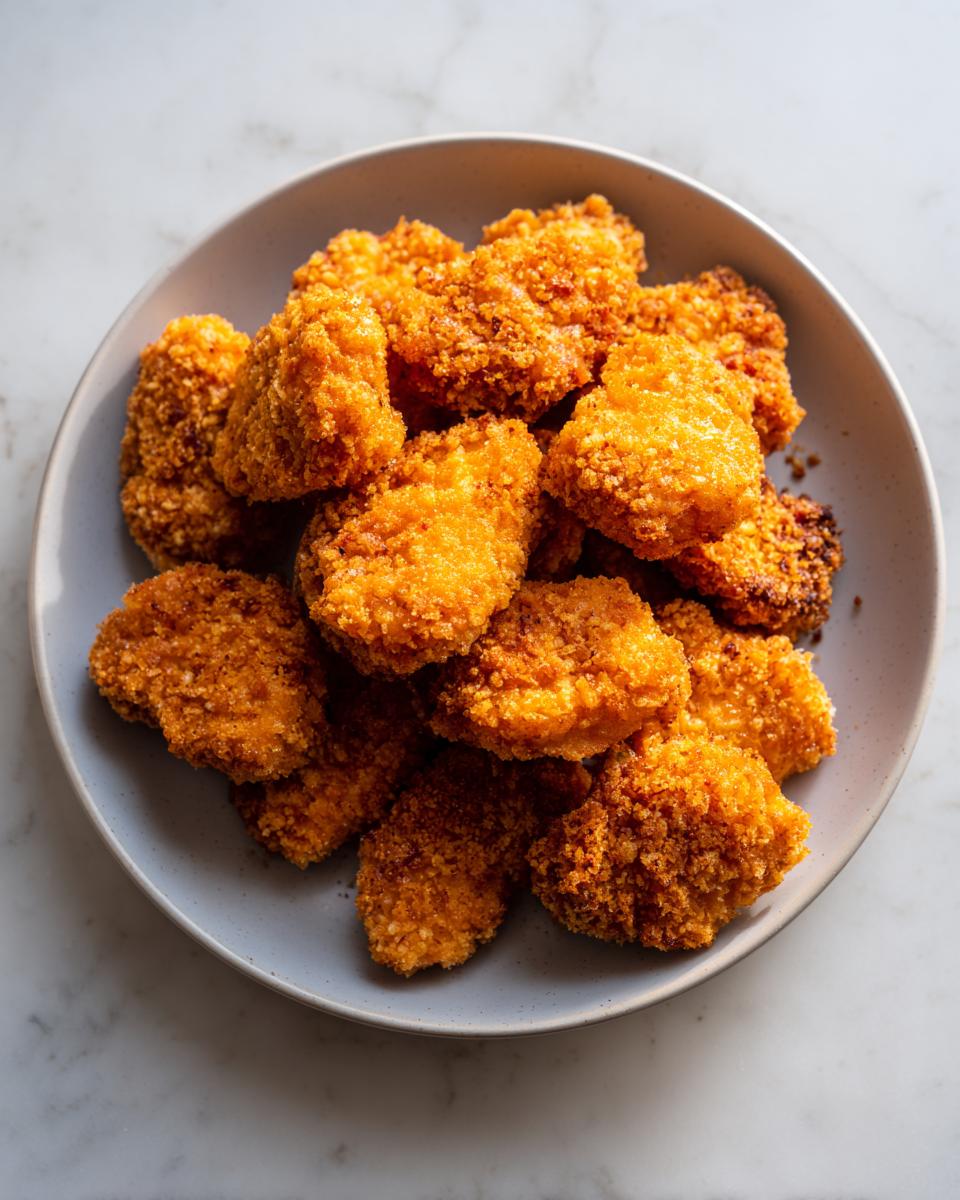
Ultimate Crispy Homemade Chicken Nuggets (Oven or Air Fryer)
Make irresistible, crispy homemade chicken nuggets from scratch. This recipe delivers juicy chicken inside a perfectly crunchy coating, suitable for baking or air frying for a family-friendly meal.
- Prep Time: 20 min
- Cook Time: 18 min
- Total Time: 38 min
- Yield: 4 servings 1x
- Category: Dinner
- Method: Baking or Air Frying
- Cuisine: American
- Diet: Low Fat
Ingredients
- 1.5 lbs boneless, skinless chicken breast, cut into 1-inch pieces
- 1 cup all-purpose flour
- 1 teaspoon salt
- 1/2 teaspoon black pepper
- 1/2 teaspoon garlic powder
- 1/2 teaspoon onion powder
- 2 large eggs
- 1 tablespoon water
- 1.5 cups panko breadcrumbs (for extra crispiness)
- Cooking spray or oil for brushing/spraying
Instructions
- Prepare the chicken: Place the chicken pieces in a food processor and pulse until coarsely ground. Do not over-process; you want a slightly chunky texture, not a paste.
- Season the chicken: In a bowl, mix the ground chicken with 1/4 teaspoon salt, 1/4 teaspoon pepper, 1/4 teaspoon garlic powder, and 1/4 teaspoon onion powder. Form the mixture into small, nugget shapes. Place shaped nuggets on a parchment-lined baking sheet and chill in the refrigerator for 15 minutes to help them hold their shape.
- Set up the dredging stations: Prepare three shallow dishes. In the first, combine the flour with the remaining salt, pepper, garlic powder, and onion powder. In the second, whisk the eggs with 1 tablespoon of water. In the third, place the panko breadcrumbs.
- Coat the nuggets: Take one chilled nugget and dredge it completely in the flour mixture, shaking off excess. Dip it into the egg wash, allowing excess to drip off. Finally, press the nugget firmly into the panko breadcrumbs until fully coated. Repeat for all nuggets.
- Cook the nuggets (Oven Method): Preheat your oven to 400°F (200°C). Lightly spray the coated nuggets with cooking spray or brush with oil. Bake for 15-18 minutes, flipping halfway through, until golden brown and cooked through (internal temperature reaches 165°F).
- Cook the nuggets (Air Fryer Method): Preheat the air fryer to 375°F (190°C). Lightly spray the coated nuggets with cooking spray. Cook in a single layer for 10-12 minutes, flipping halfway, until crispy and cooked through.
- Serve immediately with your favorite dipping sauce.
Notes
- For freezer friendly chicken nuggets, place uncooked, breaded nuggets on a baking sheet and freeze until solid. Transfer to a freezer bag and freeze for up to 3 months. Cook directly from frozen, adding a few extra minutes to the cooking time.
- If you prefer a copycat fast food nugget texture, use finely ground chicken and skip the chilling step, but be aware they may be slightly softer.
- For a healthier chicken nuggets recipe, use ground chicken instead of breast, or try baking instead of frying.
Nutrition
- Serving Size: 5 nuggets
- Calories: 280
- Sugar: 1
- Sodium: 350
- Fat: 10
- Saturated Fat: 2
- Unsaturated Fat: 8
- Trans Fat: 0
- Carbohydrates: 15
- Fiber: 1
- Protein: 30
- Cholesterol: 85