
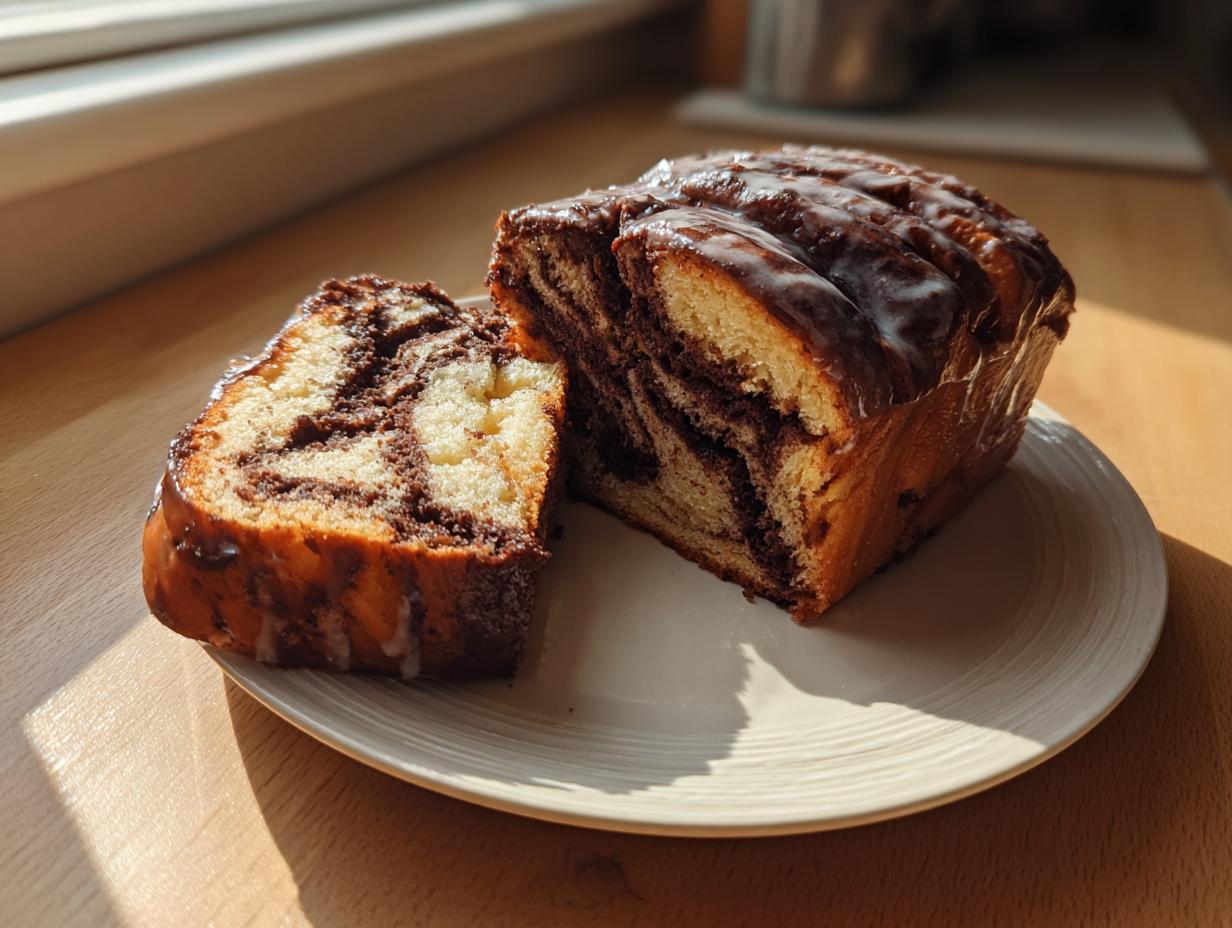
There is nothing quite like pulling apart a loaf of homemade bread—the warmth, the scent, that promise of soft, flavorful layers waiting inside. If you’re ready to tackle a baking project that genuinely rewards your effort, I am so thrilled to share this ultimate guide for making the perfect chocolate babka. Forget those dry, sad versions you find sometimes; we are going for bakery-style decadence right here in your own kitchen. This recipe nails that incredible, rich swirl and impossibly soft texture, making it the perfect thing to dedicate a slow weekend afternoon toward. If you loved my recipe for soft and gooey homemade cinnamon rolls, you’re going to adore this brioche technique. At Seventh Flavour, we believe baking is about that special “Seventh Flavour”—that feeling of connection—and this incredible sweet bread is exactly what that looks like!
- Why This Homemade Chocolate Babka Recipe Delivers Bakery Style Babka At Home
- Gathering Ingredients for Your Chocolate Babka
- Step-by-Step Instructions for Soft Chocolate Swirl Bread
- Tips for Success When Making Chocolate Babka
- Storage and Reheating Instructions for Rich Swirled Bread
- Serving Suggestions for Your Decadent Chocolate Pastry
- Frequently Asked Questions about How to Make Chocolate Babka
- Nutritional Estimate for a Slice of Chocolate Babka
- Share Your Homemade Chocolate Babka Creations
Why This Homemade Chocolate Babka Recipe Delivers Bakery Style Babka At Home
When people see a truly great chocolate babka, they usually assume it came from a professional bakery, but this recipe proves you can nail that look and texture at home! This isn’t just yeasted bread; it’s truly a show-stopping weekend baking project. Trust me when I say it’s worth every minute you spend, especially when you get to the end result.
- We focus heavily on the dough here, using a technique that results in a soft, buttery brioche that melts in your mouth. If you’ve been perfecting a classic brioche dough recipe, you’ll recognize the richness!
- The filling isn’t just cocoa powder; it’s deep, rich, and full of chopped chocolate, which guarantees those intense chocolate pockets in every slice of your rich swirled bread.
- And here’s the kicker: the finishing syrup. This step is non-negotiable! It locks in moisture, ensuring your loaf stays a wonderfully moist chocolate loaf for days.
Key Elements of the Best Chocolate Babka Bread
What sets this apart from other homemade chocolate babka recipes is combination, really. It’s the high-fat, enriched brioche dough that gives you that classic tender crumb. Then you layer it thick with that dark, decadent chocolate filling. Finally, slicing and twisting it exposes those beautiful swirls. Don’t skip the syrup glaze; it’s what makes this chocolate yeast bread stay irresistibly soft, even when you think you’ve overbaked it. It’s little tricks like this that turn a good idea into the best chocolate babka bread you’ll ever make!
Gathering Ingredients for Your Chocolate Babka
Okay, making the best chocolate babka starts right here, with what you bring to the counter. Since this is a brioche-style dough, we need quality ingredients—especially when it comes to the fat! Don’t try to rush things by using cold butter or skipping the warm milk for the yeast. Get everything ready before you begin, because when the dough is finally ready for the butter, you want to be ready to mix!
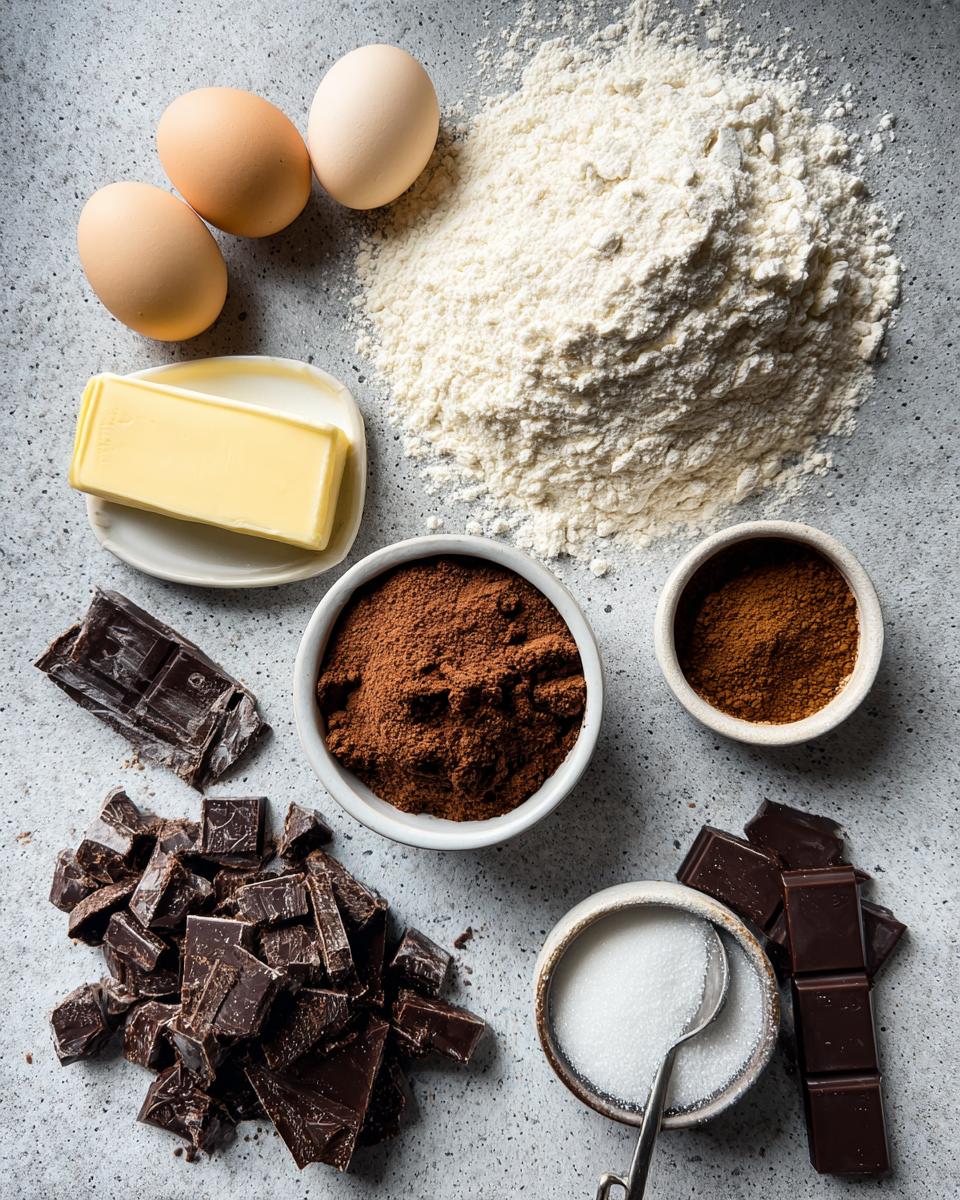
For the Rich Brioche Chocolate Babka Dough Recipe
This dough is what gives you that amazing, pillowy texture for your soft chocolate swirl bread. Everything needs to be measured out perfectly.
- 1 cup whole milk, warmed just right (to about 110°F)
- 1 packet active dry yeast (that’s 2 1/4 teaspoons)
- 1/2 cup granulated sugar
- 3 large eggs, make sure they are at room temperature!
- 1 teaspoon vanilla extract
- 1 teaspoon salt
- 4 1/2 cups all-purpose flour, plus a little extra for dusting later
- 10 tablespoons unsalted butter, softened nicely and cut into small pieces
For the Decadent Chocolate Filling
This is where all that deep, dark flavor comes from. Seriously, chop that chocolate finely; it needs to incorporate properly into the spreadable batter. Using bittersweet chocolate really gives you that beautiful contrast against the sweet dough.
- 1 cup (which is 2 full sticks) unsalted butter, softened completely
- 1 cup packed light brown sugar
- 3/4 cup unsweetened cocoa powder
- 1 teaspoon instant espresso powder (this is optional, but trust me, it deepens that chocolate flavor!)
- 1/2 teaspoon salt
- 8 ounces bittersweet chocolate, make sure it’s finely chopped
For the Essential Syrup Glaze
This simple syrup step is crucial for keeping your final loaf from drying out. It’s purely functional, but boy, does it taste delicious brushed on hot!
- 1/2 cup granulated sugar
- 1/2 cup water
Step-by-Step Instructions for Soft Chocolate Swirl Bread
This is the marathon part of making the absolute best chocolate babka, but honestly, the steps are all straightforward once you get into the rhythm. Don’t rush the rising times, and remember that patience is key for this chocolate yeast bread. We’re moving from simple ingredients to a stunning, two-toned loaf—it’s incredible! If you happen to have leftover apples, you might want to check out my apple bread pudding later this week!
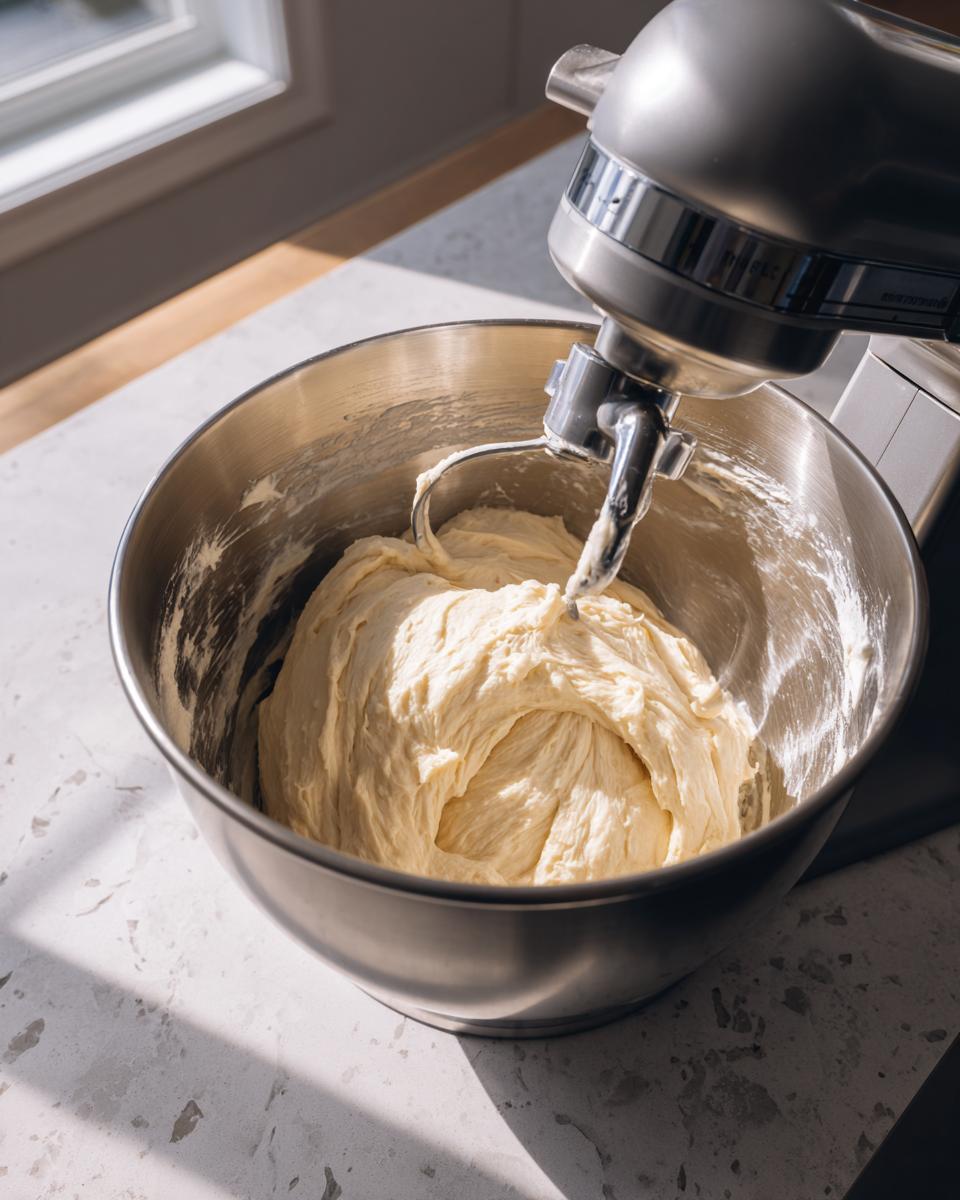
Making the Brioche Chocolate Babka Dough Recipe
First things first, we need to wake up that yeast. That lovely foam tells you the yeast is happy and ready to work its magic on your chocolate babka dough.
- Activate the Yeast: Grab a big bowl and mix your warm milk (it shouldn’t feel hot!), the yeast, and just 1 teaspoon of the granulated sugar. Let this sit for about 5 to 10 minutes until it gets really foamy on top. If it doesn’t foam, your milk was too hot or the yeast is dead, so you’ll need to start over there.
- Mix the Dough: Now, dump in the rest of the sugar, those room-temperature eggs, the vanilla, and the salt. Start adding 3 cups of your flour. Mix it slowly with your dough hook attachment until it just comes together. Then, slowly add the remaining flour until the dough pulls completely away from the sides of the bowl.
- Knead in Butter: This is where we build that brioche richness! With your mixer still running on low speed, add that soft butter, just one piece at a time. Wait until the first piece is incorporated before you add the next one. Seriously, go slow here! Once all the butter is in, crank the speed up slightly to medium-low and let it knead hard for a good 8 to 10 minutes. You want the babka dough recipe to finish smooth and really elastic.
Preparing the Filling and First Rise
While the dough is working hard, we get the delicious filling ready. The payoff for all this waiting is worth it, especially if you take advantage of the chill-time tip!
- First Rise: Transfer the smooth dough to a lightly oiled bowl—give it a quick turn so it’s coated all over. Cover it up tight and let it rise somewhere warm for 1.5 to 2 hours, or until it’s doubled in size.
- Prepare Filling: While that’s happening, whip together your totally softened butter, the light brown sugar, cocoa powder, espresso powder (if you’re using it for that depth!), and salt until it’s perfectly smooth. Then, stir in your finely chopped bittersweet chocolate.
Pro Tip Alert! If you have the time, cover that risen dough and stick it in the fridge overnight. Chilling the dough before you roll it makes rolling out the rectangle so much easier, and it develops even deeper flavor for your final chocolate babka loaf. Just let it warm up on the counter for about 45 minutes before rolling the next day.
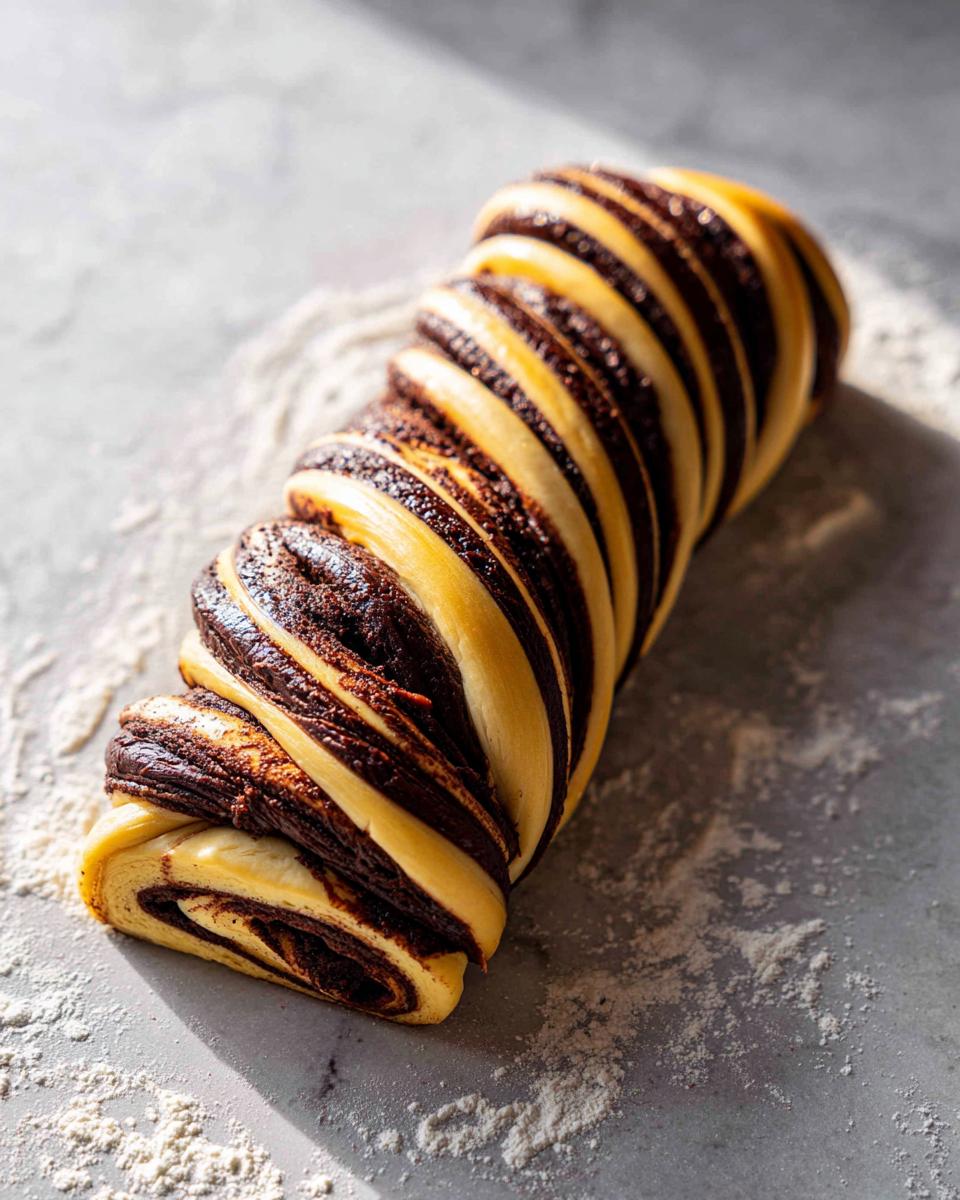
Mastering the Chocolate Babka Braiding Technique
This part looks tricky, but it really is just rolling, slicing, and crossing! This is what gives you that stunning effect in your soft chocolate swirl bread.
- Shape the Dough: Punch down that lovely risen dough gently and turn it out onto a surface dusted very lightly with flour. You need to roll it out carefully into a long rectangle—aim for about 12 by 18 inches. Don’t press too hard; we want that air we’ve worked so hard to build!
- Spread Filling: Take your rich chocolate filling and spread it edge-to-edge across the dough. Leave about a 1-inch border clear along one of the long sides—this bit acts as your seal.
- Roll and Slice: Starting from the long edge that *isn’t* empty, roll the dough up super tightly into a log. Pinch that bare edge—the seam—closed firmly. Now for the dramatic part: Using a very sharp knife or a bench scraper, slice that log right down the middle, lengthwise, from one end to the other. You should now see all those beautiful chocolate layers exposed!
- Braid: Turn the two halves so they are cut-side up. Gently cross the two gooey strands over each other, one on top of the other, making sure you keep the cut sides facing upward as much as you can. This is crucial for that perfect swirl! Pinch the ends together securely.
Baking and Glazing Your Perfect Chocolate Babka
We are in the home stretch now! The second rise encourages those layers to puff up beautifully before they bake.
- Second Rise: You need to carefully transfer that braided beauty into a greased 9×5 inch loaf pan. Loosely cover it again and let it rest in a warm spot for about 45 to 60 minutes until it looks totally puffy. Preheat your oven to 350°F (175°C) while it’s finishing that second rise.
- Bake: Bake the **chocolate babka** for 35 to 45 minutes. You know it’s done when the top is a deep, beautiful golden brown and an instant-read thermometer reads 200°F (93°C) right in the center. If you notice the top getting too dark before the center cooks, just loosely drape some aluminum foil over it to protect it.
- Make Syrup: While it’s baking, quickly make your glaze. Just combine the sugar and water in a tiny saucepan. Bring it just to a boil, stirring until the sugar vanishes into the water. Pull it off the heat right away.

The very second that amazing chocolate babka comes out of the oven, grab a pastry brush and brush that hot syrup evenly all over the top crust. Don’t be shy! Let it sit in the pan for about 15 minutes so it can set up, and then carefully move it to a wire rack to cool all the way down. Enjoy that sweet, syrupy shine!
Tips for Success When Making Chocolate Babka
I know this chocolate babka seems like a big undertaking, but truly, most of the “hard work” is just waiting for the dough to rise! If you follow a couple of little rules about temperature and timing, you’ll end up with an incredible, rich swirled bread that you’ll want to make every single month.
My biggest lesson when switching from regular bread to richer doughs like this homemade chocolate babka recipe is that everything needs to be handled gently but firmly. Think of the dough like a fussy puppy—it needs warmth and patience, but you can’t let it run wild! If you’ve ever tried making pastries with heavy cream, you know how careful you have to be with the folding, and this dough is similar. For more tips on managing delicate batters, check out my thoughts on baking with heavy cream.
Ingredient Notes and Substitutions for Chocolate Babka
The ingredients matter so much here because we are aiming for that specific moist, tender crumb that beats anything store-bought. Don’t skimp on the chocolate or rush the butter softening!
- Temperature Control is Everything: I keep stressing room temperature eggs for a reason! Cold eggs shock the dough and the other mixed ingredients, which can inhibit that smooth kneading process. When your eggs are room temperature, they incorporate into the butter and sugar mixture seamlessly, which is vital for a light and airy final chocolate babka.
- Choosing Your Chocolate: For the filling, I insist on bittersweet. The slight bitterness cuts through the richness of the brioche dough and the sweetness of the glaze, creating that complex flavor profile people love in a brioche chocolate babka. If you only have semi-sweet, it’s fine—your final loaf will just be a little sweeter.
- On Yeast Swapping: If you don’t have active dry yeast, you can use instant yeast, but you need to adjust! For this chocolate babka recipe, if you swap to instant yeast, you can skip that initial activation step in the warm milk. Just dump the instant yeast right in with the flour and dry ingredients, and it will proof during the first mix.
Storage and Reheating Instructions for Rich Swirled Bread
This chocolate babka is truly the best right on the first day, fresh from the oven with that sticky glaze, but because this recipe makes such a wonderful, large loaf, you very likely won’t finish it all at once. And that’s okay! Because we used that essential syrup glaze, this bread is far more forgiving than standard sweet breads. You have options for keeping that soft, swirled texture intact for later enjoyment, which I highly recommend for anyone planning a big family weekend.
Since this loaf is pretty substantial—and let’s be honest, making chocolate babka is a project—I always bake two if I have the time, or I just make sure to save half of this one well. I’ve got a great technique for storing everything from quick loaves to richer ones, so check out my guides on keeping date nut bread moist for general tips, but here is my specific advice for this loaf.
Keeping Your Babka Fresh at Room Temperature
If you plan on eating the whole chocolate babka within two days, just keep it wrapped very well at room temperature. The high sugar content in the glaze acts as a preservative, which is nice! Make sure it’s tightly wrapped in plastic wrap first—I usually do a double layer—and then put it inside an airtight container or a zippered bag. Keep it away from direct sunlight or heat, and you should be just fine for 48 hours. Don’t put it in the fridge! That cold air just sucks the moisture right out of the brioche dough.
Freezing Extra Chocolate Babka Loaves
This recipe freezes like a dream, which is why I almost always plan to freeze one loaf. If you want to keep that bakery style babka at home feeling for next week, this is the way to go. Once the loaf is completely cool (make sure it’s fully cooled before wrapping), slice it up. Slicing it first makes reheating individual portions so much easier later.
Wrap those slices tightly in plastic wrap, then wrap the whole bundle again in aluminum foil. This double barrier protects it from freezer burn. Label it with the date, and it will keep beautifully for up to three months. When you want a slice, just unwrap what you need and pop it straight into the microwave for 15 to 20 seconds, or use the toaster oven until it’s just warm through.
Reheating for That Fresh-Baked Soft Chocolate Swirl Bread Experience
Nothing beats warm babka, right? For the best results when reheating a large portion or the whole loaf, I have two methods depending on how desperate you are for that fresh-from-the-oven feel.
- Quick Microwave Heat: For a single slice, wrap it in a damp paper towel (yes, damp!) and microwave it for about 15 seconds. The steam from the damp towel helps soften the crumb right up again.
- Oven Revival: If you’re reheating larger pieces or the whole loaf, preheat your oven to a low 300°F (150°C). Place the babka (unwrapped or loosely tented if it’s already glazed) on a baking sheet and heat it for about 8 to 10 minutes. This gently warms the crumb all the way through without drying it out, making it taste almost as good as the first time you pulled your rich swirled bread out of the oven!
Serving Suggestions for Your Decadent Chocolate Pastry
Okay, you’ve done the work—you’ve kneaded, you’ve braided, and you’ve glazed. Now, how do we enjoy this masterpiece? This chocolate babka is so rich and decadent that it honestly stands perfectly well on its own, but pairing it with the right beverage or side elevates the entire experience. It’s more than just a sweet snack; it’s an event!
Since this bread is so wonderfully rich, it pairs beautifully with things that cut through the sweetness just a little bit, or complementary warm flavors. If you’re thinking about how to serve this up for brunch or dessert, here are a few of my favorite ways to present this chocolate yeast bread.
The Classic Coffee Companion
You simply can’t go wrong pairing this with coffee. That slight bitterness in a strong black coffee, or even a perfectly steamed latte, is just the ideal counterpoint to the buttery dough and the dark chocolate filling. For me, a sturdy slice of homemade chocolate babka recipe loaf and a warm mug is the only way to start a cozy morning. It feels so indulgent but also so comfortable.
If you’re looking for other fantastic ways to level up your morning routine, you might want to bookmark my list of easy breakfast recipes for inspiration throughout the week!
Dressing It Up for Dessert
If you’re serving your soft chocolate swirl bread after dinner, you can lean into that decadence! A simple dusting of powdered sugar over the top (if you skipped the syrup for some reason, or even on top of the glaze!) is always nice. But for a real showstopper, try adding:
- A scoop of high-quality vanilla bean ice cream while the slice is still slightly warm. The melting ice cream mingles with the sticky syrup glaze in the most heavenly way!
- A dollop of lightly sweetened whipped cream dusted with a little extra cocoa powder. Keep the cream light so it doesn’t overwhelm the bread itself.
- A drizzle of salted caramel sauce. Yes, it’s sweet on sweet, but the saltiness balances everything out perfectly, making this more of an intense decadent chocolate pastry experience.
Brunch Service Ideas
When hosting brunch, this loaf is the star, so don’t overload the table! It’s perfect served simply sliced alongside fresh, tart fruit. Think raspberries, segmented oranges, or maybe some sliced kiwi. The brightness of the fruit keeps the palate refreshed between bites of the heavy brioche dough. It’s honestly a perfect centerpiece for any holiday table, whether you’re celebrating something specific or just celebrating the weekend!
Frequently Asked Questions about How to Make Chocolate Babka
I totally get it; when you dedicate time to a big bake like this, you want all your questions answered up front so your first chocolate babka turns out perfectly. I’ve gathered the ones I get asked most often, and honestly, most of these pop up right when you’re working the dough! If you’re looking for other easy recipes to try after this incredible bake, check out my guide on easy homemade garlic butter, just for a savory break!
Can I make the babka dough without a stand mixer?
Absolutely, you can! My baking roots are totally in hand-mixing, and you can definitely achieve that soft, enriched brioche chocolate babka texture without a machine. However, you have to be ready for some serious arm work. When you get to Step 3, where you knead in the butter, you’ll need to mix by hand for a solid 15 to 20 minutes, possibly longer, until that dough is smooth and elastic. It will take a lot more time than the mixer, but the development of gluten is what matters most. Just make sure to keep your hands floured lightly, and don’t worry about the mess—it’s just part of making a gorgeous homemade chocolate babka recipe!
What if my chocolate babka braid breaks during shaping?
Oh, this happens! Don’t panic or stop to cry right over the cutting board, seriously. When you slice the log open and start crossing the strands to show off that beautiful chocolate swirl, sometimes the dough tears a little bit. It happens to me, too! If a piece snaps off or a section separates, just keep going.
Here’s the thing I learned: any little imperfection in the braid just translates into a more rustic, beautiful swirl once baked. It’s still going to taste like the most decadent chocolate pastry you’ve ever made. Just try to pinch the ends back together before it goes into the pan. Nobody will notice when they are tearing off a warm piece!
Can I use instant yeast instead of active dry yeast in this chocolate babka recipe?
Yes, you totally can use instant yeast, and it saves you about ten minutes of waiting time! If you look back at Step 1 for activating the yeast, you need to make a slight adjustment for instant yeast. Instead of proofing it separately in the milk, you can skip that first step entirely. Just whisk the instant yeast right in with the flour and dry ingredients (like the salt and the rest of the sugar) before you begin Step 2. The liquid will activate it perfectly during the main mixing process. This is a great shortcut for getting your chocolate yeast bread ready quicker!
Nutritional Estimate for a Slice of Chocolate Babka
I know when you’re baking something this rich and glorious, you might wonder where it fits into your week! Since this is an enriched, sweet bread made with butter and chocolate, it definitely falls into the treat category, but it’s wonderful to know what you’re working with. Remember, this is just an estimate based on the standard ingredients list provided. Every time you bake, the exact measurements, the type of chocolate you use, and even the amount of butter absorbed by the flour means your final numbers will shift just a bit.
Think of this as a guide for enjoying your slice of chocolate babka responsibly—or maybe not so responsibly, because it’s just too good! These numbers reflect a single serving slice from the loaf.
- Serving Size: 1 slice
- Calories: Around 450
- Sugar: About 35g (That frosting and filling packs a punch!)
- Fat: Roughly 28g (That’s the glorious butter from the brioche dough making its presence known!)
- Saturated Fat: Around 17g
- Trans Fat: Under 1g
- Carbohydrates: About 45g
- Fiber: About 2g
- Protein: Roughly 6g
- Sodium: About 250mg
- Cholesterol: Around 75mg
So, yes, it’s a rich slice of heaven, but totally worth the weekend baking effort for that perfect soft chocolate swirl bread experience!
Share Your Homemade Chocolate Babka Creations
Now, my favorite part! You’ve gone through all the rises, the kneading, the braiding, and the syrup brushing to create this masterpiece. I honestly can’t wait to see the glorious swirls you pulled apart! That feeling of pride when you see your own perfectly baked, rich, dark chocolate babka loaf sitting on the counter? That’s the Seventh Flavour shining through right there.
I always say that baking is a conversation, and I really want to hear what you thought of the process. Did you chill the dough overnight? Did you use bittersweet or semi-sweet chocolate? Tell me everything!
- Please leave a rating right down below! Five stars means you think this is the best chocolate babka bread out there, and if you have any suggestions for future tweaks or additions, drop them in the comments section. Your feedback helps the next person baking this at home.
- And please, please tag me on social media with your pictures! Seeing your beautiful loaves—especially those perfect chocolate ribbons exposed in the braid—is the absolute highlight of my week. Tag me and use the hashtag #SeventhFlavourBabka so I don’t miss your creation!
If you found this recipe helpful and want to share your journey, you can always get in touch with me directly through my contact page. I love connecting with fellow home bakers! And if you’re still scrolling Pinterest for more recipes after conquering this one, go check out Sophie’s incredible version here for another perspective on nailing this sweet bread!
PrintThe Ultimate Soft & Swirled Homemade Chocolate Babka Recipe (Step-by-Step Guide)

Make the best homemade chocolate babka from scratch. This recipe delivers a soft, rich brioche dough swirled with decadent chocolate filling, resulting in a bakery-style loaf that tastes better than store-bought. Follow the detailed steps for perfect braiding and a moist finish.
- Prep Time: 45 min
- Cook Time: 45 min
- Total Time: 3 hours 30 min
- Yield: 1 loaf 1x
- Category: Dessert
- Method: Baking
- Cuisine: Jewish/Eastern European
- Diet: Vegetarian
Ingredients
- For the Dough: 1 cup whole milk, warmed to 110°F
- 1 packet active dry yeast (2 1/4 teaspoons)
- 1/2 cup granulated sugar
- 3 large eggs, room temperature
- 1 teaspoon vanilla extract
- 1 teaspoon salt
- 4 1/2 cups all-purpose flour, plus more for dusting
- 10 tablespoons unsalted butter, softened and cut into pieces
- For the Chocolate Filling: 1 cup (2 sticks) unsalted butter, softened
- 1 cup packed light brown sugar
- 3/4 cup unsweetened cocoa powder
- 1 teaspoon instant espresso powder (optional, for depth)
- 1/2 teaspoon salt
- 8 ounces bittersweet chocolate, finely chopped
- For the Syrup Glaze: 1/2 cup granulated sugar
- 1/2 cup water
Instructions
- Activate the Yeast: In a large bowl, combine the warm milk, yeast, and 1 teaspoon of the granulated sugar. Let stand for 5 to 10 minutes until foamy.
- Mix the Dough: Add the remaining sugar, eggs, vanilla, salt, and 3 cups of the flour to the yeast mixture. Mix on low speed with a dough hook until combined. Gradually add the remaining flour until the dough pulls away from the sides of the bowl.
- Knead in Butter: With the mixer running on low, add the softened butter, one piece at a time, waiting until each piece is incorporated before adding the next. Increase speed to medium-low and knead for 8 to 10 minutes until the dough is smooth and elastic.
- First Rise: Place the dough in a lightly oiled bowl, turning to coat. Cover and let rise in a warm place for 1.5 to 2 hours, or until doubled in size.
- Prepare Filling: While the dough rises, beat together the softened butter, brown sugar, cocoa powder, espresso powder, and salt until smooth. Stir in the chopped bittersweet chocolate.
- Shape the Dough: Punch down the risen dough and turn it out onto a lightly floured surface. Roll the dough into a large rectangle, about 12×18 inches.
- Spread Filling: Spread the chocolate filling evenly over the dough, leaving a 1-inch border along one long edge.
- Roll and Slice: Starting from the long edge opposite the border, tightly roll the dough into a log. Pinch the seam closed. Using a sharp knife or bench scraper, slice the log lengthwise down the center, exposing the layers.
- Braid: Turn the two halves cut-side up. Cross the strands over each other, keeping the cut sides facing up as much as possible to expose the swirl. Pinch the ends together.
- Second Rise: Carefully transfer the braided dough to a greased 9×5 inch loaf pan. Cover loosely and let rise in a warm spot for 45 to 60 minutes, until puffy. Preheat your oven to 350°F (175°C) during the last 15 minutes of rising.
- Bake: Bake for 35 to 45 minutes, or until the top is deep golden brown and an internal temperature reaches 200°F (93°C). If the top browns too quickly, loosely tent with foil.
- Make Syrup: While the babka bakes, combine the sugar and water in a small saucepan. Bring to a boil, stirring until the sugar dissolves. Remove from heat.
- Glaze: As soon as the babka comes out of the oven, brush the hot syrup evenly over the entire top surface. Let the chocolate babka cool in the pan for 15 minutes before carefully removing it to a wire rack to cool completely.
Notes
- For the softest texture, chill the dough overnight after the first rise. Roll and shape it cold the next day.
- If you prefer a less intense chocolate flavor, substitute semi-sweet chocolate for the bittersweet chocolate in the filling.
- Use a serrated knife to slice the baked chocolate babka loaf for clean cuts.
Nutrition
- Serving Size: 1 slice
- Calories: 450
- Sugar: 35g
- Sodium: 250mg
- Fat: 28g
- Saturated Fat: 17g
- Unsaturated Fat: 11g
- Trans Fat: 0.5g
- Carbohydrates: 45g
- Fiber: 2g
- Protein: 6g
- Cholesterol: 75mg