
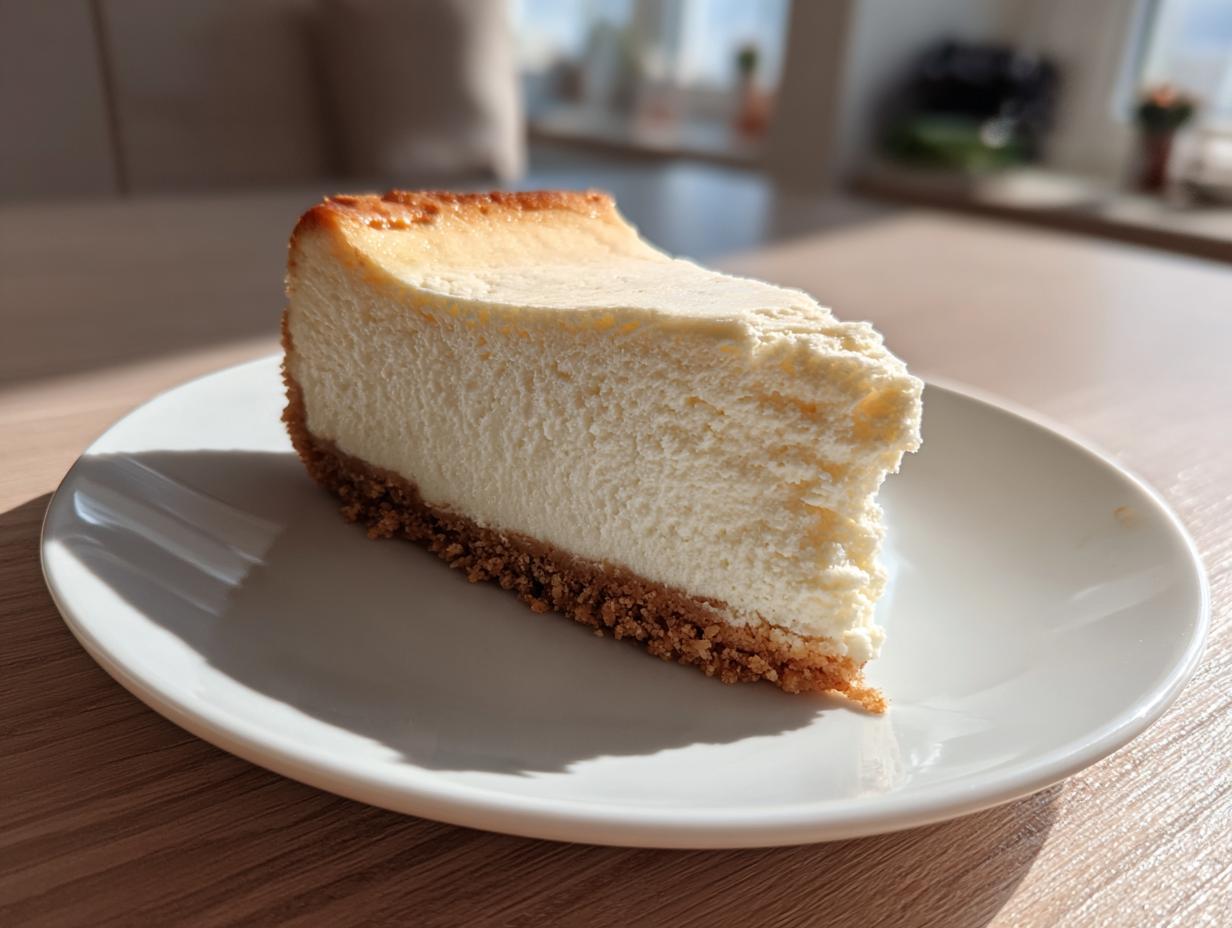
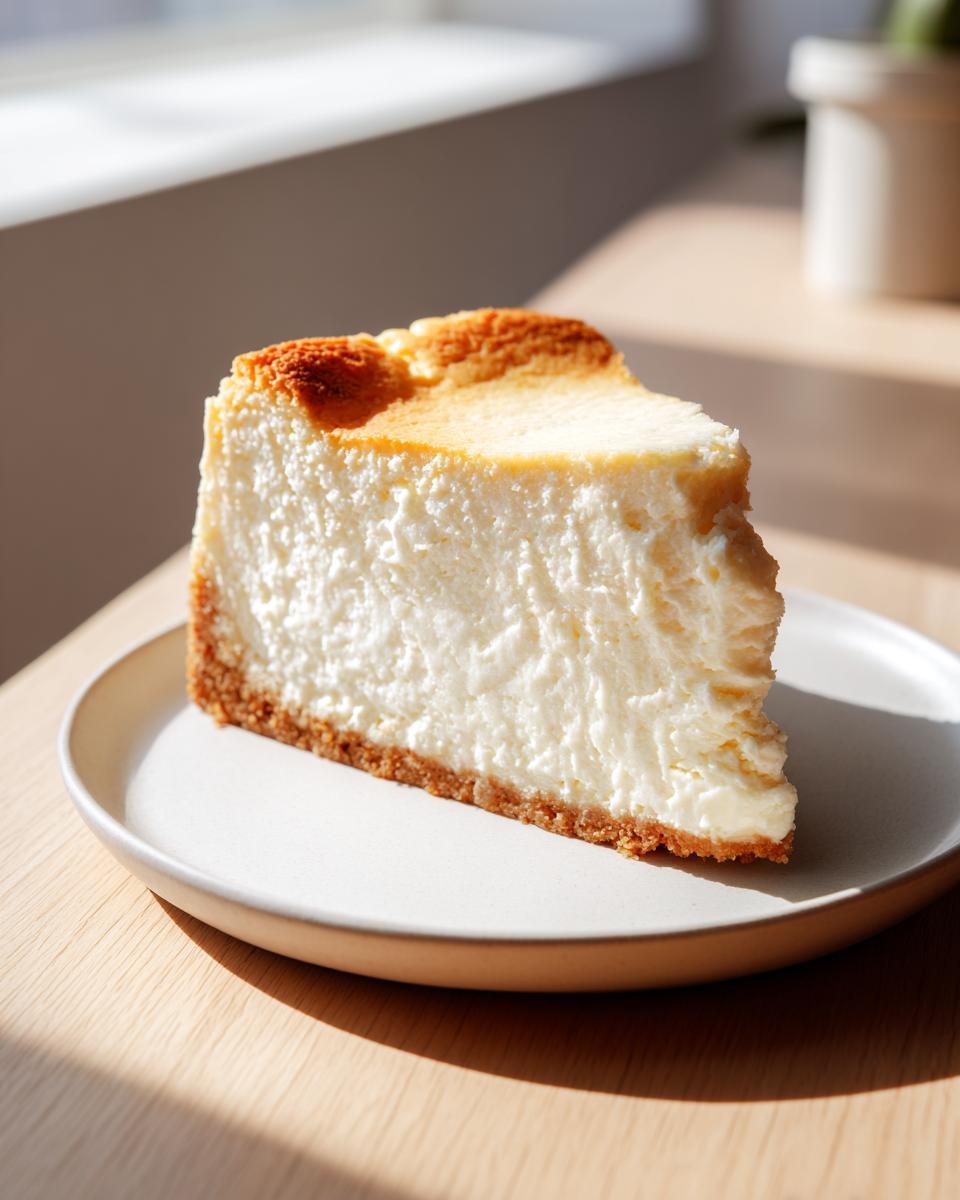
I know the absolute dread that sets in when you pull a beautiful baked good out of the oven, only to see those dreaded spiderweb cracks forming right in the middle. It happens to everyone! But let me tell you something: that fear ends today. We are diving deep into what I, Aria Sterling, consider the definitive cheesecake recipe for any home baker. After putting in over fifteen years of rigorous testing—back when I was still juggling this with a marketing career!—I cracked the code. This New York Style Cheesecake delivers that essential, dense, and rich slice you crave, but here’s the kicker: we’re achieving that flawless, velvety texture completely without a water bath. Seriously, it’s my secret weapon for turning out a legendary, crack-free dessert every single time.
- Why This New York Style Cheesecake Recipe is Your New Favorite
- Gathering Ingredients for Your Creamy Cheesecake Recipe
- Step-by-Step Instructions for the Easiest Cheesecake Recipe
- Expert Tips for a Crack Free Cheesecake Recipe Every Time
- Making the Classic Cheesecake Dessert: Serving and Storage
- Variations on This Indulgent Dessert Recipes
- Frequently Asked Questions About This Cheesecake Recipe
- Nutritional Estimates for Your Homemade Dessert
- Share Your Perfect Cheesecake Experience
Why This New York Style Cheesecake Recipe is Your New Favorite
My passion for baking, which started long before I launched Seventh Flavour, was truly cemented by conquering the cheesecake. If you’ve ever felt intimidated, you can relax now. This isn’t just another recipe; it’s my promise of perfection. You’re getting that ultra-rich, dense New York Style experience—the kind that feels incredibly indulgent.
What makes this my go-to creamy cheesecake recipe? We ditch the fussy techniques! Seriously, no fiddling with water baths here. My specific combination of room-temperature ingredients and controlled cooling means you get that beautiful, smooth top. That’s why bakers trust this method for guaranteed results. Say goodbye to sunken middles and hello to a reliably crack free cheesecake every single time. You deserve dessert success!
Gathering Ingredients for Your Creamy Cheesecake Recipe
Okay, before we even think about turning on the mixer, we have to talk about the ingredients. This is where the magic starts, and frankly, where most people mess up their gorgeous creamy cheesecake recipe! My biggest, non-negotiable rule—and the reason you get that perfectly velvety cheesecake filling—is that EVERYTHING dairy needs to be fully at room temperature. I mean it! Take the cream cheese and sour cream out early. If they are cold, you get lumps, and lumps mean weak structure later on!
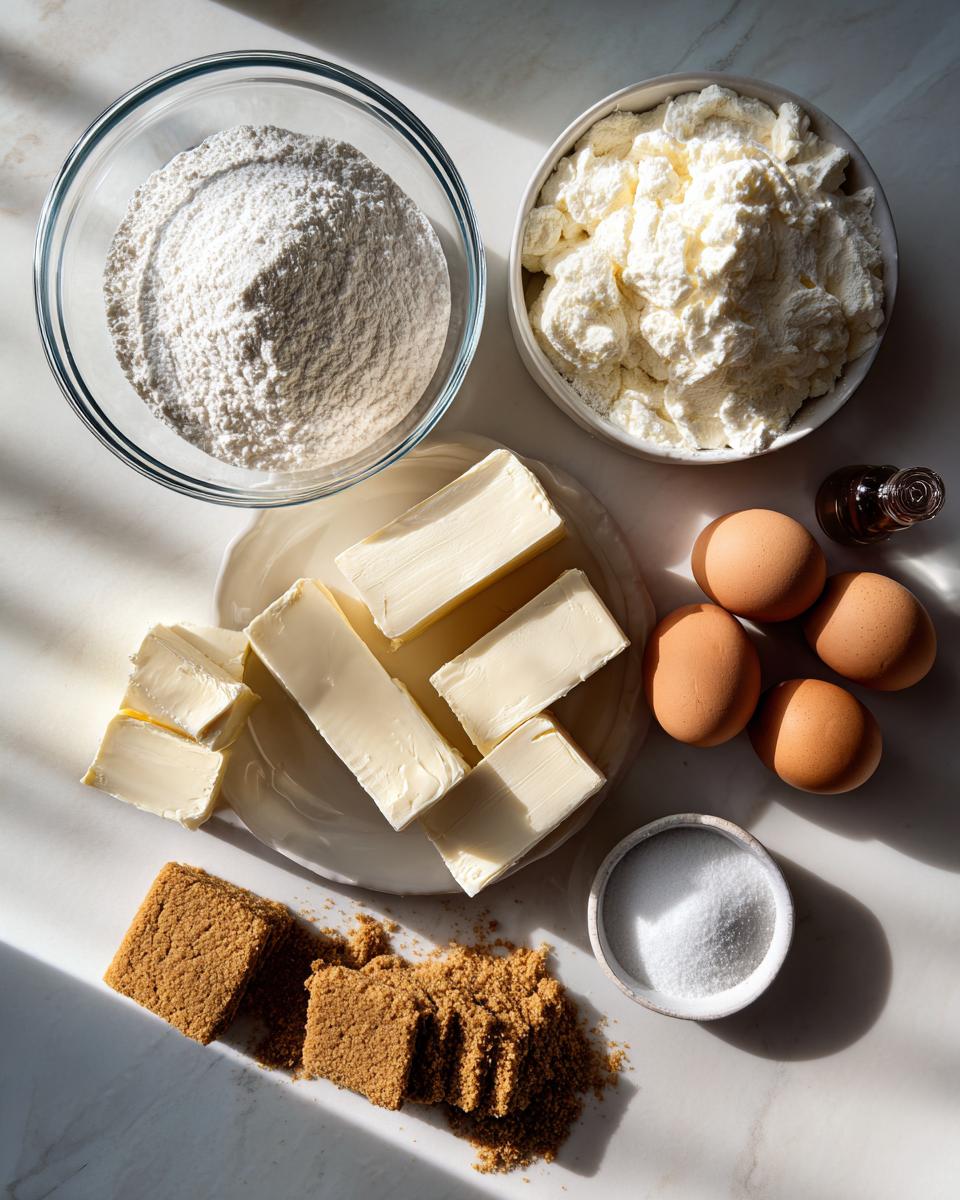
When shopping, please, please grab the full-fat cream cheese. We’re making an indulgent dessert here, not a diet snack! This classic version thrives because of the richness of those full-fat blocks.
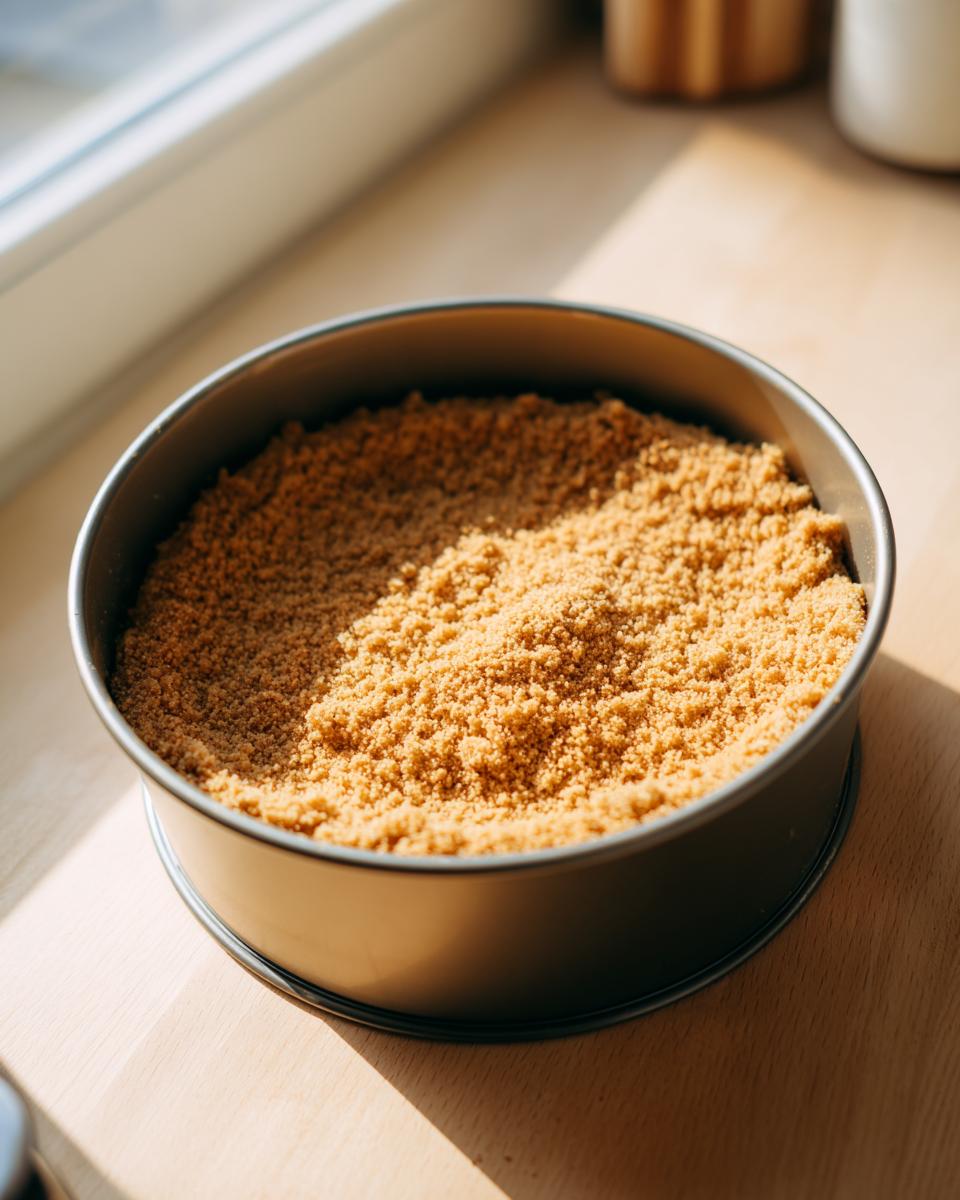
For the Graham Cracker Crust Recipe
- 1 1/2 cups graham cracker crumbs
- 1/4 cup granulated sugar (this is for the crust only, friend!)
- 6 tablespoons unsalted butter, melted
For the Rich Cheesecake Filling
- 4 (8 ounce) packages full-fat cream cheese, softened to room temperature
- 1 1/2 cups granulated sugar (for filling)
- 1/4 cup all-purpose flour
- 1 teaspoon vanilla extract
- 1/4 teaspoon salt
- 4 large eggs, room temperature
- 1/2 cup sour cream, room temperature
Step-by-Step Instructions for the Easiest Cheesecake Recipe
We are finally ready to put this glorious batter together! Don’t stress—I broke down the whole cheesecake step by step so you can focus on gentle mixing rather than worrying about what comes next. Remember, patience in these steps is what unlocks that luscious texture that keeps people coming back for seconds.
Preparing the Crust and Pan
First things first, get your oven humming at 325 degrees Fahrenheit. Because we are skipping the water bath, oven insurance is key! You need to wrap the outside of your 9-inch springform pan *really* tightly with heavy-duty foil. I usually do three layers to be safe. While that’s heating, mix up your crust ingredients: crumbs, the small amount of sugar, and melted butter until it looks like damp sand. Press that mixture firmly and evenly into the bottom of your foil-wrapped pan. Then, pop it in the oven for just 10 minutes to set up. Let it cool a little while you tackle the filling.
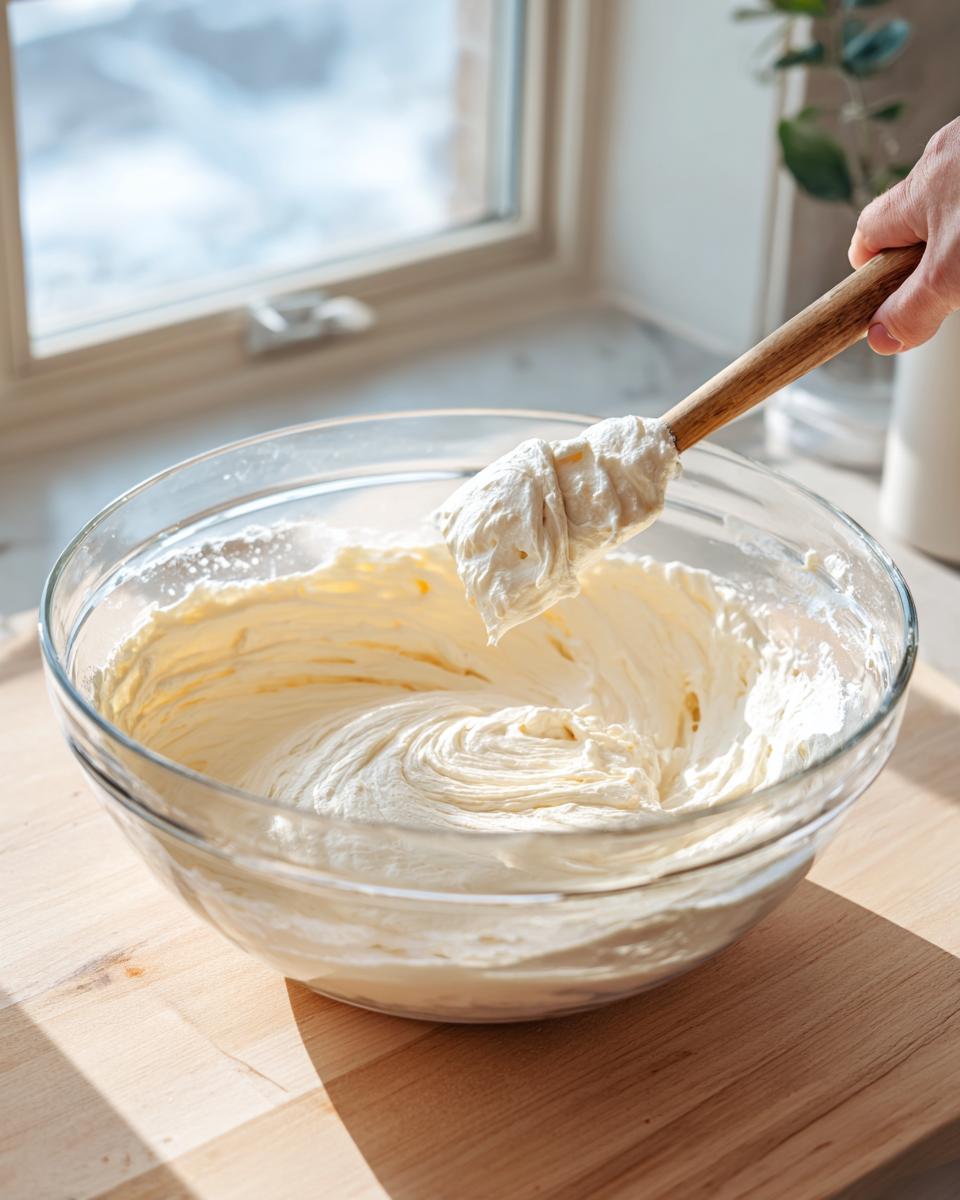
Mixing the Velvety Cheesecake Filling
Grab that big bowl! Beat your softened cream cheese until it’s perfectly silky—no lumps allowed! Scrape down the sides like you mean it. Next, slowly mix in the large measure of sugar and the flour, vanilla, and salt. Beat it just until it incorporates. Now, pay close attention: add your room-temperature eggs one at a time. Use the absolute lowest speed; we *do not* want to whip air into this. Over-beating after the eggs go in is the #1 cause of a crack free cheesecake later, so just mix until *barely* combined. Finally, gently fold in the sour cream until everything looks smooth and uniform. Stop mixing when you see streaks disappear—that’s it!
Baking and Slow Cooling for a Perfect Cheesecake Recipe
Pour that beautiful filling over your slightly cooled crust. Give the pan a few gentle taps on the counter—that knocks out any big air pockets hiding underneath. Slide it into the oven and bake for about 60 to 75 minutes. You’re looking for edges that are firm, but the center (about a two-inch circle right in the middle) should still have a slight jiggle when you nudge the pan. It shouldn’t look like soup, just wobbly! The real trick to this perfect cheesecake recipe happens right after baking: turn the oven OFF. Prop the door open about two inches—you can use a wooden spoon for this—and just let it sit in that residual warmth for a full hour. Trust me, this slow decrease in temperature is the secret to no cracks!
Expert Tips for a Crack Free Cheesecake Recipe Every Time
We already covered the slow cooling, which is huge, but let’s talk about preventing structural issues from the start. If you want the absolute best cheesecake recipe results, you have to treat those ingredients right! Remember how I stressed room temperature for the cream cheese and sour cream? That’s not just for looks; cold ingredients beat together poorly, creating micro-pockets of air that expand rapidly in the heat and then collapse when cooling, causing those heartbreaking cracks.
Secondly, be your own traffic cop when adding the eggs. Once that batter is mostly smooth, you must slow down to a crawl! Overbeating past the point of just incorporating the yolks introduces too much air. I like to mix on the lowest speed my mixer can handle, just until the egg disappears. That’s my cue to turn it off immediately.
Here’s one more thing I learned over years of baking: If you see any bits of softened butter that didn’t fully incorporate into the cream cheese initially, dig them out! A stray bit of solid fat in the mix can cause uneven heating, leading to a slight hump or dip on the surface. Taking an extra minute to scrape and ensure perfect smoothness before the eggs go in makes all the difference for that gorgeous, smooth finish. For more ways to master baking like this, sometimes you just have to check out what others are doing, like the great tips found over at Live Well Bake Often.
Making the Classic Cheesecake Dessert: Serving and Storage
Whew! You survived the bake, and now comes the hardest part: waiting. Honestly, if you’re looking to present a truly classic cheesecake dessert, you cannot rush the chill time. I know you’ll be staring at it through the oven door, tempted to just let it sit on the counter, but trust me, resisting temptation here ensures you get that firm, luscious slice you worked so hard for.
Once the cheesecake is completely cool—meaning it’s been sitting out until it’s just warm to the touch after that slow oven cool-down—it’s time to wrap it up. Cover the springform pan tightly with plastic wrap. You want to make sure that foil wrap we put on for baking is still secure around the edge so that nothing contaminates the top. Then, slide it into the fridge. I know some articles say six hours is enough, and technically, yes, that’s the minimum needed for it to firm up. But if you want that texture to go from “good” to “absolutely unforgettable,” you need at least overnight. Six hours feels rushed; overnight lets those fats set completely, giving you that dense, yet creamy mouthfeel.
When it’s finally time to serve your gorgeous creation, run a thin, sharp knife gently around the edge of the pan before releasing the springform collar. Wipe the knife clean between each slice; this keeps the edges looking sharp and clean.
What about leftovers? Because this is such a rich dessert, you’ll likely have some! Keep any leftovers tightly covered in the refrigerator. It keeps beautifully for about four or five days. If you find a slice seems a little firm straight out of the fridge the next day, just let it sit on the plate on the counter for about 20 minutes before you dive in. That small bit of warming lets the textures soften back up perfectly. Reheating in the microwave is a risky business with cheesecake; you risk melting the delicate structure, so I always advise against it if you can just let it come to cool room temperature naturally!
Variations on This Indulgent Dessert Recipes
While this base recipe is pure New York decadence, I love seeing how you all adapt it! Don’t feel locked into keeping it plain, even though it’s perfectly delicious just as it is. Having mastered the base, you’re ready to explore some fun twists that truly make this dessert your own.
The best variations play up the richness of the filling without compromising that essential crack-free surface we worked so hard for. Think about smooth textures on top if you aren’t a fruit fan, or swirling in a little something extra right before that final bake.
For example, if you want a gorgeous presentation, try making some kind of swirl! A quick way to get that lovely color is using a fruit reduction. If strawberries are calling your name, you can whip up a simple homemade sauce – just cook down fresh or frozen berries with a splash of lemon juice and a spoon of sugar until thick enough to drizzle. Next, swirl that sauce gently into the batter before it goes into the oven. You can check out lovely ideas like a Strawberry Swirl Cheesecake Recipe for inspiration on how much swirl is *just* right.
Another simple way to elevate this into one of your go-to indulgent dessert recipes is with toppings applied *after* chilling. Caramel is always a winner. Make a quick salted caramel (or buy a decent jar!). Drizzle it over the chilled, released cheesecake just before serving. The salty-sweet contrast against the tangy cream cheese is divine.
If you’re feeling chocolatey, try this: Reduce the flour in the filling by half and add a quarter cup of sifted, high-quality cocoa powder along with the sugar. This gives you a stunning, slightly darker, rich base that works beautifully with a chocolate ganache topping poured over once it’s fully set in the fridge. These little tweaks keep this recipe fresh, even though the core is timeless!
Frequently Asked Questions About This Cheesecake Recipe
It’s completely normal to have questions when tackling a classic recipe like this! We want your first attempt at this easy homemade cheesecake to be a total success. Below, I’ve gathered some of the things I get asked most often in my inbox about keeping this New York Style cheesecake perfect. If your question isn’t here, feel free to drop a note over on my contact page!
Can I substitute the sour cream in this cheesecake recipe?
I strongly recommend sticking with full-fat sour cream! The sour cream isn’t just for balancing the sweetness; it contributes a crucial element of moisture and that subtle, desirable tang that cuts through the richness of the cream cheese. If you absolutely must substitute, Greek yogurt (the full-fat kind!) would be the closest in texture, but be aware that it often makes the filling slightly firmer and might change the flavor profile a tiny bit. Skip low-fat versions entirely; they contain too much water and will definitely affect your beautiful, dense texture.
How long does the cheesecake need to chill before serving?
This is another one of those non-negotiables, darling! For the best possible outcome, give it a minimum of six hours, but truly, overnight is where this recipe sings. During chilling, the starches, fats, and proteins firm up and meld together beautifully. If you rush it, your knife will drag, and the texture won’t have that signature velvety smoothness; it’ll be slightly grainy or too soft. Think of the chilling time as integral to the cooking process!
Here are a couple of other things people always ask:
What if I absolutely must use a water bath? Well, if you feel safer using one, go for it! But remember to counteract the added steam. If you use a water bath, reduce your initial oven temperature to 300°F and skip the slow cooling step inside the oven; take it straight out to cool on a rack after it sets. Adding moisture means you need less gentle cooling!
How do I know when it’s done baking without cracking? You’re looking for that slight wobble in the center, about a two-inch circle that jiggles when nudged gently. If the whole thing is rigid, it’s likely overbaked, and that’s what leads to cracking when it cools down. Trust the wobble!
Nutritional Estimates for Your Homemade Dessert
Now, let’s be real: when you’re diving into a slice of rich, New York cheesecake recipe perfection, you probably aren’t counting macros! This is an indulgent dessert, meant for celebrating, for special occasions, and for enjoying life. However, since I believe in being transparent about what goes into our favorite homemade treats, I’ve put together some estimates for you.
Please take this little chart below as a general guide. I developed this recipe using standard, full-fat components, so these numbers reflect a sizable slice of that creamy goodness. Remember, these figures are based on my formula, and if you add a massive salted caramel topping, you’ll need to adjust accordingly!
We strive to guide you toward confidence in the kitchen, and that includes knowing what you’re serving. For full details on how Seventh Flavour handles data and privacy, you can always take a peek at our privacy policy.
- Serving Size: 1 slice
- Calories: 450
- Fat: 30g (Don’t skimp on the butter and cream cheese—that’s where the texture lives!)
- Carbohydrates: 40g
- Sugar: 35g
- Protein: 8g
- Cholesterol: 120mg
See? Totally worth every single bite. Knowing roughly what’s in it just helps you savor that beautiful, tangy experience even more when you take that first bite of your creamy cheesecake recipe!
Share Your Perfect Cheesecake Experience
And there you have it! We’ve conquered the wrapping, we’ve respected the room temperature rule, and most importantly, we’ve navigated that tricky slow-cooling process to create a flawless, rich, and perfectly dense New York Style Cheesecake. Pat yourself on the back, friend, because you just made an incredible dessert that looks and tastes professionally made!
Now comes the best part of my job here at Seventh Flavour: hearing from you. Baking should always feel like a celebration of connection, so I truly want to know how this went. Did you manage that elusive crack-free top? How did your family react to this unbelievably creamy cheesecake recipe?

Please, don’t be shy! Head down to the comments section below, give this recipe a star rating if you loved the results, and tell me about your experience. I absolutely adore seeing your creations! Snap a picture of that beautiful slice you manage to cut and share it on social media—tag me so I can celebrate with you! That’s the Seventh Flavour we’re chasing: the joy we find in sharing something wonderful we made with our own hands.
If you’re diving into more recipes from the site, just keep in mind that all content is governed by our standard Terms of Use, but your baking success story is always welcome!
PrintPerfect New York Style Cheesecake Recipe (Creamy and Crack-Free)
Follow this simple guide to make the best homemade New York Style Cheesecake. You will achieve a rich, dense, and velvety filling with a buttery graham cracker crust, guaranteed to be crack-free without needing a water bath.
- Prep Time: 25 min
- Cook Time: 75 min
- Total Time: 1 hour 40 min
- Yield: 12 servings 1x
- Category: Dessert
- Method: Baking
- Cuisine: American
- Diet: Vegetarian
Ingredients
- 1 1/2 cups graham cracker crumbs
- 1/4 cup granulated sugar (for crust)
- 6 tablespoons unsalted butter, melted
- 4 (8 ounce) packages full-fat cream cheese, softened to room temperature
- 1 1/2 cups granulated sugar (for filling)
- 1/4 cup all-purpose flour
- 1 teaspoon vanilla extract
- 1/4 teaspoon salt
- 4 large eggs, room temperature
- 1/2 cup sour cream, room temperature
Instructions
- Preheat your oven to 325 degrees Fahrenheit. Wrap the outside of a 9-inch springform pan tightly with heavy-duty aluminum foil.
- Prepare the crust: Mix graham cracker crumbs, 1/4 cup sugar, and melted butter until combined. Press the mixture firmly into the bottom of the prepared springform pan. Bake for 10 minutes. Remove from oven and let cool slightly.
- Prepare the filling: In a large bowl, beat the softened cream cheese with an electric mixer until smooth. Scrape down the sides.
- Gradually beat in 1 1/2 cups sugar, flour, vanilla extract, and salt until just combined. Do not overmix.
- Add the eggs one at a time, beating on low speed after each addition until just incorporated. Mix in the sour cream until the batter is smooth.
- Pour the filling over the cooled crust. Gently tap the pan on the counter a few times to release large air bubbles.
- Bake for 60 to 75 minutes. The edges should look set, but the center (about 2 inches wide) should still jiggle slightly when the pan is gently nudged.
- Turn off the oven, prop the oven door open slightly (about 2 inches), and allow the cheesecake to cool inside the oven for 1 hour. This slow cooling helps prevent cracks.
- Remove the cheesecake from the oven and let it cool completely on a wire rack. Once cool, cover and refrigerate for at least 6 hours, or preferably overnight, before serving.
Notes
- Use room temperature ingredients for the cream cheese, eggs, and sour cream; this prevents lumps and ensures a smooth texture.
- To avoid cracks, do not overbeat the batter once the eggs are added; excessive air incorporation causes rising and subsequent cracking.
- If you prefer a thinner crust, reduce the butter to 5 tablespoons.
Nutrition
- Serving Size: 1 slice
- Calories: 450
- Sugar: 35g
- Sodium: 300mg
- Fat: 30g
- Saturated Fat: 18g
- Unsaturated Fat: 12g
- Trans Fat: 0.5g
- Carbohydrates: 40g
- Fiber: 1g
- Protein: 8g
- Cholesterol: 120mg