
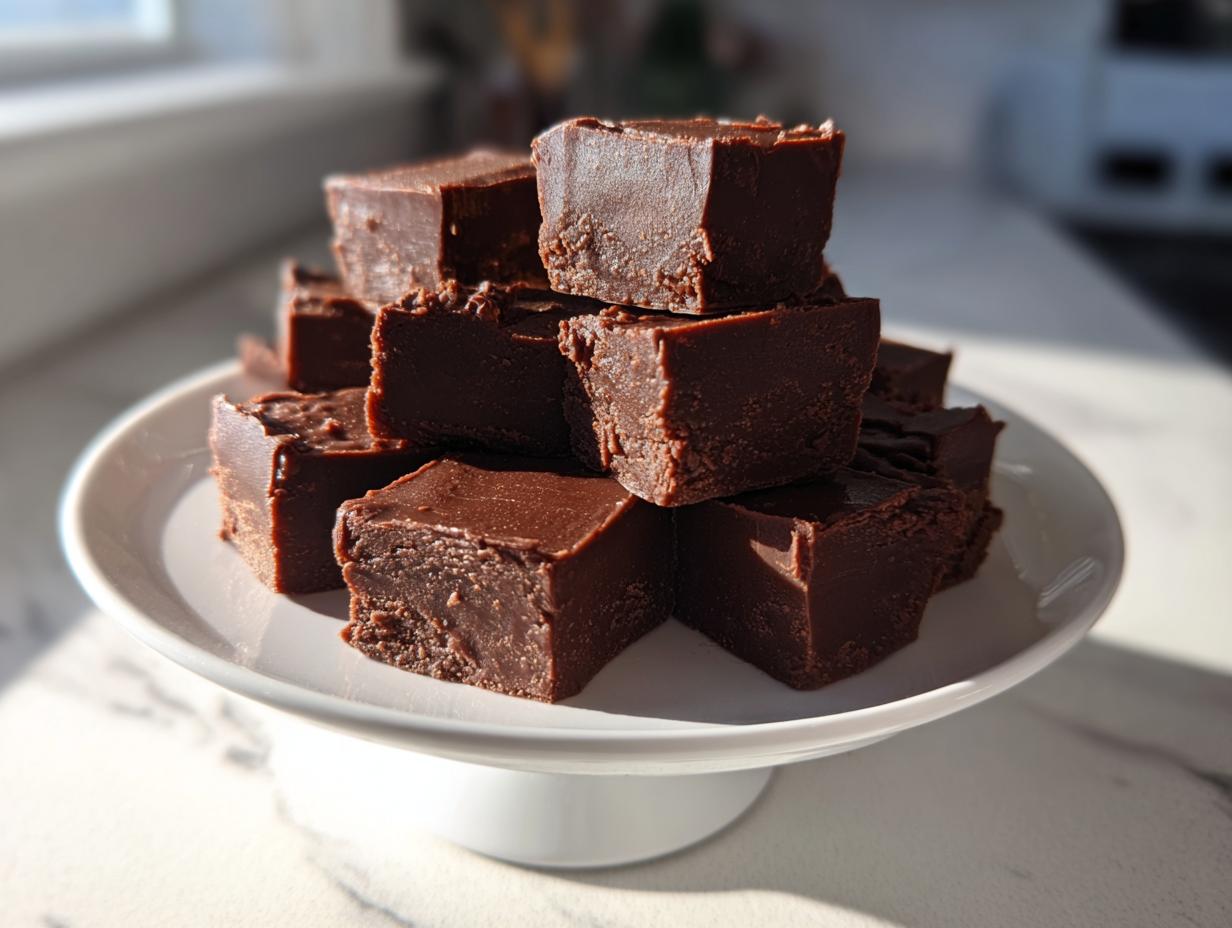
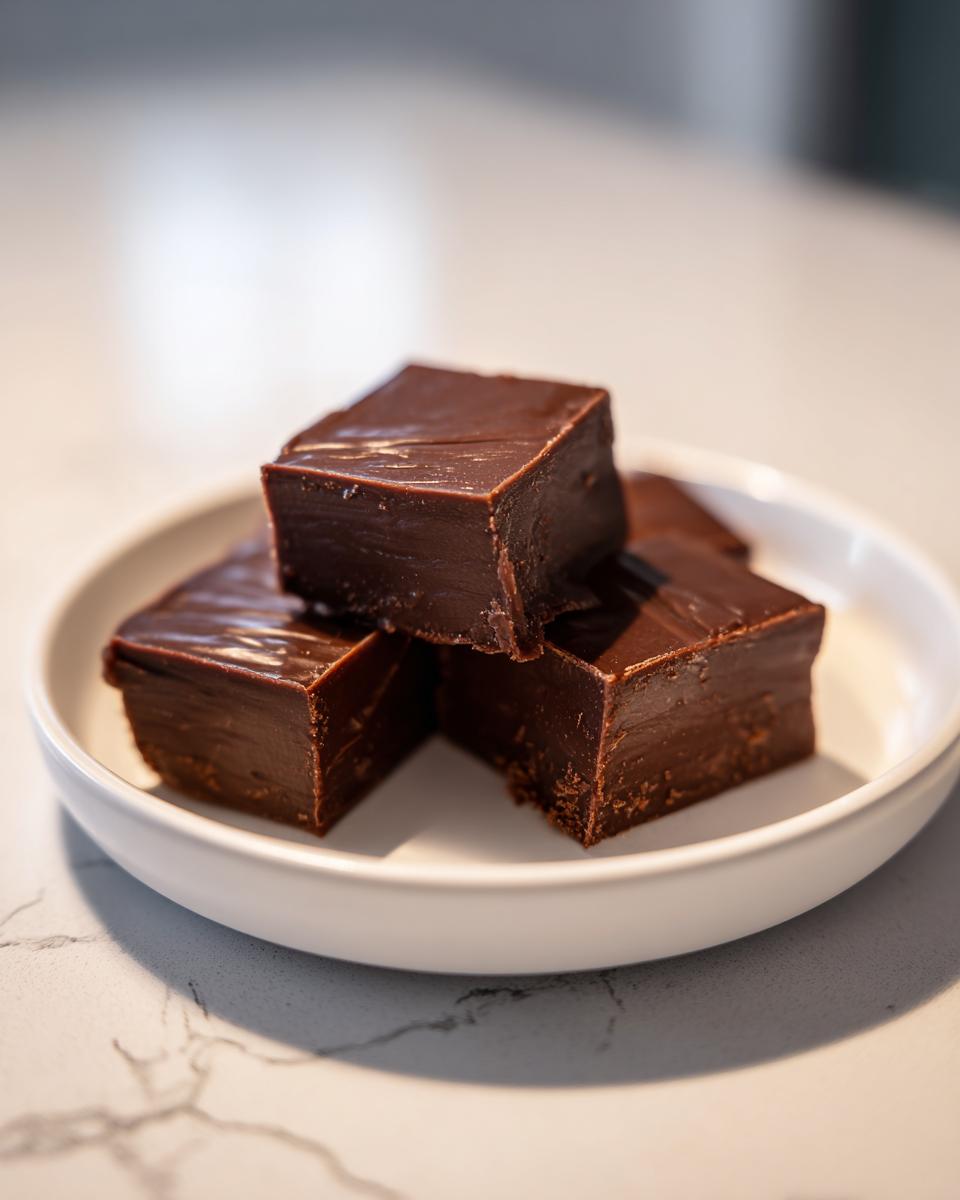
Sometimes, that deep, undeniable chocolate craving hits—you know the one! You need something rich, decadent, and utterly satisfying right now, but the thought of complex baking projects just isn’t going to fly. Trust me, I’ve been there when I needed a quick comfort fix after a tough day. That’s why I’m sharing what I honestly believe is the best fudge recipe out there for busy evenings. This is our foolproof, 3-ingredient chocolate fudge that delivers that amazing, smooth, melt-in-your-mouth experience, and best of all? You don’t even need a candy thermometer! For me, creating quick, beautiful treats like this is what Seventh Flavour is all about—finding that spark of joy in the simple act of making something delicious for yourself or to share with friends. If you love quick fixes, you should definitely check out my 5-minute creamy chocolate dip next!
- Why This 3-Ingredient Chocolate Fudge is the Best Fudge Ever
- Ingredients for Your Quick and Creamy Fudge
- Step-by-Step Instructions for Perfect Homemade Fudge
- Variations for Your Favorite Fudge Flavor
- Tips for Success When Making Fudge
- Storage and Serving Suggestions for Homemade Fudge
- Frequently Asked Questions About Making Fudge
- Estimated Nutritional Information for This Fudge Candy Recipe
- Share Your Experience Making This Simple Dessert
Why This 3-Ingredient Chocolate Fudge is the Best Fudge Ever
When I developed this recipe, I was looking for something that screamed decadent but whispered minimal effort. This 3-ingredient fudge absolutely delivers on that promise! It’s truly a champion among Quick Dessert Recipes because it skips all the finicky steps that trip people up when they try Homemade Candy Making.
- It’s a true No Bake Fudge wonder—just mix, chill, and done.
- It’s unbelievably fast; you can have it in the pan in under ten minutes.
- It produces that perfect, dense, rich square you dream about.
This is the simplest path to making Creamy Chocolate Fudge that tastes like you spent hours tending a double boiler. You’re going to love bringing this to parties!
Achieving Melt In Your Mouth Fudge Texture
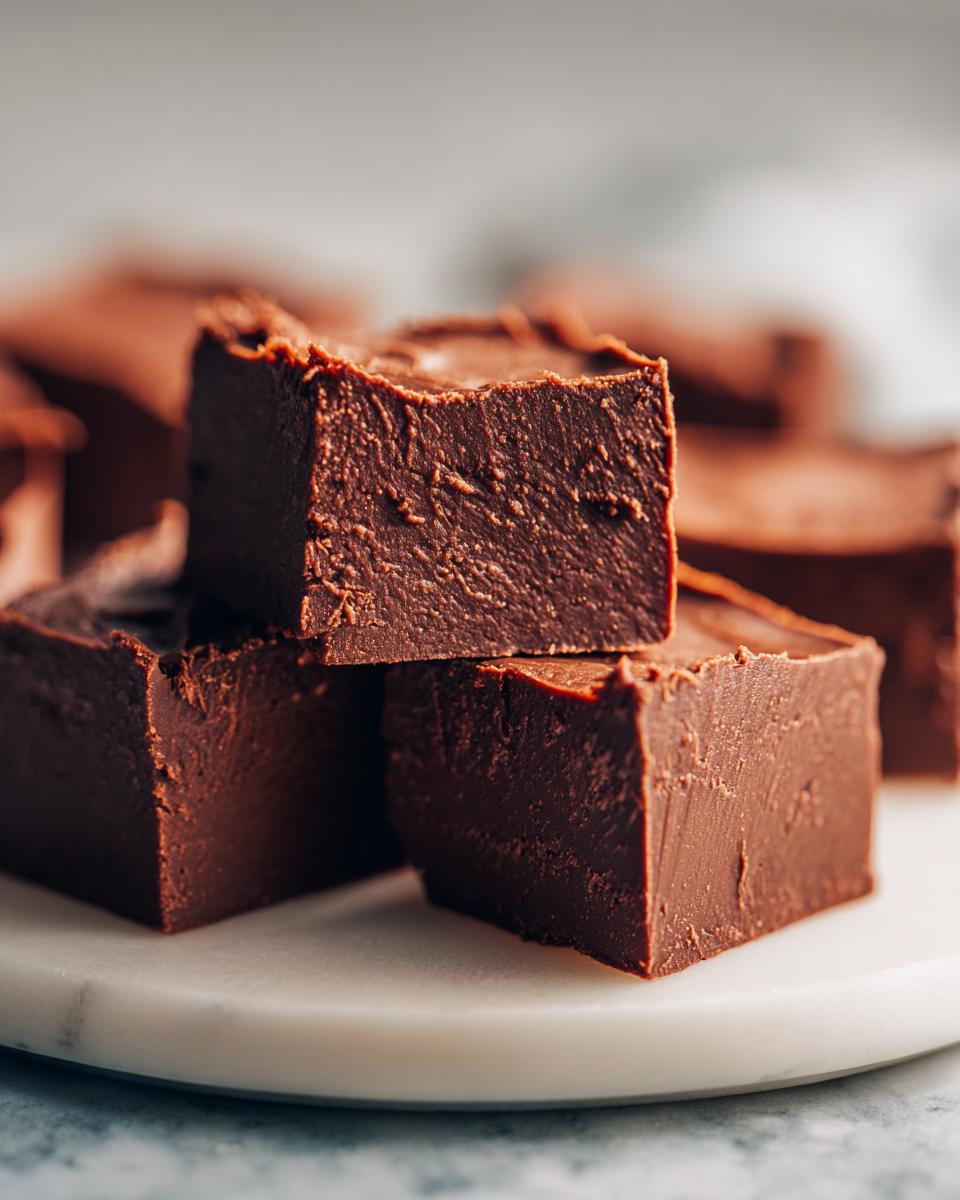
The magic really happens with the ratio here. Forget the sugar syrup and constant stirring required for Old Fashioned Fudge. By relying on sweetened condensed milk as the base, we skip the crystallization step that often leads to grainy candy. The milk coats those chocolate chips perfectly.
When they melt down together, they form an incredibly smooth emulsion. It’s how we achieve that gorgeous, Smooth Fudge Texture that truly feels like it melts in your mouth. This recipe guarantees a beautiful, seamless result every single time, which is why I call it Fudge Without Candy Thermometer confidence!
If you’re looking for another indulgent, easy texture fix, you should check out my recipe for a gooey hot fudge pie.
Ingredients for Your Quick and Creamy Fudge
When it comes to this quick fudge, precision with your ingredients is key—but thankfully, there are only three things you need! I’ve listed them out exactly as I measure them in my kitchen. Having these on hand means you are just minutes away from the start of decadent, Homemade Fudge.
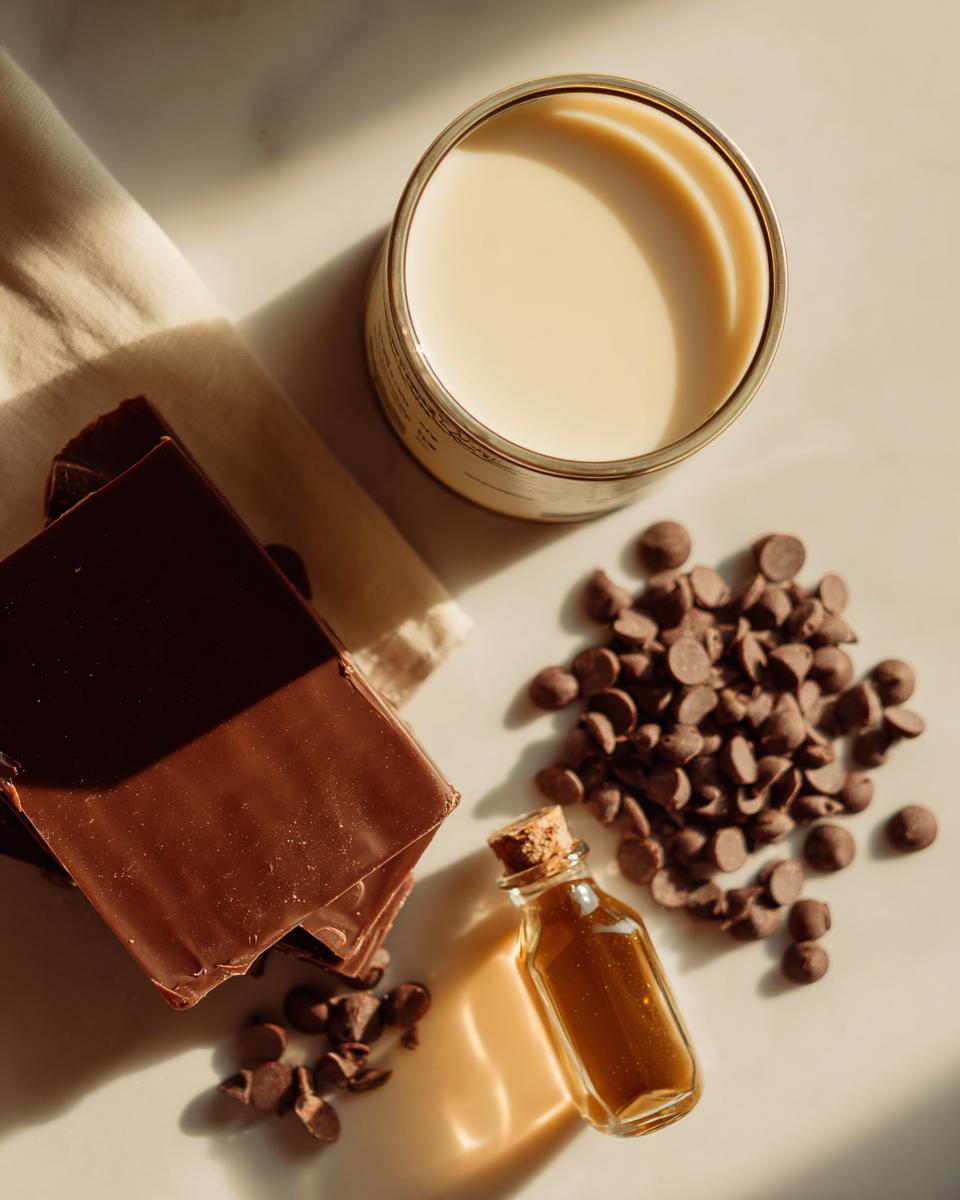
- 1 (14 ounce) can sweetened condensed milk
- 1 (12 ounce) package semi-sweet chocolate chips
- 1 teaspoon vanilla extract
That’s it! No butter drama, no corn syrup wrestling, just pure, simple goodness waiting to turn into a wonderful treat. These ingredients come together so fast; it’s brilliant!
Ingredient Notes and Simple Substitutions for Fudge
Even with only three items, quality still matters big time if you want that perfectly Melt In Your Mouth Fudge texture. Don’t skimp on the chocolate chips! If you use chips that have less cocoa butter or stabilizers, your fudge might not melt quite as smoothly. I really recommend a decent brand of semi-sweet chips here.
Now, listen closely about the milk: You must use sweetened condensed milk for this recipe. If you accidentally grab evaporated milk, the whole thing turns into liquid chaos—trust me, I learned that the hard way during a late-night craving session! Evaporated milk has a totally different sugar and water ratio, and it won’t thicken up properly for our No Bake Fudge.
As for the vanilla, using pure vanilla extract, not the imitation stuff, really deepens that rich chocolate flavor. Before you start mixing, you might want to peek at my recipe for sugar cookie truffles if you’re looking for another easy, no-bake favorite!
Step-by-Step Instructions for Perfect Homemade Fudge
Okay, let’s get this incredible, creamy chocolate fudge into a pan! This is where that 5-minute prep time really shines. The beauty of this Easy Fudge Recipe is that it bypasses all the scary confectionery steps. We’re keeping it simple so you can focus on how amazing this is going to taste!
Preparing the Pan for Easy Fudge Removal
Before you even think about turning on the microwave, get your 8×8 inch pan ready. This step is non-negotiable if you want clean squares and zero stress later. I line mine completely with parchment paper. Here’s the secret: leave a couple of inches of paper hanging over the short sides of the pan. Think of these as little handles!
Once this gorgeous fudge sets up beautifully in the fridge, you just grab those parchment handles and lift the entire slab out in one gorgeous piece. Then, slicing is a breeze. Trust me, dealing with sticky fudge stuck to the bottom of a pan is a mood killer!
Melting Technique for Smooth Fudge Texture
Now for the melting. I know many people panic about heating chocolate, but the microwave makes this foolproof. Combine your condensed milk and chocolate chips in a bowl that’s safe for the microwave. We’re going in with 30-second bursts on high power. Pop it in, heat for 30 seconds, stir vigorously until smooth, and repeat.
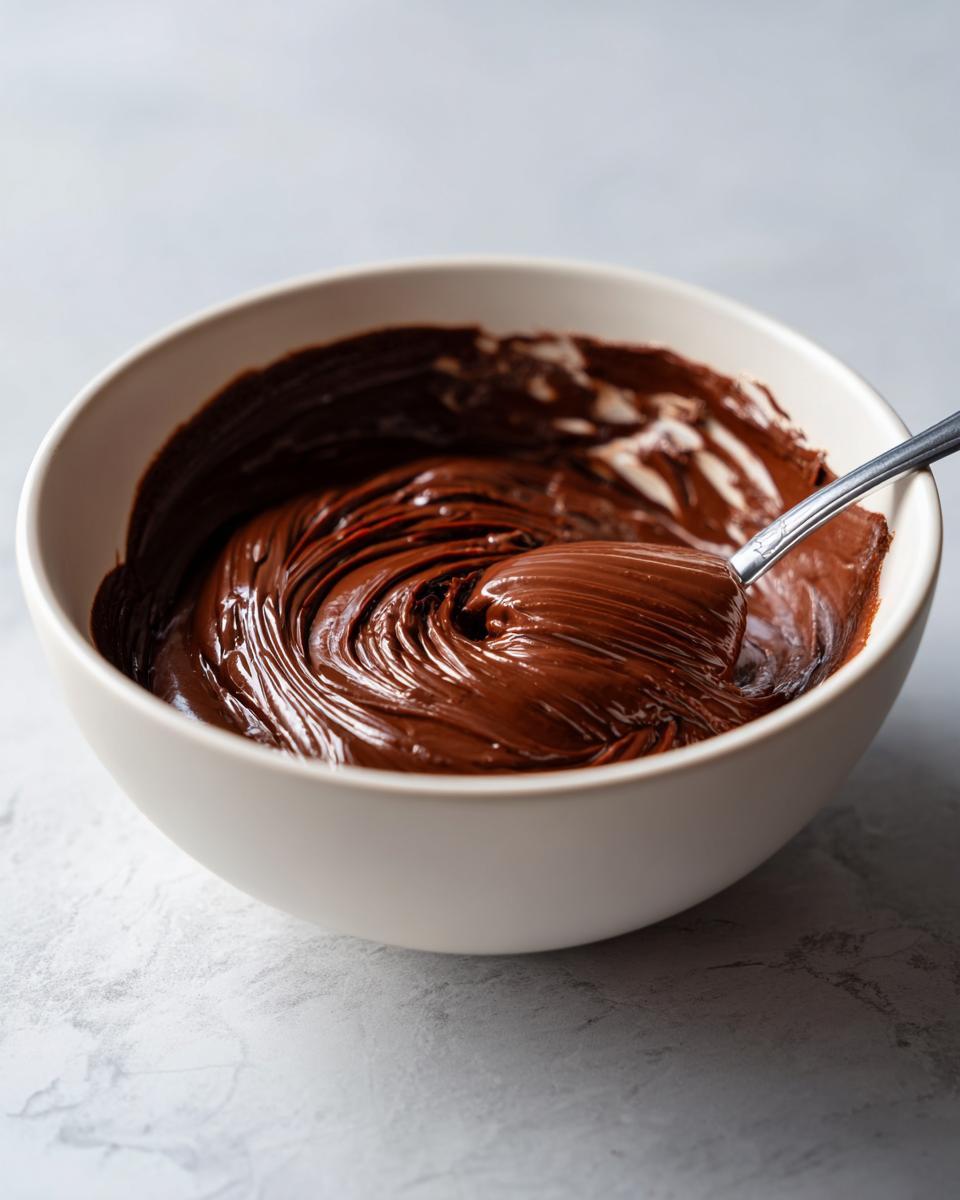
Keep doing this until you see almost no lumps. It usually takes me about 1 to 1.5 minutes total, but you have to stir in between blasts! This constant stirring prevents overheating and keeps the mixture glossy and smooth, which is exactly what we need for that melt in your mouth fudge finish.
If you really prefer the stovetop—maybe you don’t like using the microwave—you can absolutely do this over very low heat, stirring constantly. Either way, the goal is smooth, combined goodness. If you need another quick, simple treat, check out my 5-minute creamy chocolate dip!
Once the vanilla is stirred in, spread it smooth in your prepared pan.
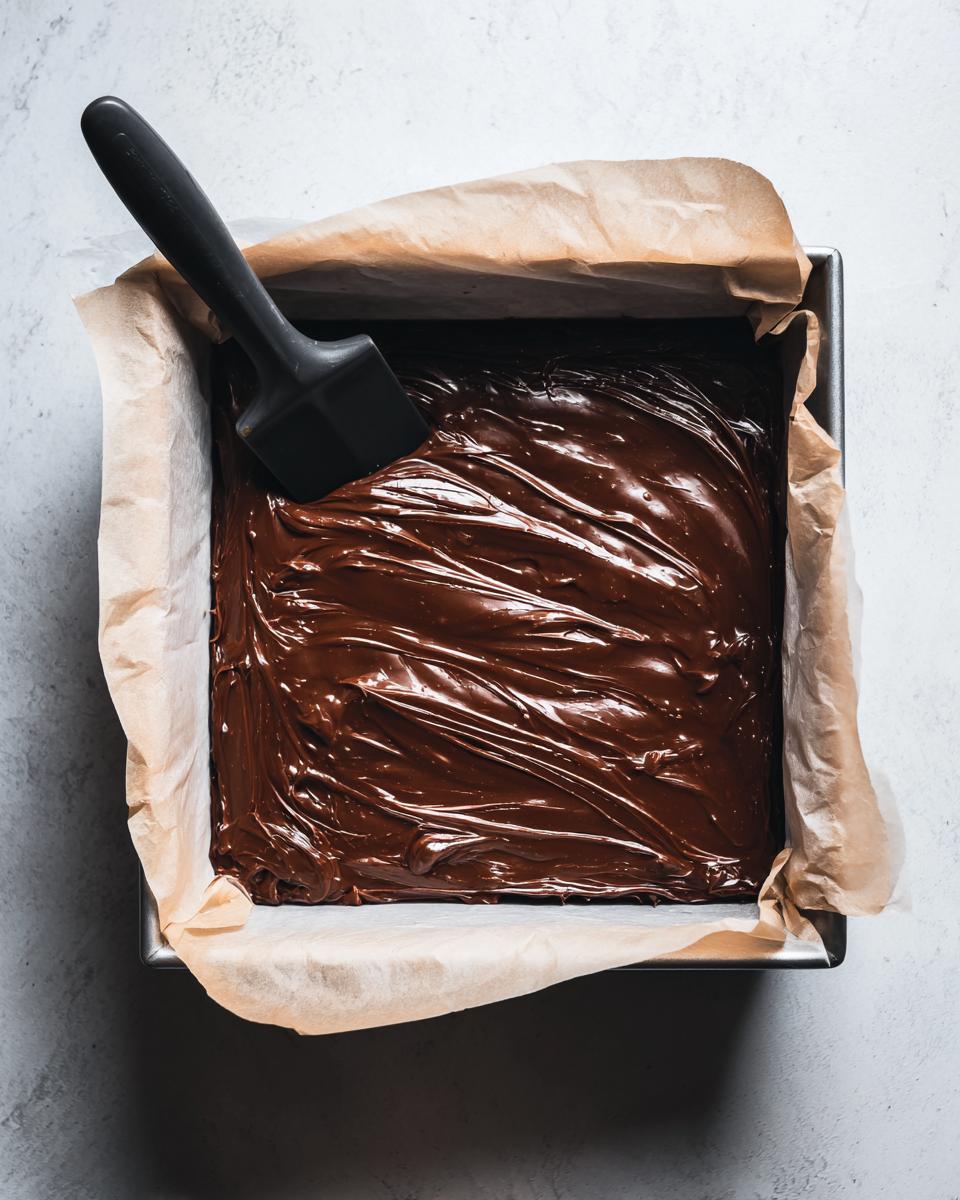
Then, patience! You need at least two hours in the fridge to make sure it’s firm enough for cutting into those perfect squares.
Variations for Your Favorite Fudge Flavor
While this initial recipe delivers the absolute best starting point for a deep, rich chocolate fudge moment, I know half the fun of cooking is making something uniquely *yours*! I always encourage my readers to play around. This base is so stable because of the condensed milk combo that you can sneak in other wonderful flavors for different types of homemade candy.
For example, remember that note about adding chopped nuts? Walnuts or pecans are fantastic additions. Just stir them in right at the very end, after the vanilla. It adds a great crunch contrast to the soft center!
But I know so many of you are searching for that classic diner flavor, and this recipe can absolutely get you there for a completely different sort of decadent treat. If you like peanut butter, try my Peanut Butter Bars recipe too!
Making Peanut Butter Fudge with This Base
If you are absolutely set on making Peanut Butter Fudge instead of chocolate, you can pivot this recipe easily, though it won’t be precisely the same texture—it will be just as delicious, I promise! For a great peanut butter version, swap out the chocolate chips entirely for 12 ounces of good quality peanut butter chips. You’ll skip the microwaving, though! Instead, gently warm the condensed milk on the stovetop over low heat until warm, then stir in the peanut butter chips until completely smooth.
You’ll still add the vanilla, but you can also mix in a splash of extra peanut butter for intensity. It sets up wonderfully and gives you that nostalgic flavor people crave in holiday candy. It’s just another way to prove how versatile a simple base can be!
Tips for Success When Making Fudge
Even though this is the easiest *fudge* recipe you’ll ever touch, a few little tricks can elevate it from “good” to “I can’t believe you made this” status. Since I’ve spent countless hours testing variations of Homemade Candy Making, I picked up a few things that really help avoid common pitfalls like soft centers or weird textures.
First, let’s talk about graininess, even though we successfully avoided the usual suspects by using condensed milk. If you feel like your melted mixture looks a little streaky or slightly hesitant to come together when stirring, don’t rush it! Keep stirring gently but consistently until it’s perfectly glossy. Sometimes, that microwaved chocolate needs an extra thirty seconds of aggressive stirring off the heat to truly emulsify.
What if your fudge doesn’t set? Nine times out of ten, it’s because the chocolate chip package you used had high stabilizer content, meaning it needed a little kick to set up firmly. If you chill it for the full two hours and it still seems too soft to cut cleanly, just pop it back in the fridge for another hour. Sometimes ambient kitchen temperature plays a role!
Now, for density. If you want that slightly firmer, almost classic Old Fashioned Fudge chew, you might prefer storing the finished squares at cool room temperature in an airtight container. If you want it super firm—almost like a dense chocolate block—definitely keep it in the fridge. Just remember, letting it sit at room temperature for about 15 minutes before eating gives you that perfect Melt In Your Mouth Fudge experience we’re aiming for!
If you’re looking for another deeply textural, rich dessert that comes out perfectly every time, you absolutely have to try my fudgy brownie cookies. They are a total winner!
Storage and Serving Suggestions for Homemade Fudge
So, you made the best fudge ever! Now comes the tricky part: making it last long enough to share, or better yet, keeping those perfect squares hidden from yourself long enough for a party. Since this is a No Bake Fudge, storage is super easy, which is fantastic news for people making Holiday Candy Recipes.
The official word from my notes is that this wonderful homemade fudge will keep beautifully for up to a week stored in an airtight container at room temperature. I find my house doesn’t cooperate with that timeline very often, but it’s good to know it doesn’t need to crowd the fridge for short-term storage.
If you aren’t planning on devouring it within a week, or if your kitchen gets really warm, definitely tuck it into the refrigerator. Storing it cold will extend its life much longer, ensuring you have plenty of Sweet Treats for Gifting ready to go right up until Christmas morning! Just remember the cooling tip I gave you earlier: let it sit out for about 15 minutes if it’s been refrigerated—that brings back the ultimate Melt In Your Mouth Fudge texture.
When it comes time to serve, presentation really makes a difference, especially if you’re wrapping these up for neighbors or teachers. I love cutting them into neat squares, dusting them lightly with high-quality cocoa powder for a gourmet look, or maybe even dipping just the bottom of each square into tempered dark chocolate for an extra touch of elegance. It’s amazing how such a Simple Dessert Idea can look so professional!
If you’re looking for more easy ideas perfect for wrapping up and handing out, you absolutely must look at my collection of sweet treats perfect for gifting! They require just as little drama as this wonderful fudge.
Frequently Asked Questions About Making Fudge
That’s totally fine if you still have a few lingering thoughts! When you’re making something as wonderful as homemade fudge, you want to make absolutely sure you get it right. I’ve gathered the questions I get asked most often about this super Easy Fudge Recipe. Hopefully, these help you feel totally confident before you start!
Can I use dark chocolate instead of semi-sweet chips?
Oh, yes, you totally can! If you prefer a less sweet, more intense chocolate flavor—which I sometimes do when I want a really rich, decadent chocolate that feels almost too fancy for how easy it is—go right ahead and use good quality dark chocolate chips. Just keep in mind that the darker the chip, the less sweet your finished fudge will be, since this is a No Bake Fudge recipe that doesn’t rely on sugar syrup for its main structure.
My fudge didn’t set properly and it’s still too soft. What went wrong?
If you’re struggling to get a firm set, that usually comes down to one of two things with this particular method. First, checking your chocolate chips: if they contained a lot of stabilizers or vegetable fats instead of cocoa butter, they might not firm up as reliably at room temperature. Secondly, are you impatient? (Kidding, mostly!) Make sure you’re chilling it for the full two hours, minimum. If it’s still soft after that, try moving it to the coldest part of your fridge for another hour. This is the only time rushing can hurt our otherwise perfect Easy Fudge Recipe!
Is it possible to double this recipe for a bigger batch?
Yes, you absolutely can double this for larger parties or holiday candy making! When you double it, though, you need to adjust the melting time in the microwave significantly. Instead of 30-second blasts, you might need 45 or 60 seconds, and you must stir much more thoroughly in between each blast, because the sheer volume of chocolate takes longer to heat evenly. It works beautifully, though, yielding a thicker slab in your 9×13 pan!
Can I use evaporated milk instead of sweetened condensed milk?
Please, please, please don’t try that swap! I cannot stress this enough, especially if you’re expecting a true, meltable Smooth Fudge Texture. Evaporated milk is just milk with most of the water removed; it lacks the massive amount of sugar needed to stabilize and set the texture when paired with chocolate chips. If you use evaporated milk, you’ll end up with a very warm, slightly thickened chocolate sauce, not candy.
If you love simple, reliable recipes that come together fast, you should definitely browse my collection of easy dessert recipes for more failsafe favorites!
Estimated Nutritional Information for This Fudge Candy Recipe
When we are whipping up quick treats like this amazing fudge, sometimes we forget about the numbers. But since this is destined to be a favorite for gifting, I thought it was only fair to give you an idea of what’s packed into these decadent little squares. Remember, these figures are based on the three core ingredients listed and don’t account for any nuts or extra flavorings you might toss in!
This information is primarily for reference, but I always stress not to let the numbers stress you out when you’re enjoying a moment of pure, sweet comfort. That’s the Seventh Flavour we’re chasing, after all!
- Serving Size: 1 square
- Calories: 110
- Sugar: 15g
- Sodium: 25mg
- Fat: 5g
- Protein: 2g
I hope seeing these numbers assures you that while this Fudge Candy Recipe is undeniably sweet and rich, it’s made with just a few, identifiable things. If you decide to add pecans or walnuts for that crunchy texture, remember those numbers will shift slightly because of the added healthy fats and proteins from the nuts!
Share Your Experience Making This Simple Dessert
Now that you’ve experienced the magic of whipping up this incredible, ridiculously easy batch of fudge, I truly want to know what you think! That feeling when you cut into that first perfectly smooth square? That’s the payoff for me!
If this Easy Fudge Recipe brought a moment of peace, happiness, or sheer chocolate satisfaction to your day, please take a moment to leave a rating right here on the page. Your feedback genuinely helps other home cooks feel confident trying this recipe!
Did you try adding toasted coconut, or perhaps a swirl of caramel? Did you use it as a foundation for one of your own amazing Simple Dessert Ideas? I love seeing how you adapt these recipes in your own kitchens. Don’t be shy—send me photos or drop a comment below telling me all about your experience. We are all about building that connection around delicious food here at Seventh Flavour!
If you need to reach out with a question that the FAQ didn’t cover, please don’t hesitate to visit my contact page. Happy making, and I hope this wonderful, creamy treat becomes a staple in your home!
PrintFoolproof 3-Ingredient Chocolate Fudge: Quick and Creamy
Make rich, melt-in-your-mouth chocolate fudge using only three simple ingredients. This quick, no-bake recipe guarantees a smooth texture without needing a candy thermometer, making it perfect for fast desserts or holiday gifting.
- Prep Time: 5 min
- Cook Time: 2 min
- Total Time: 127 min
- Yield: 36 small squares 1x
- Category: Dessert
- Method: No Bake
- Cuisine: American
- Diet: Vegetarian
Ingredients
- 1 (14 ounce) can sweetened condensed milk
- 1 (12 ounce) package semi-sweet chocolate chips
- 1 teaspoon vanilla extract
Instructions
- Line an 8×8 inch baking pan with parchment paper, leaving an overhang on the sides for easy removal. Lightly grease the paper.
- In a medium, microwave-safe bowl, combine the sweetened condensed milk and chocolate chips.
- Microwave on high in 30-second intervals, stirring well after each interval, until the chocolate is completely melted and the mixture is smooth. This usually takes 1 to 2 minutes total.
- Stir in the vanilla extract until fully combined.
- Pour the fudge mixture into the prepared baking pan. Spread evenly with a spatula.
- Refrigerate for at least 2 hours, or until the fudge is firm enough to cut.
- Lift the fudge out of the pan using the parchment paper overhang. Cut into small squares.
Notes
- For a denser, old-fashioned texture, you can gently heat the mixture on the stovetop over low heat, stirring constantly until smooth, instead of microwaving.
- Add 1/2 cup of chopped nuts (like walnuts or pecans) with the vanilla extract for a classic chocolate fudge with nuts variation.
- Store the finished fudge in an airtight container at room temperature for up to one week, or refrigerated for longer storage.
Nutrition
- Serving Size: 1 square
- Calories: 110
- Sugar: 15
- Sodium: 25
- Fat: 5
- Saturated Fat: 3
- Unsaturated Fat: 2
- Trans Fat: 0
- Carbohydrates: 16
- Fiber: 0
- Protein: 2
- Cholesterol: 5