
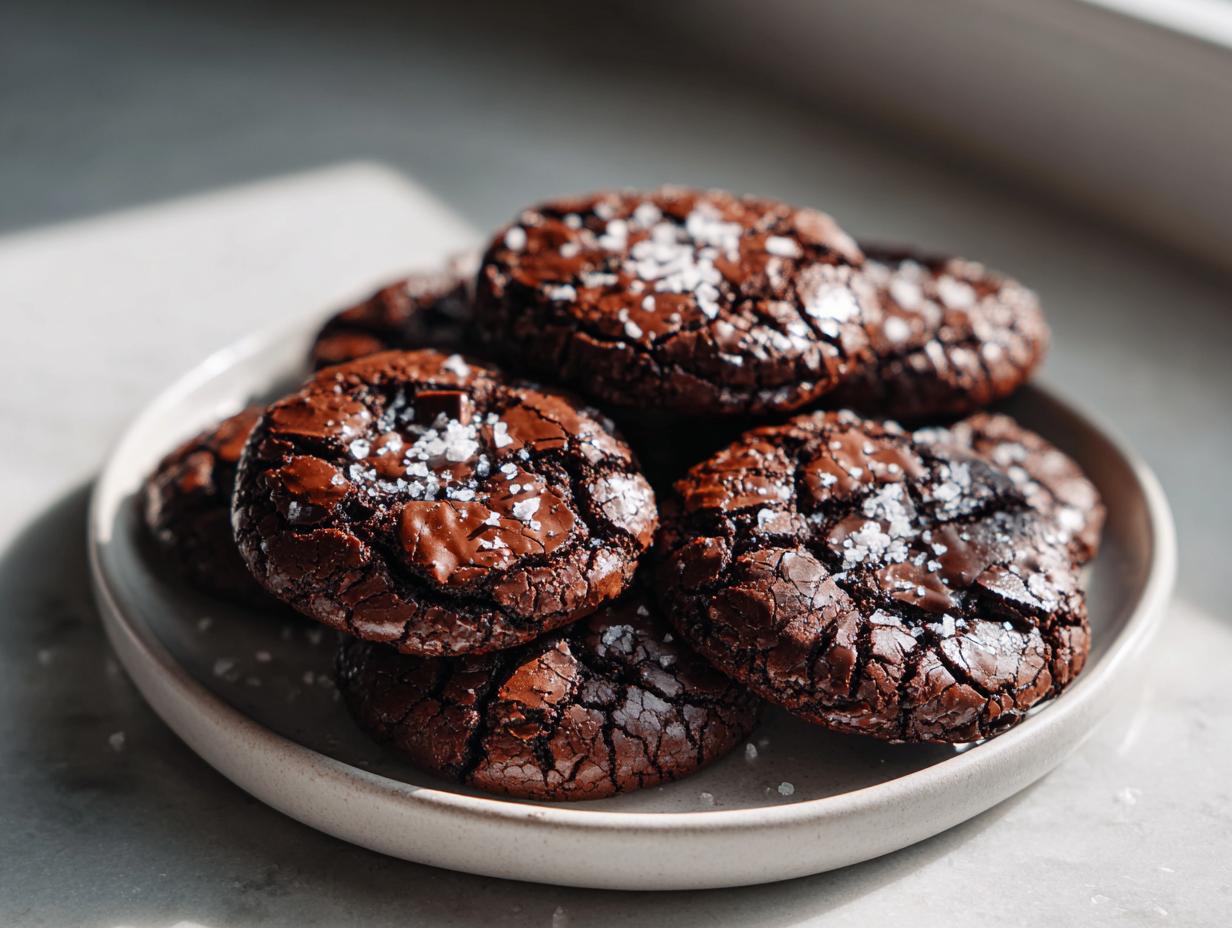
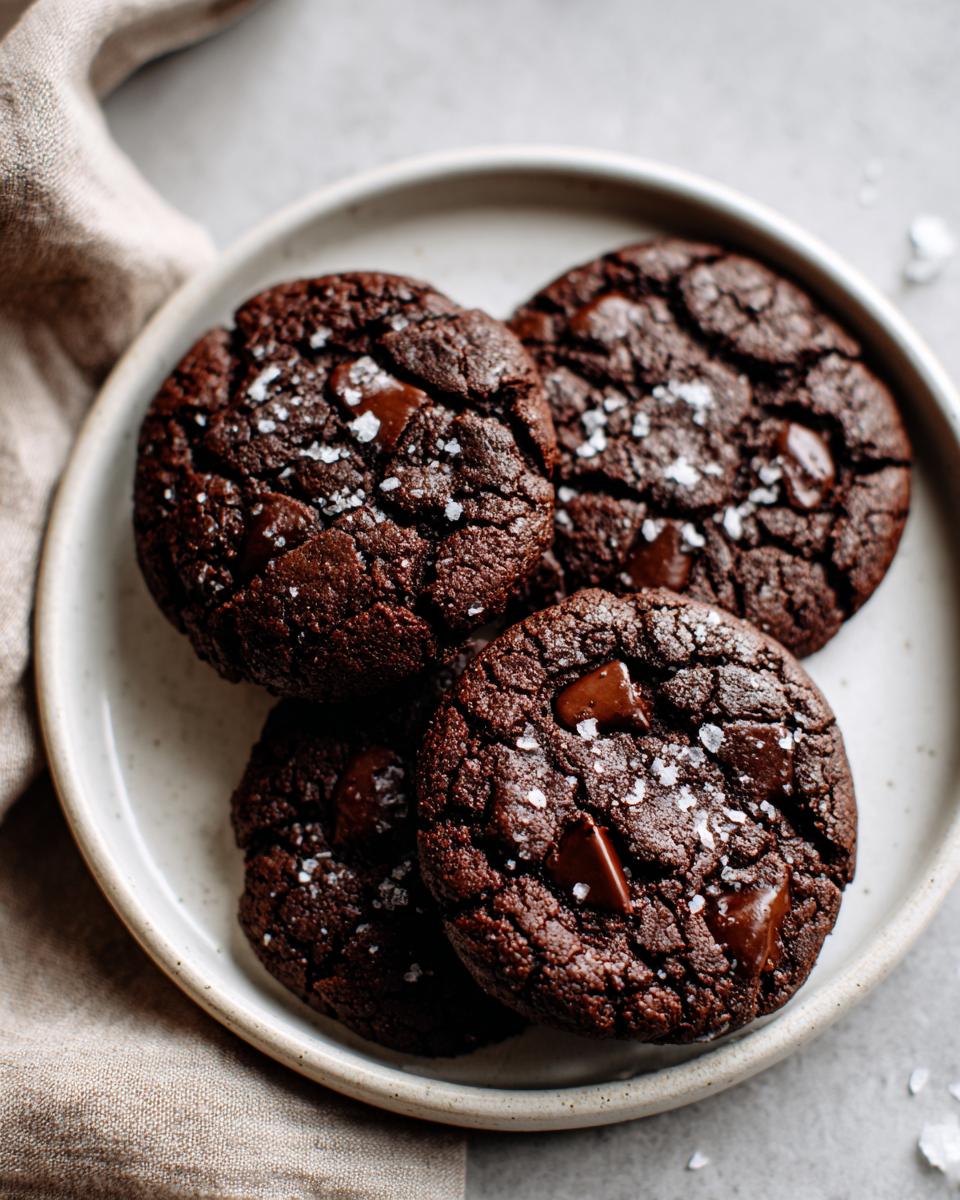
There are moments when only the deepest, richest chocolate will do. I’m talking about that intense, melt-in-your-mouth experience you usually only get when you cut a perfect square from a pan of homemade brownies, right? Well, I spent years in my Pacific Northwest kitchen chasing that feeling, determined to turn it into a cookie—and I finally cracked that code! These brownie cookies combine the chewiness of a classic cookie with that signature fudgy center and, most importantly, that glorious, shiny, crackly top.
Here at Seventh Flavour, my goal, as Aria Sterling, has always been to bring you recipes that work flawlessly, every single time you try them. These cookies are the result of serious testing—not just making sure they taste great, but making sure that texture holds up. They are incredibly satisfying for any chocolate lover who needs a quick, decadent fix. If you need more easy dessert recipes on rotation, you know where to look!
Forget dry, crumbly cookies! These are delightfully chewy and so gooey inside, I sometimes call them ‘browkies’ because they really blur the line beautifully. If you’re looking for an easy chocolate dessert that delivers pure brownie bliss in cookie form, you’ve found your new go-to recipe.
- Why These Are the Ultimate Brownie Cookies (The Seventh Flavour Difference)
- Gathering Ingredients for Perfect Brownie Cookies
- Step-by-Step Instructions for Fudgy Brownie Cookies
- Tips for Success When Making Brownie Cookies
- Storage and Reheating Instructions for Chewy Chocolate Cookies
- Variations on Brownie Cookies for Chocolate Lover Desserts
- Serving Suggestions for These Quick Dessert Ideas
- Frequently Asked Questions About Brownie Cookies
- Nutritional Estimates for Homemade Brownies
Why These Are the Ultimate Brownie Cookies (The Seventh Flavour Difference)
Listen, there are so many cookie recipes out there, but these brownie cookies are truly different. They nail that perfect balance we all crave. We aren’t aiming for soft and cakey here; we are aiming for pure decadence! These turn out as wonderfully chewy chocolate cookies, packed with that deep, satisfying chocolate punch you expect from a rich pan of goodness. They are easily some of my favorite fudgy cookies I’ve ever developed.
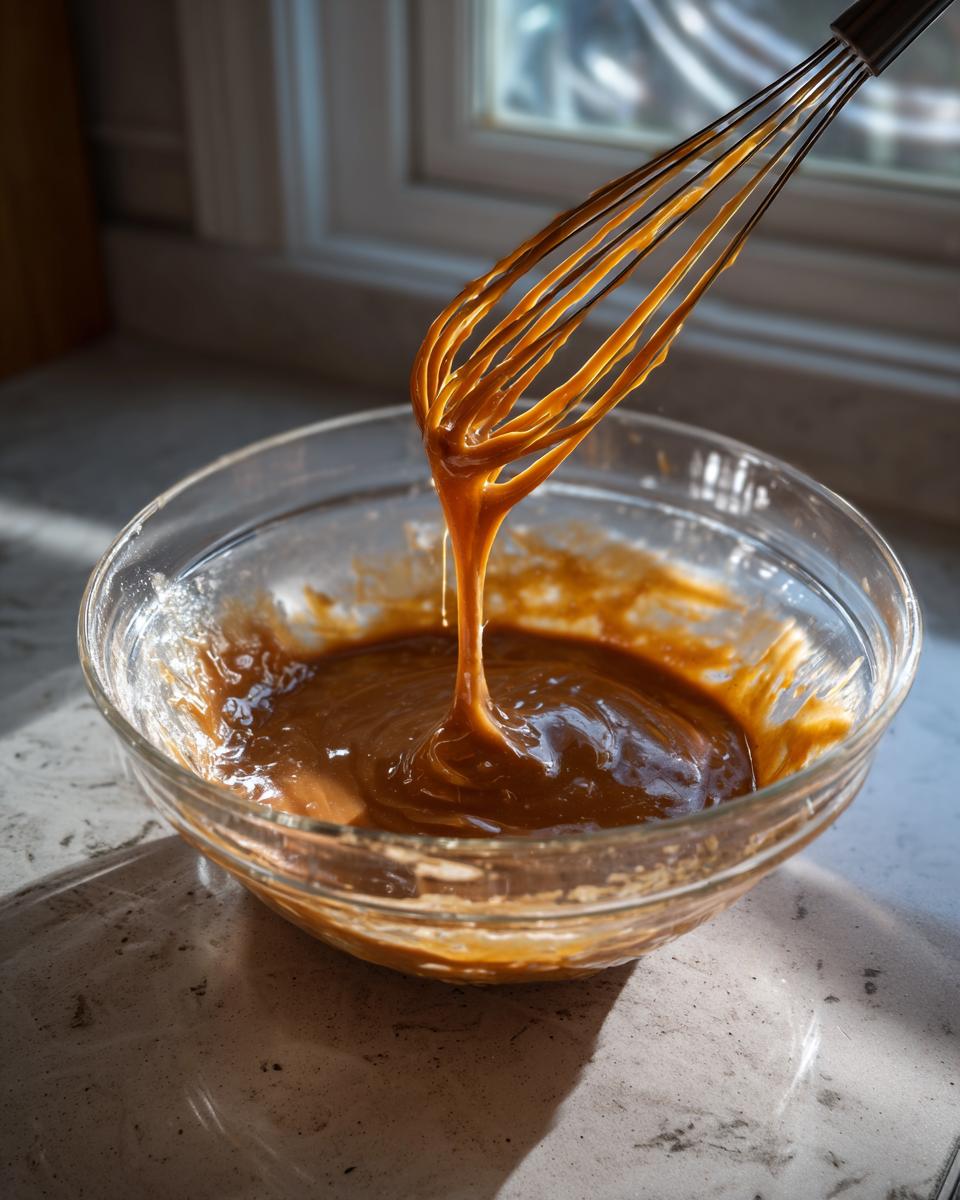
When I was first testing this recipe, I was obsessed with the top. I wanted that beautiful, shining surface you see on the best brownies after they’ve cooled. It took ages, honestly! We used to get perfectly chewy centers, but the tops were always dull, just like a regular cookie. I realized it was all about the initial whisking of the melted butter and both sugars until they got truly glossy. That step creates the structure for the beautiful sheen.
It’s that attention to a specific texture that makes this recipe worth your time. If you check out my story over on the About Page, you’ll see that my goal is always reliable results in a real kitchen, and these cookies deliver that rich, chocolatey payoff every time.
Achieving the Signature Crackly Top Cookies
The trick to getting those incredible crackly top cookies is simple chemistry, really. You *must* use melted butter—softened won’t cut it here! When you whisk that warm melted butter aggressively with the sugars right at the start, you are dissolving those sugar crystals just enough. As the cookies bake and spread, the eggs and the sugar syrup on top form that thin, shiny shell. Don’t worry if they look a little wet in the middle when you pull them out; that residual heat is what sets the crackle as they cool down on the pan!
Gathering Ingredients for Perfect Brownie Cookies
Okay, now that you know *why* these turn out so amazing, let’s talk about what you need to pull them together. Remember, with baking, especially when you’re aiming for deep chocolate flavor, the ingredients matter! This recipe for brownie cookies is built on a specific combination of fats and sugars to get that fudgy chewiness, so try not to swap the main players if you can help it.
You’ll need these key players ready to go. Make sure you have your eggs sitting out for a bit so they are at room temp—it really helps them incorporate better!
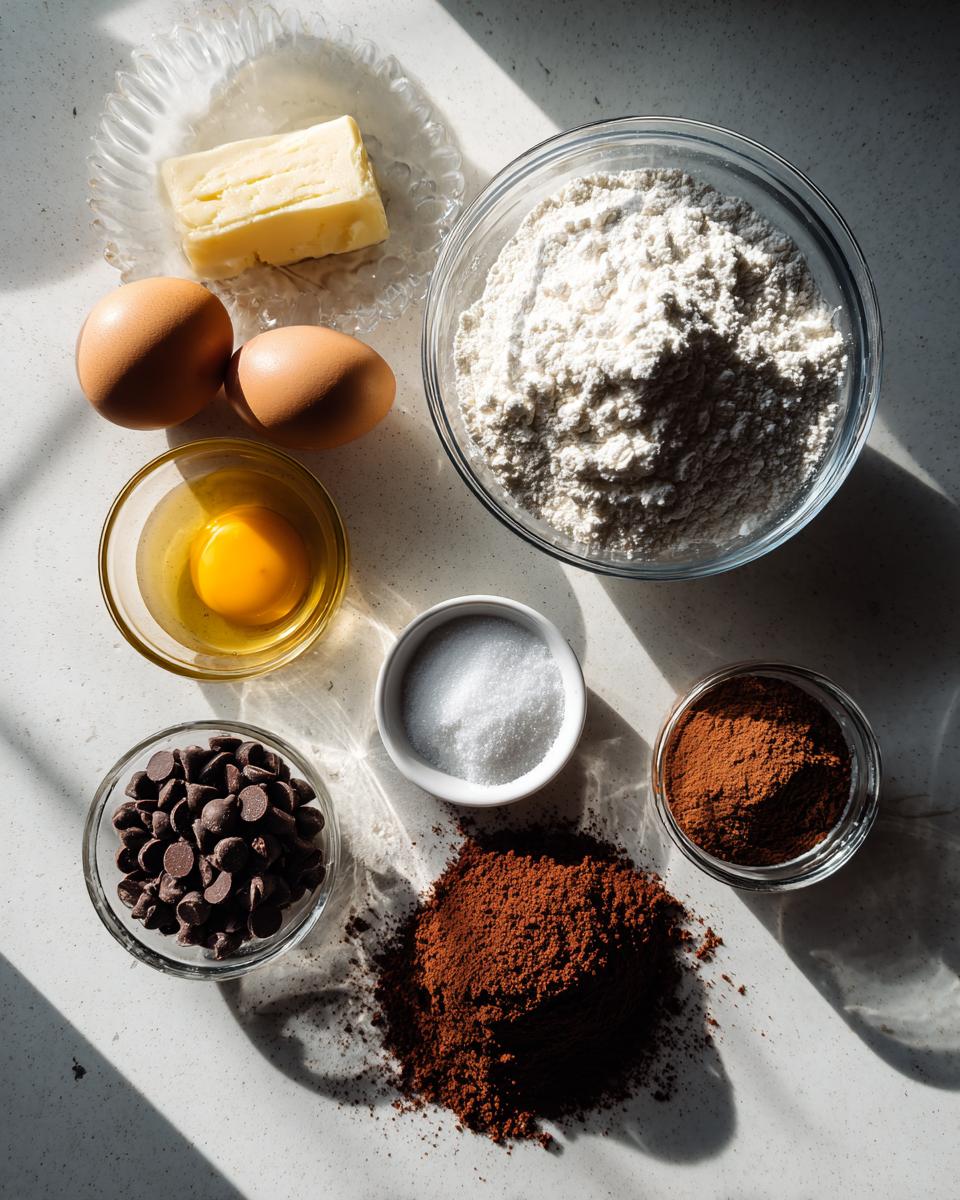
- 1 cup (2 sticks) unsalted butter, melted
- 1 1/2 cups granulated sugar
- 1 cup packed light brown sugar
- 2 large eggs, room temperature
- 1 tablespoon vanilla extract
- 3/4 cup unsweetened cocoa powder (natural or Dutch-process)
- 1 teaspoon instant espresso powder (optional, deepens chocolate flavor)
- 1/2 teaspoon salt
- 1 cup all-purpose flour
- 1/2 cup semi-sweet chocolate chips
- Flaky sea salt, for topping (optional)
Ingredient Notes and Substitutions for Rich Dessert Recipes
Since we are chasing that deep, intense chocolate experience, quality really counts here. For the cocoa powder, I give you two options because I’ve tested both successfully in these rich dessert recipes! Natural cocoa powder tends to give you a slightly sharper chocolate tang, whereas Dutch-process cocoa yields a darker color and a smoother, almost malt-like flavor. Pick whichever you usually prefer when making homemade brownies.
Now, about that espresso powder—I highly recommend it, even if you don’t like coffee! It doesn’t make the cookies taste like mocha; it just wakes up the cocoa flavor. Honestly, it’s my secret weapon for making chocolate taste *more* like chocolate. If you absolutely can’t do it, you can just leave it out, but I promise you’ll miss that extra depth!
Also, I noted semi-sweet chips, but feel free to use something darker if you want an even richer result, or even milk chocolate chips if you prefer a sweeter flavor profile. But please, be careful substituting the main fat source. Stick to that full cup of melted unsalted butter; it’s essential for that signature fudgy texture we love so much!
Step-by-Step Instructions for Fudgy Brownie Cookies
Time to get messy! Even though these are brownie cookies, the process feels a lot like starting a classic brownie batter, which is fantastic news for us chocolate lovers who want fast results. Before you even pull out your bowl, make sure your oven is preheated to 350°F (175°C) and you’ve got parchment paper ready on your baking sheets. Trust me, parchment paper is the hero here, preventing sticking is crucial for that perfect cookie shape.
We start with all the wet stuff in one bowl, which keeps this recipe feeling delightfully simple. Whisk that melted butter with both the granulated and the packed light brown sugar. You need to whisk this for a good minute or two until the mixture looks glossy and smoother than when you started. That’s the key step I mentioned earlier for the crackle!
Next up are the eggs and vanilla. I like to add the eggs one at a time, whisking well after each addition. You want everything completely homogenized before moving on. It should look silky smooth before you even think about adding the dry stuff. If you’re looking for more easy dessert recipes to try this week, keep this technique in mind!
Mixing the Batter: Achieving a One Bowl Cookies Consistency
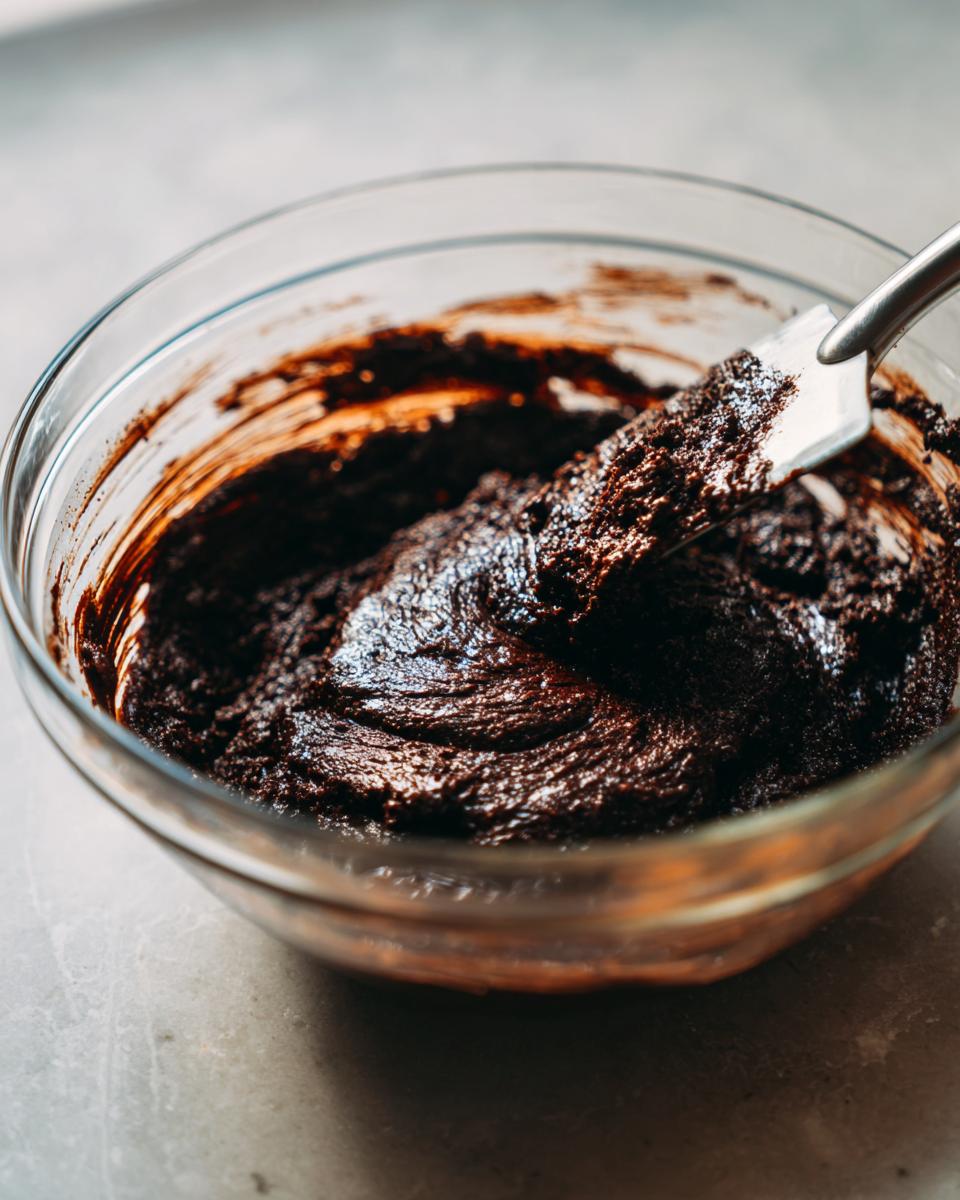
Here’s where we transition into making sure these aren’t cakey! In a separate little bowl—or just dust them right over the top of the wet mixture, since this is our version of one bowl cookies—whisk your cocoa powder, salt, and that espresso powder if you’re using it. Now, add all the dry ingredients to the big bowl of wet ingredients. You absolutely cannot overmix this batter. I mean it!
Use a rubber spatula, not your electric mixer for this part. Fold everything together gently until you see just a few streaks of flour remaining. If you mix until it’s perfectly smooth, you’ll develop gluten, and suddenly, you have tough chocolate cookies instead of fudgy cookies. When you fold in the chocolate chips, the batter should be super thick and heavy, exactly like thick brownie batter ready for the pan. If your kitchen is warm, I highly suggest plopping the bowl in the fridge for 30 minutes now; it really helps these spread less.
Baking and Cooling for Gooey Chocolate Treats
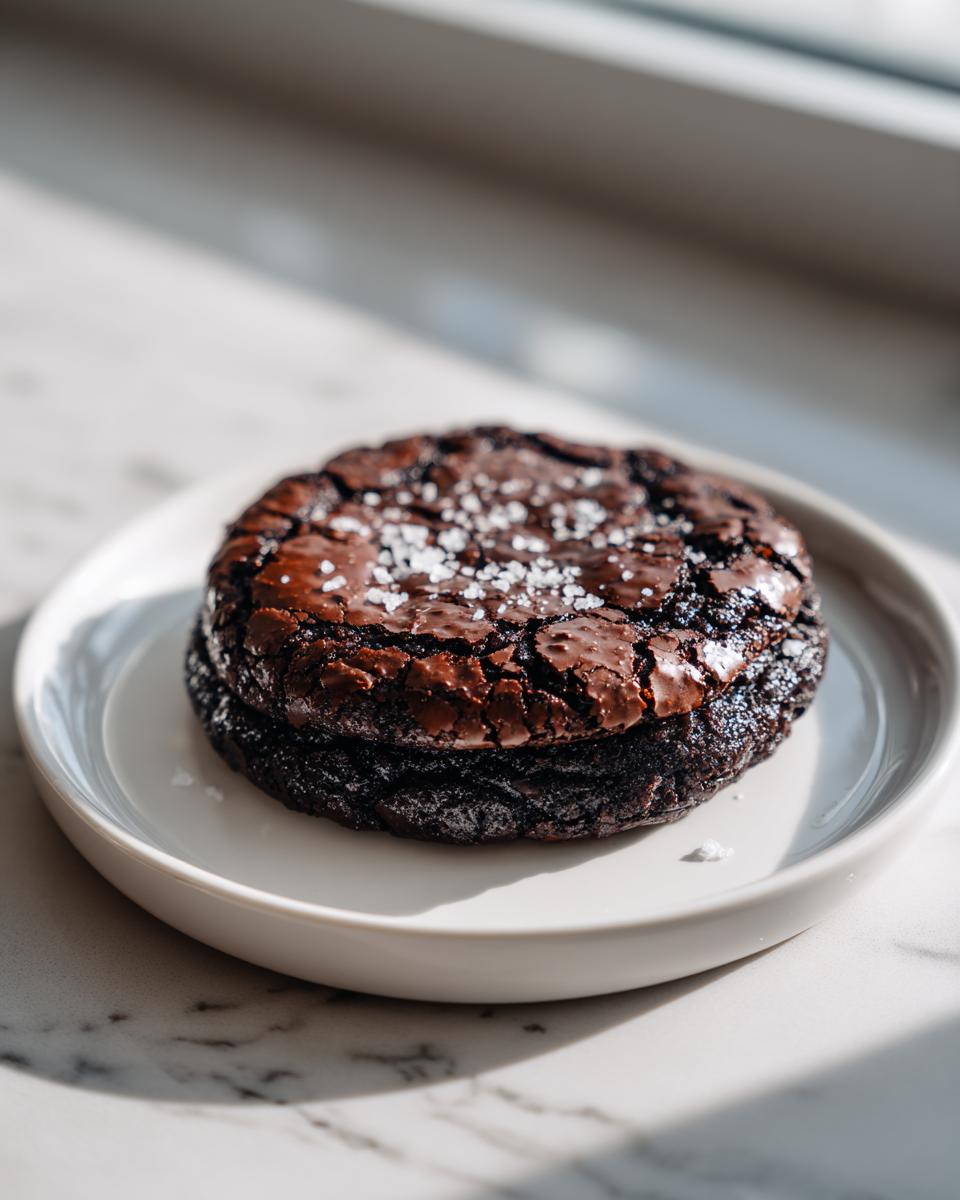
Scoop out rounded spoonfuls onto your prepared sheets, spacing them about two inches apart. Remember, we want gooey chocolate treats, so we are purposefully underbaking these slightly. Bake them for just 10 to 13 minutes. You’ll know they are *almost* done when the edges look set and dry, but the very center of the cookie still looks a little soft or wet. Don’t panic! If you bake them until the center looks done, they will be dry when they cool.
The MOST important part happens right when they come out of the oven. Immediately sprinkle on that flaky sea salt, if you’re using it—the salt crystals melt beautifully into that shiny top. Then, you must leave them alone! I insist you let them rest on the hot baking sheet for a full 10 minutes. The residual heat is what finishes cooking the inside to that perfect soft center while allowing the top to contract and form that gorgeous crinkle. Only after those 10 minutes are up do you carefully move them to a wire rack to cool the rest of the way. Patience here guarantees the texture!
Tips for Success When Making Brownie Cookies
I’ve made these brownie cookies more times than I care to admit in my kitchen, and through all that testing, I figured out a few little tricks to ensure they turn out perfect even if you’re new to this specific kind of baking. Remember, we are going for that fudgy-meets-chewy texture, which is delicate!
First off, let’s revisit ingredient quality. You see that cocoa powder listed? Use the best unsweetened one you can find, seriously. Since chocolate is the star here, a cheap, dull cocoa powder will result in dull brownie cookies. You want deep, dark flavor, so invest in a good brand—it makes a huge difference in the final result, enhancing that rich chocolate base.
Next is temperature management, especially when handling the dough. If you’re baking on a hot day, or your kitchen tends to run warm, you absolutely must chill the dough. I mentioned it briefly before, but I want to hammer this point home: warm dough spreads too fast in the oven! This leads to thin, crispy cookies instead of the thick, puffy mounds we want. If your dough feels too soft when you try to scoop it, cover the bowl and let it hang out in the fridge for at least 30 minutes. It firms up beautifully and guarantees those cookies stay nice and thick.
When you’re ready to bake, make sure your oven rack is centered. Temperature fluctuations can ruin the development of that crackly top. If your oven runs hot, check them a minute or two early. It’s better to pull a slightly underdone cookie (which will set up on the hot pan) than to overbake it and end up with a chewy chocolate cookie that’s actually just… hard.
Finally, don’t skip the resting period on the pan! I know that waiting is the hardest part, but letting them sit for those 10 minutes after they come out is non-negotiable if you want that glorious, shiny, cracked exterior. If you try to move them too soon, they’ll collapse and lose that beautiful presentation. Be patient; the payoff is worth it for these rich, decadent treats!
Storage and Reheating Instructions for Chewy Chocolate Cookies
One of the best parts about these brownie cookies is that they taste even better the next day, but only if you store them correctly! If you treat them like a regular cookie, they might dry out, and we absolutely cannot have that when we’re aiming for that perfect, gooey interior.
To keep your chewy chocolate cookies at their absolute peak fudginess, you need an airtight container. I learned this the hard way after leaving a batch out on a plate only to have them stiffen up before morning. Store them at room temperature in a sealed container, and they should stay wonderfully soft and chewy for about three to four days. If you stack them, try putting a small piece of parchment paper between layers, just so they don’t stick together since they are so soft!
Now, sometimes I make giant batches because, well, they vanish too fast, but I’m always trying to hide some for later! Freezing is your best friend here. You can freeze these cookies, and they keep that amazing texture surprisingly well. Scoop the dough ahead of time, place the dough balls on a tray, freeze them solid, and then transfer them to a heavy-duty freezer bag. They last beautifully for about two months this way.
When you want to eat a frozen cookie—and trust me, eating one slightly chilled is divine—you can eat it right from frozen for a very dense, almost fudge-like texture. Or, if you want that freshly baked experience again, just pop them onto a baking sheet and warm them up in a 300°F oven for about five minutes. It re-melts those chocolate chips beautifully and revives that soft chewiness. That’s my favorite way to reheat them—it makes them taste like they just came out of the oven for the second time!
Variations on Brownie Cookies for Chocolate Lover Desserts
Once you master the core recipe for these decadent brownie cookies, the fun really begins! They are fantastic all on their own, but I love tweaking them slightly depending on what I have in the pantry or what I’m in the mood for that day. Since these are already such intensely rich chocolate lover desserts, you don’t need to do much to elevate them—small additions make a huge impact.
Here are a couple of tried-and-true ways I change things up without turning this into a complicated baking project. Remember, we want fast, easy, delicious, and deeply chocolatey!
- The Nutty Crunch: If you have pecans or walnuts lying around, this variation is fantastic. Toasting the nuts slightly beforehand releases their oils and deepens their flavor. Just roughly chop about 1/2 cup of your favorite nut and fold them in right along with the chocolate chips. The buttery crunch of the nuts against the fudgy interior is just heavenly.
- The Ultimate Chocolate Overload: This is for when you seriously require a major chocolate hit. Instead of just using semi-sweet chips, swap half of them out for dark chocolate chunks or even use a mix of raspberry chips if you’re feeling fruity! For an extra layer of decadence, you can use milk chocolate chips if you prefer a sweeter cookie, though I usually stick to darker cocoa for better contrast.
- Peanut Butter Swirl Magic: This one feels fancy but is so easy! Take about 1/4 cup of creamy peanut butter and warm it up slightly so it’s very runny. When you scoop your batter onto the baking sheet, dollop a tiny spoonful of the warm peanut butter right on top of each mound. Then, take a toothpick and gently swirl it through the batter once or twice. It bakes up beautifully and creates a gorgeous ripple effect. If you enjoy experimenting with chocolate and classic pairings, you might also want to check out my recipe for sweet potato brownies—similar concept, totally different texture adventure!
No matter which route you take, you still get that signature crackly top because the core process—the melted butter and the specific sugar ratio—remains the same. These simple swaps turn a fantastic base recipe into a whole new treat!
Serving Suggestions for These Quick Dessert Ideas
You’ve done the hard work, battled the sugar cravings, and pulled off the most perfectly fudgy brownie cookies imaginable. Now what? Well, you absolutely shouldn’t eat them while standing over the sink hiding from the rest of your family! These rich treats deserve a proper moment of indulgence.
Because these cookies are so intensely chocolatey and rich, they pair up wonderfully with something creamy or slightly acidic to cut through that deep cocoa flavor. I always think about serving things that complement what makes them so good—that fudgy chewiness and that delicate sea salt finish if you added it.
Here are my absolute favorite ways to serve these up:
- The Classic A La Mode: This is non-negotiable for me when they are warm. Take one of these fresh-from-the-oven (after that crucial 10-minute rest, of course!) cookies and top it with a generous scoop of high-quality vanilla bean ice cream. The combination of the warm, gooey cookie melting into the cold creaminess? Pure heaven. It’s the best way to fully appreciate that gooey chocolate treat factor.
- A Grown-Up Pairing: If you’re enjoying these with a cup of coffee, you’re in for a treat. The slight bitterness of a dark roast complements the sweetness of the sugars in the cookie perfectly. I love having one with an espresso after dinner—it makes the whole experience feel a little more gourmet, even though they were super fast to make!
- Simple Milk Ritual: Honestly, sometimes the simplest things are the best. A tall, cold glass of milk is the traditional partner for any great cookie, and it works beautifully here. Let the cookie get slightly soft dunking it for just a second—it elevates that chewy chocolate cookie texture even more.
If you’re making these for a special occasion or just planning your weekend menu, don’t forget to check out my super simple easy breakfast recipes for the morning after! But for now, enjoy the best part—the immediate, decadent reward of these incredible chocolate wonders.
Frequently Asked Questions About Brownie Cookies
I know that when you promise someone a recipe that perfectly bridges the gap between a cookie and a brownie, you have to answer the tough questions! I’ve compiled some of the things I get asked most frequently about these brownie cookies. Hopefully, this clears up anything holding you back from baking a batch today!
Are these better than using a brownie mix?
Oh, that’s a common one! If you are looking for a total baking shortcut—maybe you’re tired after a long day—then using a great quality brownie mix is definitely faster, and you can find some really good mix recipes out there. However, if you want that specific textural magic—that perfect crackly top that only comes from controlling the sugar dissolving in melted butter—then this from-scratch version wins every time. In my opinion, the scratch method gives you superior control over the crisp edges and the truly fudgy cookies centers.
Can I use softened butter instead of melted butter?
No, I really can’t recommend that substitution if you want success! Using softened butter will push this recipe straight into standard cookie territory rather than giving you that rich, dense fudge texture. Softened butter creamed with sugar incorporates a lot of air, making the cookie puff up more and bake dry. We need that wet, melted butter to inhibit gluten development and create the dense, gooey structure necessary for these gooey chocolate treats. Stick to melting it on the stovetop!
What is the secret to making them extra fudgy?
It truly comes down to two things that I made sure to highlight in the steps above! First, use a higher ratio of sugar to flour, which we’ve done here—sugar attracts moisture, keeping things soft. Second, and most critically, is *underbaking*. You have to pull these cookies out when the centers still look a bit too soft and glossy. If you wait until the center looks set, it has already overbaked for a fudgy cookie, and it will be firm when it cools. Let that residual heat do the finishing work on the pan!
How long do these stay fresh?
Because they are so rich in fat and sugar, these chewy chocolate cookies are surprisingly resilient! They are best within the first two days, obviously, but stored correctly in an airtight container at room temperature, they usually maintain that perfect chewiness for four or five days. If you find they start to dry out even a little bit, pop one in the microwave for about 10 seconds—it brings all that gooey texture right back to life. It’s my favorite trick for getting a fresh-tasting quick dessert idea!
If you have any more questions about perfecting your bake or want to chat about other baking tips, please don’t hesitate to reach out. Happy baking!
Nutritional Estimates for Homemade Brownies
Alright, let’s talk numbers for a second. I know that when you’re making something this rich and decadent, you might be wondering about the nutritional side of things. Since these homemade brownies—well, cookies—are made completely from scratch in my kitchen using specific measurements, I can give you a good ballpark figure for what you’re looking at per cookie.
I always want to be upfront with you guys: these aren’t exactly diet food, but they are worth every single bite! Please remember these are just estimates based on the ingredient list provided. If you use different brands of chocolate or significantly alter the amounts of butter or sugar, those counts will change, of course. But for the standard recipe batch, here is what you can generally expect for one cookie:
- Serving Size: 1 cookie
- Calories: 220
- Total Fat: 13g
- Saturated Fat: 8g
- Cholesterol: 45mg
- Sodium: 110mg
- Total Carbohydrates: 26g
- Sugar: 22g
- Protein: 3g
See? That high sugar concentration is what helps us get that signature fudgy, crackly texture we went over earlier! They are wonderfully satisfying, but that’s because they are packed with richness. Enjoy one (or two!) guilt-free, knowing you created something truly special from basic, honest ingredients. That’s the Seventh Flavour experience!
PrintUltimate Fudgy Brownie Cookies with Crackly Tops
Make these rich, chewy brownie cookies that capture the deep chocolate flavor and signature crackly top of a perfect brownie. This recipe delivers decadent, gooey treats with minimal effort.
- Prep Time: 15 min
- Cook Time: 13 min
- Total Time: 28 min
- Yield: 18 cookies 1x
- Category: Dessert
- Method: Baking
- Cuisine: American
- Diet: Vegetarian
Ingredients
- 1 cup (2 sticks) unsalted butter, melted
- 1 1/2 cups granulated sugar
- 1 cup packed light brown sugar
- 2 large eggs, room temperature
- 1 tablespoon vanilla extract
- 3/4 cup unsweetened cocoa powder (natural or Dutch-process)
- 1 teaspoon instant espresso powder (optional, deepens chocolate flavor)
- 1/2 teaspoon salt
- 1 cup all-purpose flour
- 1/2 cup semi-sweet chocolate chips
- Flaky sea salt, for topping (optional)
Instructions
- Preheat your oven to 350°F (175°C). Line two baking sheets with parchment paper.
- In a large bowl, whisk together the melted butter, granulated sugar, and brown sugar until fully combined.
- Whisk in the eggs one at a time until the mixture is smooth and glossy. Stir in the vanilla extract.
- In a separate bowl, whisk together the cocoa powder, espresso powder (if using), and salt.
- Add the dry ingredients to the wet ingredients. Mix gently with a spatula until just combined; do not overmix.
- Fold in the chocolate chips. The batter will be thick, similar to brownie batter.
- Scoop rounded tablespoons of dough onto the prepared baking sheets, leaving about 2 inches between each mound.
- Bake for 10 to 13 minutes. The edges should look set, but the centers will still look soft and slightly underdone. This is key for fudginess.
- Remove the sheets from the oven. Immediately sprinkle the tops with flaky sea salt, if desired.
- Let the cookies cool on the baking sheet for 10 minutes before transferring them to a wire rack to cool completely. The tops will develop their signature crackle as they cool.
Notes
- For the best crackly top, do not overbake. The residual heat will finish cooking the center.
- Use high-quality cocoa powder for the deepest chocolate flavor.
- Chill the dough for 30 minutes before scooping if your kitchen is warm; this helps prevent spreading.
Nutrition
- Serving Size: 1 cookie
- Calories: 220
- Sugar: 22
- Sodium: 110
- Fat: 13
- Saturated Fat: 8
- Unsaturated Fat: 5
- Trans Fat: 0
- Carbohydrates: 26
- Fiber: 1
- Protein: 3
- Cholesterol: 45