
When I think about real comfort food baking, my mind always goes straight to desserts that taste exactly like they did when we were kids. You know the ones—sweeter than modern desserts, perfectly simple, and baked with zero fuss. That’s why I’m so thrilled to share this custard pie recipe with you today! Forget those grainy, rubbery nightmares you might have had elsewhere. My goal here at Seventh Flavour is to hand you down recipes perfected right here in my own kitchen, and this Old Fashioned Silky & Creamy Egg Custard Pie is the result of serious testing by me, Aria Sterling. You can read more about my journey into home cooking right here, but know that every recipe has been tested for approachability and perfection.
I spent years perfecting this balance while I was working my way out of the corporate world and back into my true passion: making food that connects people. My philosophy is about chasing that Seventh Flavour—the feeling you get! And nothing feels more connected than a perfect slice of this creamy egg custard pie. Trust me when I say, this technique delivers a filling that is unbelievably smooth, every single time.
- Why This Old Fashioned Custard Pie Recipe Works (E-E-A-T)
- Ingredients for Your Classic Custard Pie Recipe
- How to Prepare Your Easy Homemade Custard Pie
- Tips for a No Crack Custard Pie
- Variations: Cinnamon Vanilla Custard Pie for the Holidays
- Serving Suggestions for this Nostalgic Pies Classic
- Storage & Reheating Instructions for Your Custard Pie
- Frequently Asked Questions About Making Custard Pie
- Share Your Grandma Approved Pies Experience
Why This Old Fashioned Custard Pie Recipe Works (E-E-A-T)
Making a fantastic, crack-free custard pie isn’t luck; it’s all about technique, and that’s where my testing comes in! Look, I’ve baked this Old Fashioned Custard Pie until the sun came up just to make sure you don’t have to worry. People look for that perfect, Grandma Approved Pies standard, and for me, that means a filling that melts in your mouth and stays perfectly intact. If you’ve ever been disappointed by a cracked top, you’re in the right place! This is my go-to Foolproof Custard Pie Technique, focused entirely on delivering that signature luxurious feel. You can check out how I tackle similar challenges in my no-crack cheesecake method, because the science is similar! By following these exact steps, you unlock the secret to a truly Creamy Egg Custard Pie, just like the wonderful versions praised elsewhere, like the Pioneer Woman’s take.
Achieving That Silky Smooth Pie Filling
The biggest enemy of smooth custard is air! When we’re whisking eggs and milk, it’s easy to whip the mixture into a froth, but those tiny bubbles desperately want to rush to the surface while baking. When they pop, they leave fissures behind. So, my main advice is just to incorporate everything gently, especially after the eggs go in. We are mixing for combination, not for volume. This gentle hand is exactly what keeps the filling wonderfully silky smooth pie filling.
Ingredients for Your Classic Custard Pie Recipe
When you’re aiming for that true, old-fashioned taste, you quickly realize that the fewer ingredients there are, the more important each one becomes! This custard pie recipe relies on beautiful simplicity. I find that focusing on high-quality staples makes all the difference. If you’re feeling ambitious, I highly recommend trying out my recipe for the Best Homemade Pie Crust, as a flaky crust really sets off the creamy filling.
For the base filling, we’re keeping it nice and tight—just the essentials needed to achieve that perfect texture. Remember, this is the foundation, and we can dress it up later if you want that holiday spin!
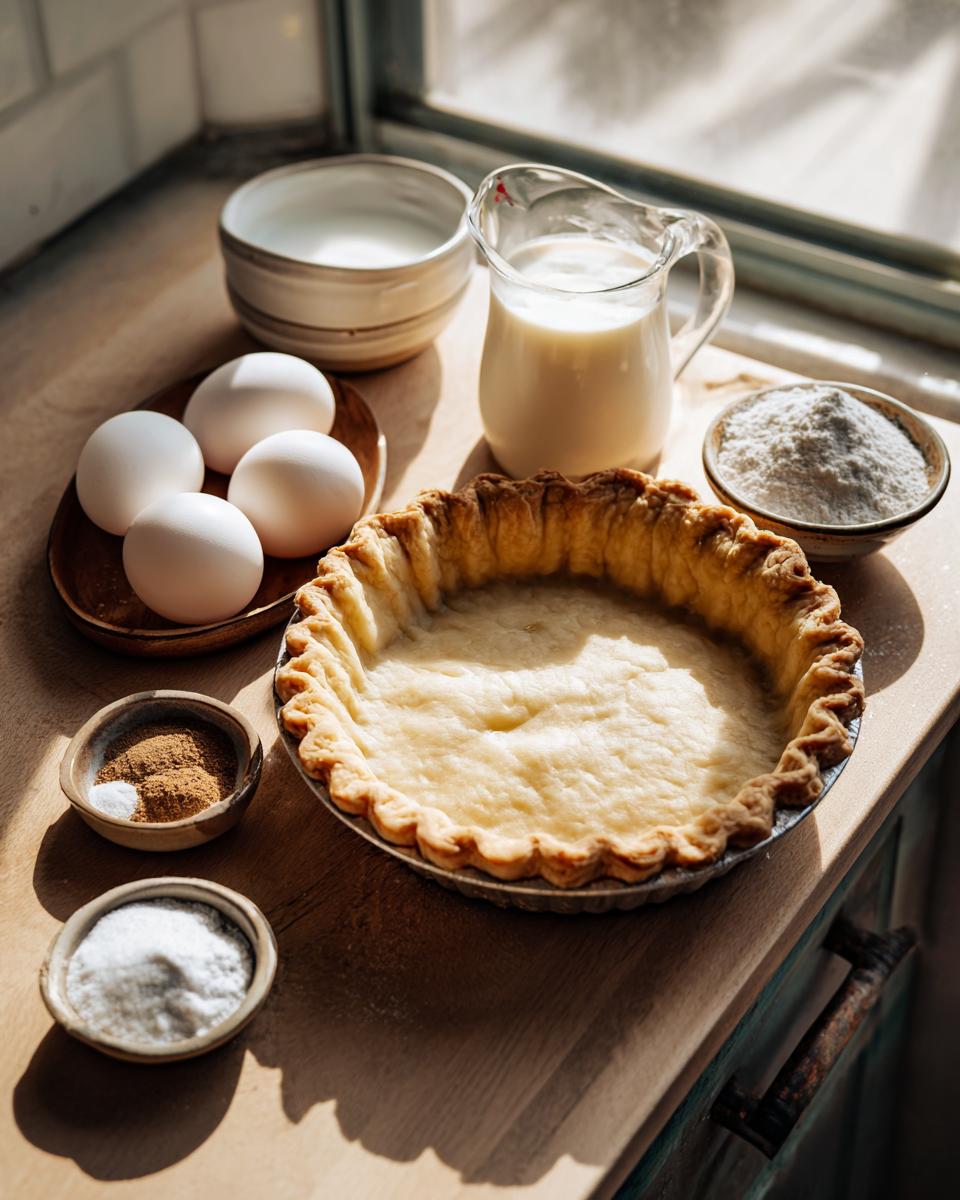
- 1 (9-inch) unbaked pie crust (I always suggest going for those Flaky Crust Pies!)
- 1 cup granulated sugar
- 1/4 teaspoon salt
- 1 teaspoon vanilla extract
- 3 large eggs
- 2 cups whole milk
Now, for those of you smelling Christmas when I mention custard pie, add these optional spices right on top of the filling before baking:
- 1/2 teaspoon ground nutmeg (just a light dusting!)
- 1/4 teaspoon ground cinnamon (this gives that beautiful color!)
That’s it! No fancy stabilizers or weird additives here. Just simple ingredients coming together for a truly Simple Baked Custard experience. Keep them handy, because we’re moving on to mixing next!
How to Prepare Your Easy Homemade Custard Pie
Even though this is an Old Fashioned Dessert Recipe, we aren’t messing around with complicated timers or water baths here! This is about making a successful, Easy Homemade Custard Pie that tastes like tradition but fits into a busy week. My goal, as always, is getting you to that beautiful, Simple Baked Custard consistency without breaking a sweat. We are using these instructions to focus on gentle mixing and perfect timing, which are the real heroes here.
Prepping the Crust and Oven for the Custard Pie
First things first: get your oven warmed up! We need a nice, steady temperature, so set it to 350 degrees F right now. While that’s heating, take your 9-inch unbaked pie crust and settle it nicely into your pie plate. Don’t crimp the edges yet—just let it sit there ready for its creamy filling. Once the oven sounds ready, we move straight into mixing the dry essentials.
Mixing the Creamy Egg Custard Pie Filling
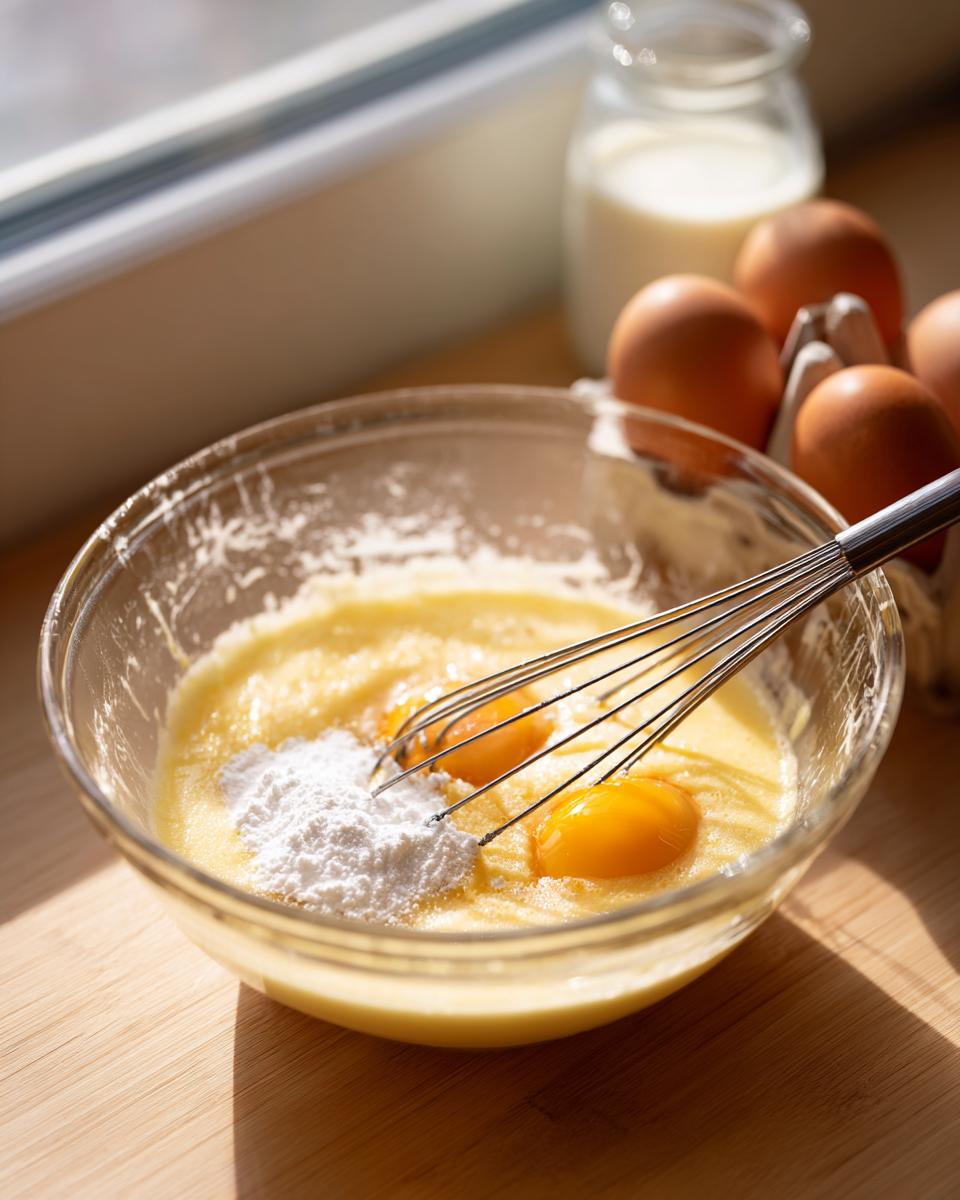
This is where the magic starts, and where we need patience! Grab a medium bowl and whisk together your sugar and salt until they are absolutely happy together. Next, lightly beat your eggs in a separate small bowl—we don’t want them foamy, just broken up. Now, introduce those eggs to the sugar and salt mixture. Whisk that gently until it’s just combined. The key, as I always stress for a simple dessert like this, is what comes next: slowly, slowly stream in the whole milk and the vanilla extract. Keep whisking softly. We are sneaking in the liquids without whipping air into the custard pie. Remember, air equals cracks!
Baking and Setting the Custard Pie
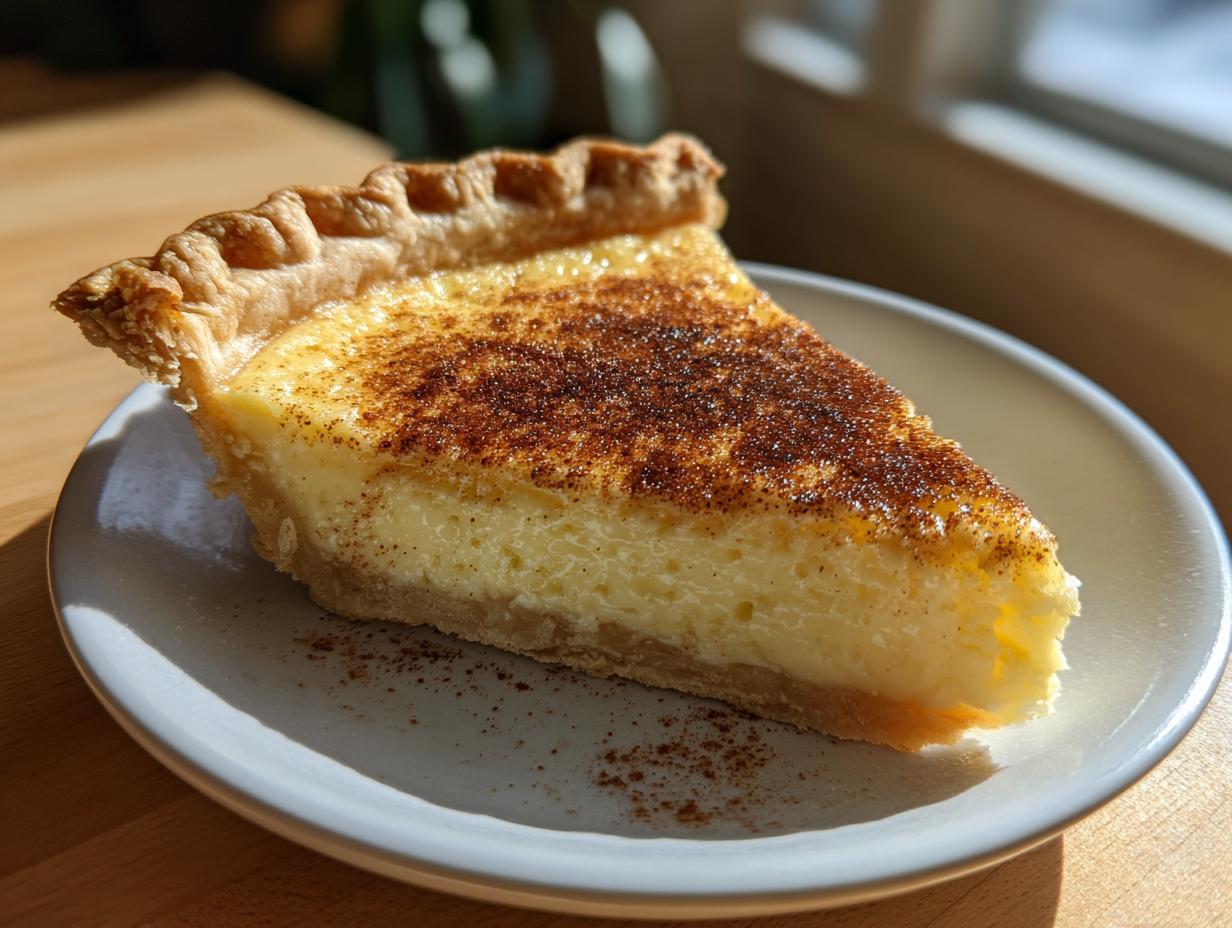
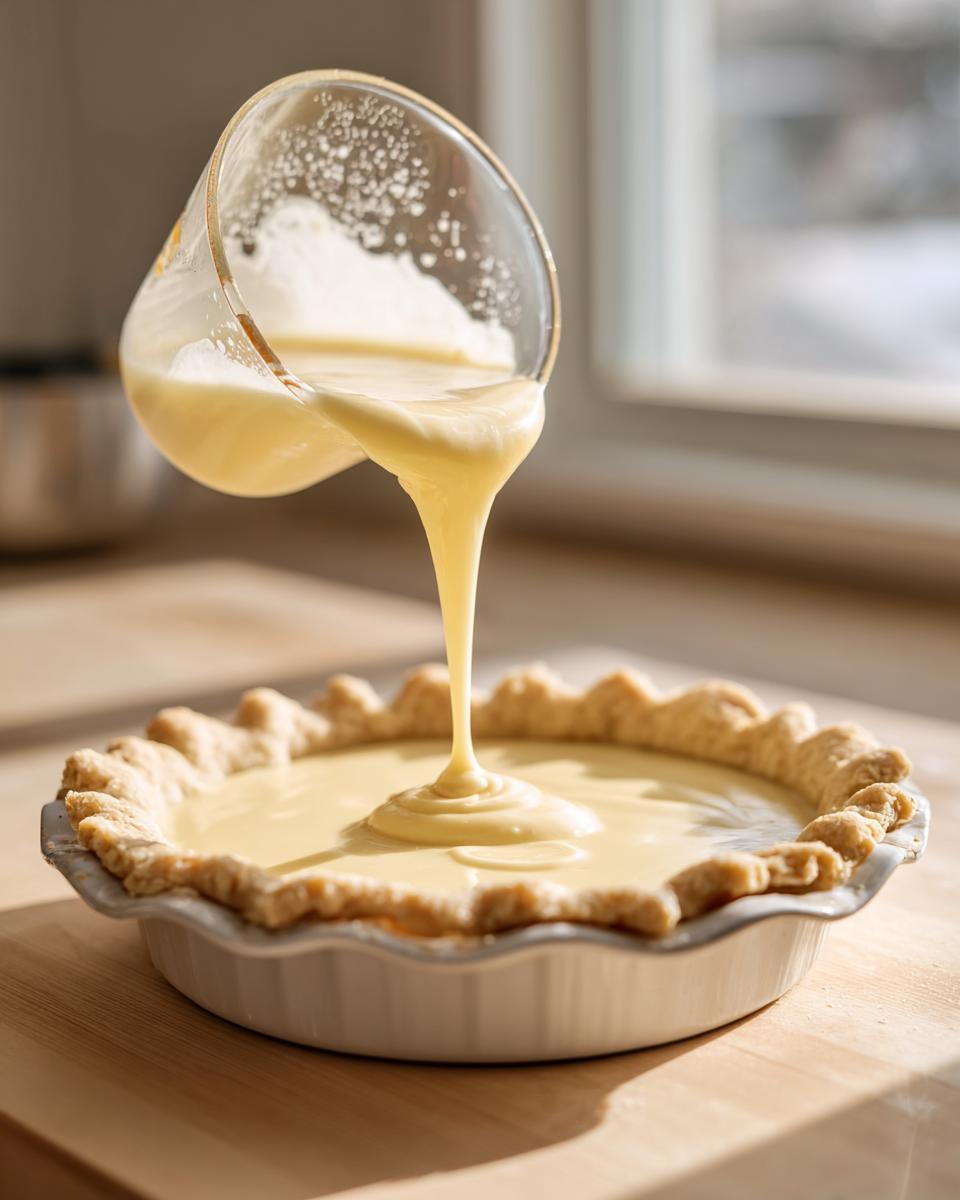
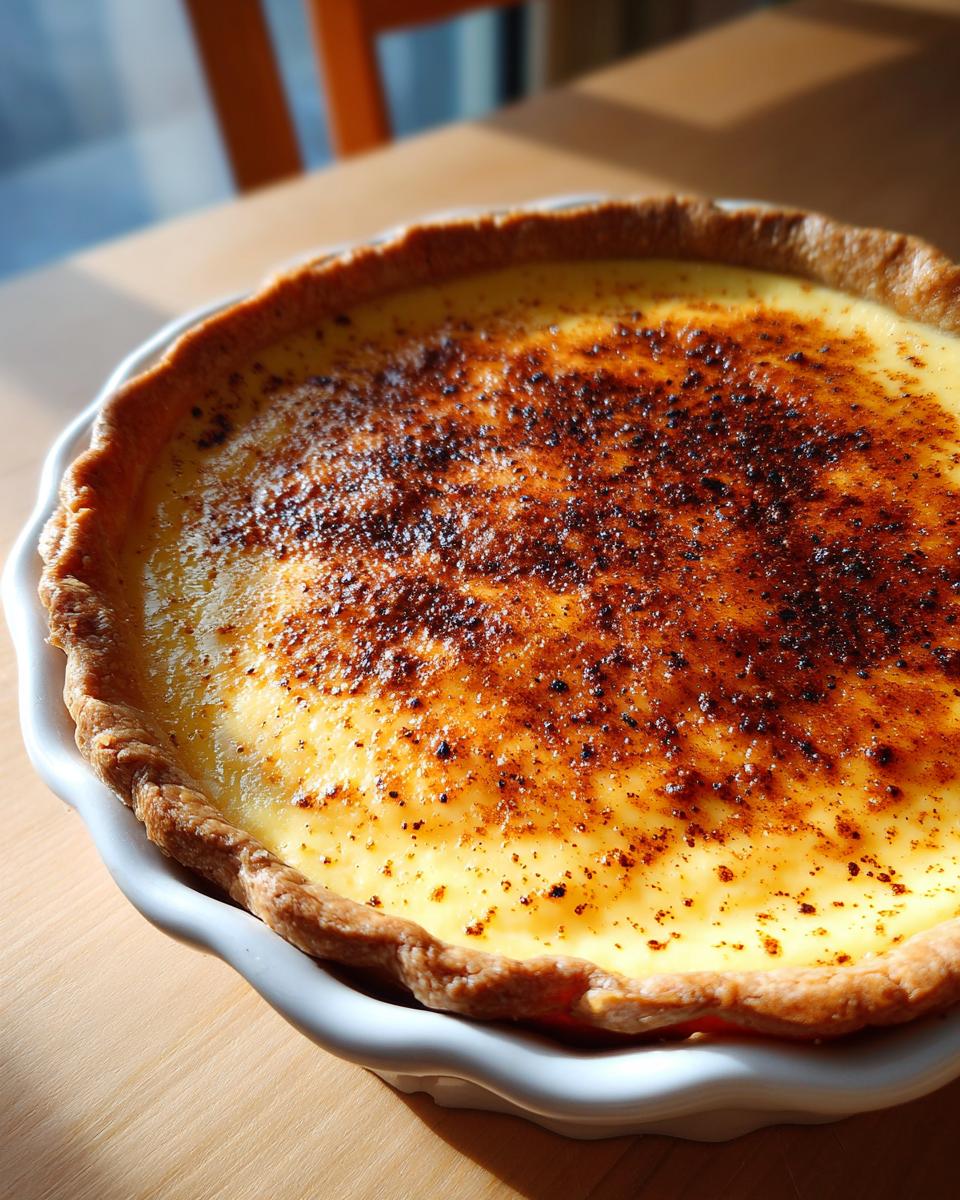
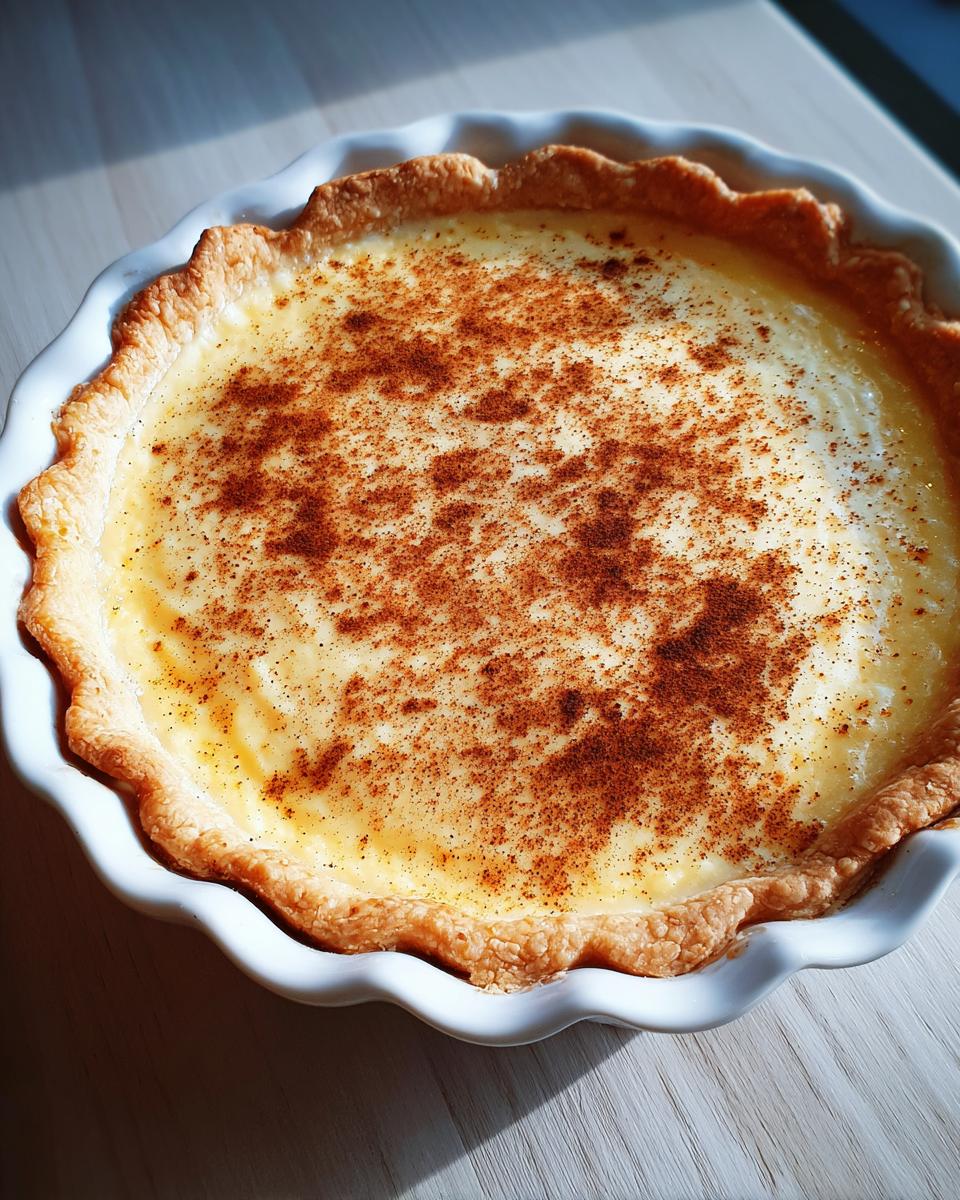
Gently pour that beautiful, smooth filling right into your waiting crust. If you’re using those optional spices, just a tiny sprinkle across the top makes it look exactly like the pies from the old-fashioned cookbooks, like the ones mentioned over at Nourish With Recipes. Slide that pie into the hot oven and let it bake for about 40 to 50 minutes. How do you know it’s done? Look for the edges to look totally set, but if you nudge the pan side-to-side, the very center should still have a tiny bit of wobble. That little jiggle is your promise of a future silky smooth pie filling!
Once it’s out, the cooling process is crucial: let it cool on the counter for a full two hours before you even think about putting it in the fridge. Then, chill it for at least four hours—I usually leave mine overnight—so it sets up completely firm before slicing.
Tips for a No Crack Custard Pie
Oh, the dreaded crack! Nobody wants to spend time making a gorgeous, Old Fashioned Custard Pie only to slice into a surface that looks like dry mud. This is honestly my number one focus when I’m baking any good custard, whether it’s this recipe or a big cheesecake—I want that No Crack Custard Pie finish!
The absolute most important thing I learned from my thousands of hours of testing is this: stop trying to incorporate air! When you whisk the eggs and milk, treat it like you’d treat a delicate balloon; you don’t want to over-press it. Don’t over-beat the filling once everything is combined. That gentle handling is the true secret behind my foolproof custard pie technique, guaranteeing you a velvety result instead of fissures. I talk a lot more about gentle mixing in my cheesecake guide, and the concept is identical here. If you keep the filling calm, the surface stays smooth. Trust me on this one; it makes all the difference in achieving that perfect slice, just like an old-fashioned recipe promises!
Variations: Cinnamon Vanilla Custard Pie for the Holidays
You know, while the classic vanilla is amazing year-round, I absolutely *love* turning this into a Cinnamon Vanilla Custard Pie when the weather turns chilly! This is where we get to cover that cozy, celebratory feel, making it a true Holiday Custard Pie favorite.
It’s shockingly easy to pivot from the base recipe into this warming spice treat. You don’t need a whole new recipe at all! Just look at Note 2 in the recipe card—that’s your secret handshake. When you mix your filling, simply swap out some of that vanilla for ground cinnamon. I like to pull out 1/4 teaspoon of the vanilla and use 1/2 teaspoon of cinnamon in its place. This infuses that perfect sweet spice throughout the entire custard pie base. If you want an extra sprinkle of spice on top before baking, go for it! It tastes sensational and makes your whole kitchen smell like a festive dream, just like the wonderful recipes you find for Christmas Eve desserts.
For more warm spice goodness in your life, you simply have to check out my recipe for gooey cinnamon rolls—it’s next level!
Serving Suggestions for this Nostalgic Pies Classic
Once you’ve wrestled that perfect, beautifully set custard pie out of the fridge, the final step is deciding how to serve it! Since this recipe embraces that Old School vibe, we want toppings that enhance the silky texture without overpowering that lovely vanilla or cinnamon warmth. Everything here is meant to keep things truly accessible, fitting perfectly into that warm, comforting space of Comfort Food Baking.
Honestly, the pie is fantastic all by itself, but here are a few ways my family likes to present it, especially when we’re serving it after a big holiday meal:
- A Simple Dusting: If you skipped the nutmeg and cinnamon before baking, dust the fully chilled pie lightly with powdered sugar right before serving. It looks so elegant and clean!
- Whipped Cream Cloud: My absolute favorite? A big, soft dollop of freshly whipped cream. I make my own—it’s just heavy cream beaten until soft peaks form. If you want some inspiration on making killer whipped cream, you can check out my notes on whipping things up perfectly over here, though we omit the savory elements, of course!
- A Berry Brightness: Sometimes, that rich custard needs a tiny bit of tartness to cut through. A modest scattering of fresh, bright raspberries or thinly sliced strawberries on top of each slice adds a gorgeous color contrast and a welcome tang.
- A Little Warming Spice: If you made the base flavor vanilla, you can always bring in a tiny pinch of cinnamon or nutmeg right on top of the slice when it hits the plate. It jolts the vanilla flavor awake!
Remember, because this is such a rich and satisfying custard pie, you don’t need much else. Let that creamy texture shine!
Storage & Reheating Instructions for Your Custard Pie
Okay, you’ve made the perfect custard pie, and now you have those glorious leftovers—if you even have any! The great news is that this pie actually tastes even better the next day, especially after that long chill we insisted on during the baking steps.
The best way to handle leftovers is to store them right in the refrigerator. You want to make sure it stays covered, though! If you just stick it back in the box, the open air will start to dry out the surface of that beautiful custard pretty fast. I usually cover the entire dish lightly with plastic wrap, making sure the plastic doesn’t actually touch the top of the pie itself. If it starts sticking to the filling, you’ll get that ugly surface texture we worked so hard to avoid!
Here’s the most important part: this custard pie is truly at its peak when served cold or perfectly chilled. Seriously, try a slice straight from the fridge! It holds its structure beautifully and that cooling really enhances the vanilla notes. If you *must* serve it warmer, let the slice sit out on the counter for about 20 minutes before eating. That’s just enough time for it to come up slightly from icy cold without losing its structure.
Now, should you try to reheat the whole thing? Please don’t! Putting this delicate simple baked custard back into the oven or microwave tends to ruin that silky texture we achieved. High heat will cause the eggs to tighten up, and you’ll end up with a rubbery texture instead of the melt-in-your-mouth goodness you deserve. Stick to chilling it covered, and you’ll be enjoying that Old Fashioned Custard Pie perfectly for days!
Frequently Asked Questions About Making Custard Pie
It happens every time I post something truly nostalgic—people have great questions! Since this custard pie recipe is so near and dear to my heart, I wanted to gather the most common things I hear and answer them right here. I hope this boosts your confidence so you can go ahead and bake the absolute best creamy egg custard pie!
Can I use pre-made pie crust for this custard pie?
Oh, absolutely you can! If you’re looking for an Easy Homemade Custard Pie experience, using a store-bought crust is perfectly fine. Life is busy, and we still want that delicious pie! However, if you want to elevate it just a bit more, a homemade crust gives you that unbeatable buttery flavor and texture that really complements the smooth filling. If you skip homemade, just make sure you choose a good quality one so you at least get those benefits of Flaky Crust Pies.
What is the secret to a ‘Simple 4 Ingredient Dessert’ custard pie?
That’s a fantastic question because it gets right to the core of this recipe’s simplicity! When someone talks about a “Simple 4 Ingredient Dessert” version, they’re usually referring to the core custard elements: eggs, milk, sugar, and salt. That’s the bare minimum you need for a Simple Baked Custard to set up nicely. The secret there isn’t adding more ingredients; it’s making sure the ones you *do* have are the best quality they can be. Since you aren’t masking flavors, the quality of your whole milk and eggs really shines through!
I also always recommend checking out more tips from experts who tackle the classic bake, like the insights found in articles like this one on easy homemade custard pie. Sometimes just knowing someone else made it work gives you that final push of faith!
If you’ve got any specific problems or just want to share how smooth your custard pie turned out, please drop a comment below or reach out to me on our contact page—I love hearing the success stories from my baking friends!
Share Your Grandma Approved Pies Experience
Well, that’s it! You’ve got the recipe, the tips, and all the reassurance you need to make the most wonderfully nostalgic custard pie. Now comes the best part for me: hearing about *your* successes! I put everything I know into making sure this recipe works beautifully, but I absolutely live for seeing someone else achieve that perfect, silky smooth result in their own kitchen.
So, once you’ve let that beauty chill and sliced into it, promise me you’ll let me know how it went! Did your filling set up exactly how you hoped? Did one of your family members mistake this for a recipe from their own childhood? Please drop a comment right below this is—I read every single one, and your feedback helps me keep tweaking and perfecting these cherished recipes.
If you took a picture of your finished, crack-free masterpiece, I would be thrilled if you’d tag me on social media or send it over through the contact page. Seeing your beautiful creations is truly the seventh flavor that keeps me going! Happy baking, friends!
PrintOld Fashioned Silky & Creamy Egg Custard Pie

Make a classic, old fashioned egg custard pie with a silky smooth, creamy filling. This simple recipe delivers the comforting taste of tradition without complicated steps.
- Prep Time: 15 min
- Cook Time: 50 min
- Total Time: 6 hours 5 min
- Yield: 8 servings 1x
- Category: Dessert
- Method: Baking
- Cuisine: American
- Diet: Vegetarian
Ingredients
- 1 (9-inch) unbaked pie crust (flaky crust pies recommended)
- 1 cup granulated sugar
- 1/4 teaspoon salt
- 1/2 teaspoon ground nutmeg (optional, for topping)
- 1 teaspoon vanilla extract
- 1/4 teaspoon ground cinnamon (optional, for topping)
- 3 large eggs
- 2 cups whole milk
Instructions
- Preheat your oven to 350 degrees F. Place your unbaked pie crust into a 9-inch pie plate.
- In a medium bowl, whisk together the sugar and salt.
- In a separate bowl, lightly beat the eggs. Whisk the beaten eggs into the sugar mixture until combined.
- Slowly whisk in the whole milk and vanilla extract until the mixture is smooth. Do not over-mix; too much air causes cracks.
- Pour the custard filling carefully into the unbaked pie crust.
- If desired, lightly sprinkle the top surface with cinnamon and nutmeg for a traditional look.
- Bake for 40 to 50 minutes. The pie is done when the edges are set but the center still has a slight jiggle when gently shaken. This helps achieve a silky smooth pie filling.
- Remove the pie from the oven. Let it cool completely on a wire rack at room temperature for at least 2 hours before chilling.
- Chill the custard pie in the refrigerator for at least 4 hours, or until fully set, before slicing and serving.
Notes
- For a foolproof custard pie technique that prevents cracks, avoid over-beating the filling to minimize air bubbles.
- If you prefer a holiday flavor, substitute 1/4 teaspoon of the vanilla extract with 1/2 teaspoon of ground cinnamon mixed into the filling for a Cinnamon Vanilla Custard Pie variation.
- This recipe uses simple 4 ingredient dessert logic for the base filling, relying on quality milk and eggs for texture.
Nutrition
- Serving Size: 1 slice
- Calories: 280
- Sugar: 30
- Sodium: 180
- Fat: 10
- Saturated Fat: 5
- Unsaturated Fat: 5
- Trans Fat: 0
- Carbohydrates: 35
- Fiber: 1
- Protein: 8
- Cholesterol: 95