
If there’s one thing I’ve learned balancing a busy career and my love for cooking, it’s that a great roast shouldn’t feel like a weekend-only commitment. So many folks think getting that perfectly tender and juicy pork loin roast requires hours of complicated work, but trust me, it doesn’t! This recipe is the result of years of real testing right here in my home kitchen, designed to give you incredible results whether you need an easy pork dinner on Tuesday or a centerpiece for a lovely Sunday roast recipe. We focus on achieving that perfect internal temperature every single time.
- Why This Juicy Pork Loin Roast Recipe Works for Any Occasion
- Ingredients Needed for Your Pork Loin Roast
- Equipment for the Best Oven Roasted Pork
- Step-by-Step Instructions for a Tender Pork Loin Roast
- Creating a Simple Pan Sauce Gravy for Your Pork Loin Roast
- Tips for Success with Your Pork Loin Roast
- Storage and Reheating Instructions for Leftover Pork Loin Roast
- Frequently Asked Questions About the Pork Loin Roast
- Estimated Nutritional Data for This Pork Loin Roast
Why This Juicy Pork Loin Roast Recipe Works for Any Occasion
I didn’t design this recipe just for special occasions. Honestly, I made it because I wanted to pull a guaranteed juicy pork loin out of the oven on a random Wednesday when I felt like making something a little more special than meatloaf. It’s all about timing!
- It requires almost zero hands-on time once you get it into the oven.
- The payoff is incredible: perfectly pink, supremely tender meat every time.
- Minimal ingredients mean you’re tasting the beautiful pork, not heavy masking flavors.
The Secret to an Easy Pork Dinner
The real trick is the two-stage roasting. We shock it hot at 425 degrees to get that nice crust going, then immediately drop the heat down to 350 degrees. This gentle approach lets the meat cook evenly right up to the target pork loin internal temp (145°F, remember!) without letting the outside dry into leather. It’s how we make it an easy pork dinner.
Perfect for Sunday Roast Recipe or Weeknight Dinner
Because prep is so fast—really, just mixing spices and rubbing them on—this is fantastic for a quicker weeknight meal. But don’t dismiss it for a Sunday! When you add that simple pan sauce gravy we make later, it absolutely stands up as a gorgeous Sunday roast recipe centerpiece. You get maximum flavor impact for minimal effort, which is my favorite way to cook!
Ingredients Needed for Your Pork Loin Roast
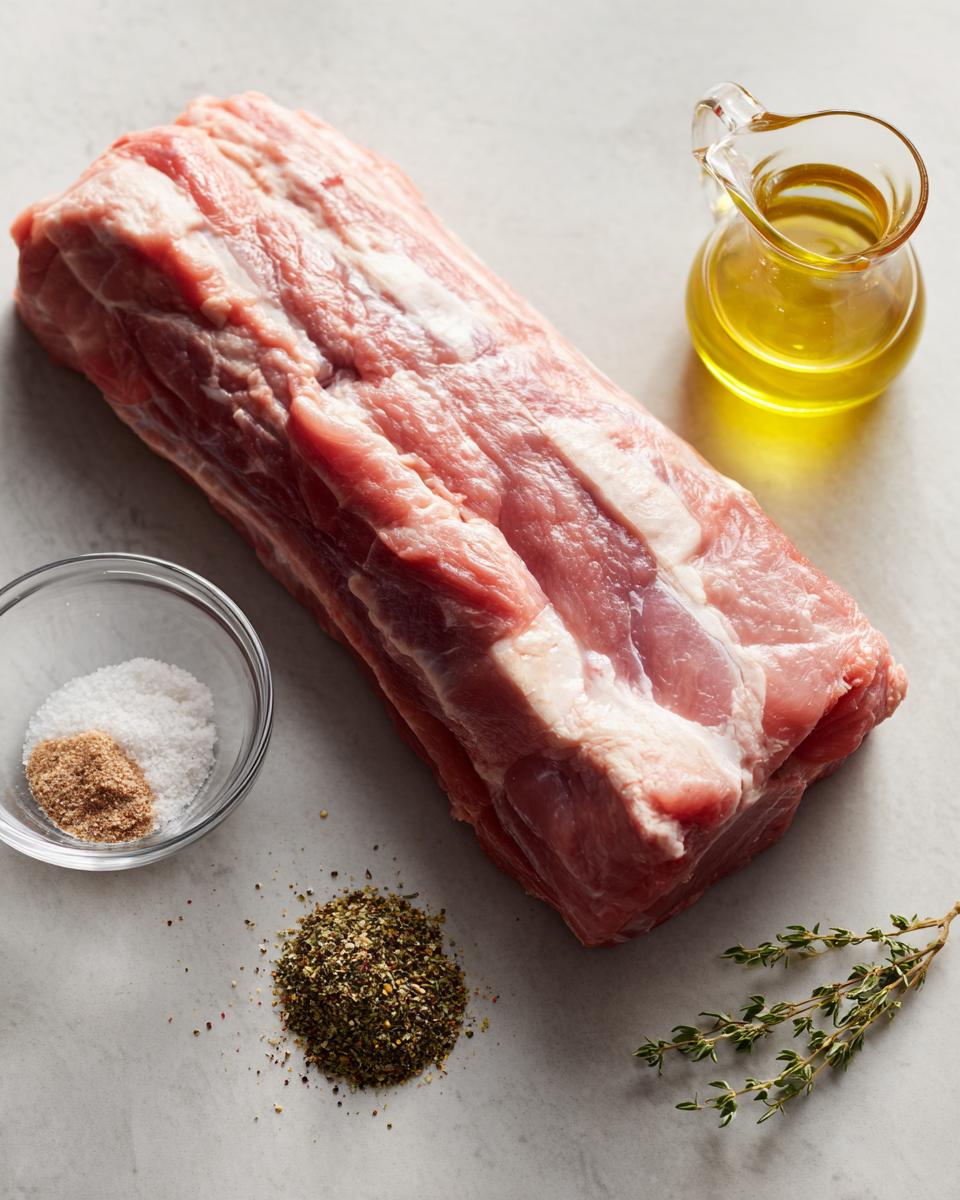
I always keep these simple staples on hand because you never know when a spontaneous pork roast craving is going to hit! Remember, we aren’t using complicated marinades here; we are letting that quality pork flavor shine. For this recipe, you’ll want one substantial three-pound pork loin roast, preferably bone-out so slicing is a breeze later on.
For the rub, which is where all the initial flavor comes from, grab two tablespoons of good quality olive oil. That oil helps the spices cling beautifully to that dry surface we create. Then, be sure to use one tablespoon of kosher salt—don’t skip kosher salt for roasting, it just adheres better! Follow that up with one teaspoon each of freshly ground black pepper, garlic powder, and dried thyme.
Finally, we add a little color and depth with just half a teaspoon of paprika. That’s it! Seriously, grab that pork loin roast, the oil, and those spices, and we are ready to rock. I’ve laid out the full list below so you can check your pantry right now before we head to the oven!
The list is straightforward:
You need 3 lb pork loin roast, bone-out.
Use 2 tablespoons olive oil.
Measure out 1 tablespoon kosher salt.
Grab 1 teaspoon black pepper, 1 teaspoon garlic powder, and 1 teaspoon dried thyme.
Finish with 1/2 teaspoon paprika.
Equipment for the Best Oven Roasted Pork
Okay, so you’ve got your beautiful pork loin roast seasoned up—now we just need to make sure we have the right tools so this oven roasted pork turns out perfectly tender. Good cooking isn’t just about the ingredients; it’s about using tools that help you be precise! Don’t stress; you probably have all this stuff already.
First up, you absolutely must have a good meat thermometer. I cannot stress this enough for a juicy pork loin. We are aiming for a specific internal temperature, and if you guess, you risk ending up with dry meat or, worse, undercooked pork. Seriously, it’s the MVP of any roasting process.
Next, you need something to roast it on. A simple roasting pan works fantastic, especially one with a little rack if you have it—that lets the heat circulate underneath. If you don’t have a dedicated roasting pan, a sturdy, rimmed baking sheet will totally work in a pinch. Just make sure those rims are high enough to catch any wonderful spice drippings!
And finally, give a good sharp knife and a solid cutting board a prime spot on the counter. We wait until the end to slice, but getting your slicing station ready now means you aren’t scrambling when that beautiful roast comes out of the oven, ready for the mandatory rest period.
Step-by-Step Instructions for a Tender Pork Loin Roast
This is where the magic happens! Don’t be intimidated by the temperature steps; it’s actually very straightforward, and focusing on the meat thermometer is your golden ticket to avoiding dry pork. We are going to treat this pork loin roast with respect in the beginning so it rewards us with incredible juiciness at the end. Follow these core steps carefully for the best oven roasted pork.
Preparation and Seasoning the Pork Loin Roast
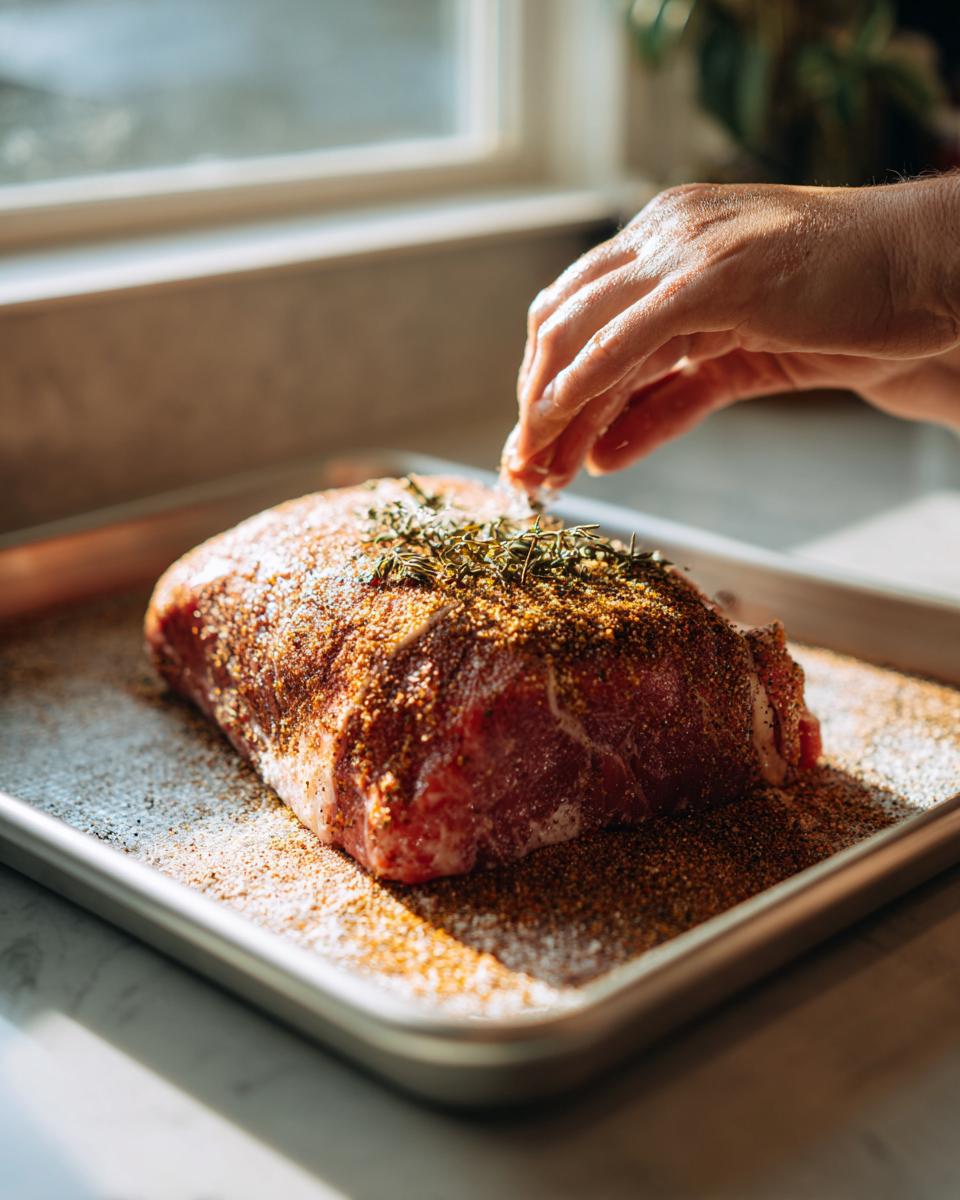
First things first: take that roast out of the fridge about 30 minutes before you plan to start seasoning. Letting it warm up just a touch helps it cook more evenly inside—that’s one of my best secrets for avoiding that dreaded thick gray band just under the crust! Next, grab some paper towels and pat that pork loin absolutely dry. I mean bone-dry on all sides. A dry surface gets happy with the heat, which means a better crust for us.
While the pork is warming up, mix all your spices together in a small bowl. Once it’s dry, coat the whole surface lightly in olive oil—just enough to make it tacky. Then, be generous but even when you rub that spice mix over every single inch of the roast. That mix locks in all the flavor!
The Two-Stage Roasting Method: Hitting the Right Pork Loin Internal Temp
Preheat that oven up high to 425 degrees Fahrenheit right away! We want to give the outside a quick blast of heat for 15 delightful minutes. This sets our beautiful rub. Set your timer and don’t peek too much!
When that 15 minutes is up, immediately drop the temperature down to 350 degrees Fahrenheit. Now, we roast low and slow until we hit our target—the magic number for a truly juicy pork loin is 145 degrees Fahrenheit. You absolutely must check the thickest part of the roast using your meat thermometer. Don’t rely on time alone here; the specific pork loin internal temp is what guarantees tenderness.

Resting and Slicing the Pork Loin Roast
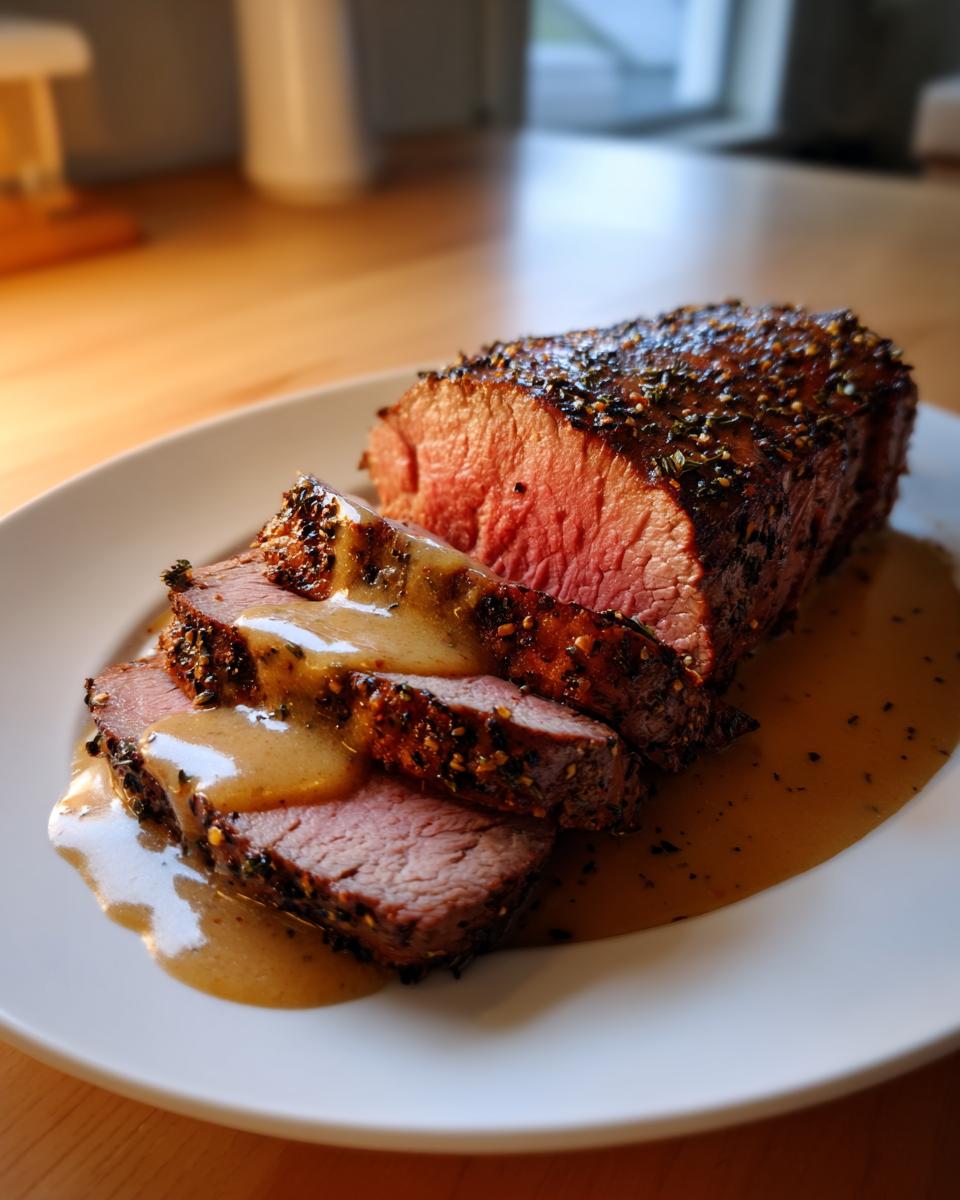
The moment that thermometer hits 145°F, pull that roast out! Now, this next step is perhaps the most crucial for guaranteeing juiciness, so don’t cheat the clock: Tent it loosely with foil and let it rest for a minimum of 10 minutes. No slicing yet!
Why wait? As the roast rests, the internal juices, which have rushed toward the center during cooking, redistribute back through the muscle fibers. If you cut too soon, all those precious juices—the whole point of a juicy pork loin—will flood out onto your cutting board. Ten minutes is non-negotiable; it allows the meat to relax and hold onto that moisture we worked so hard to keep inside.
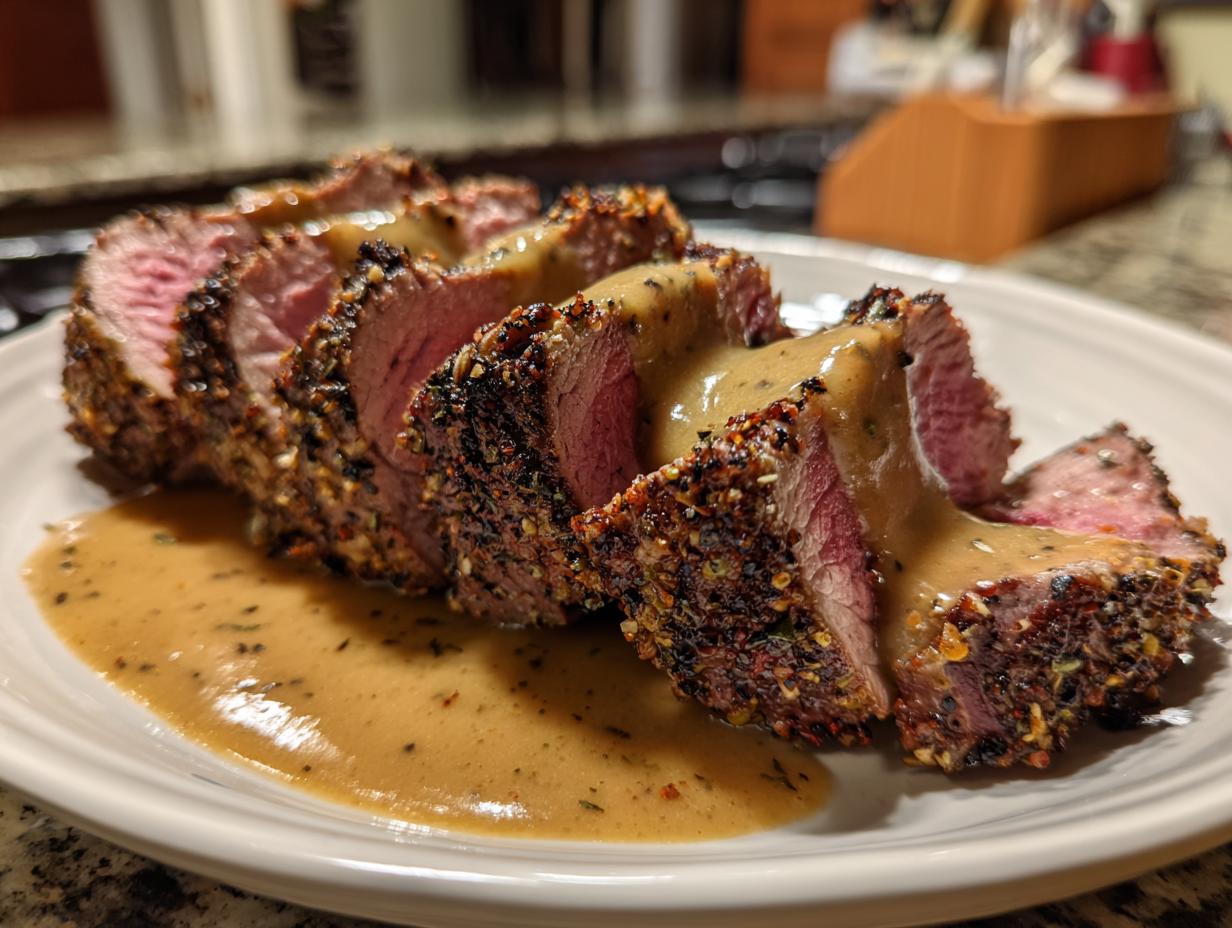
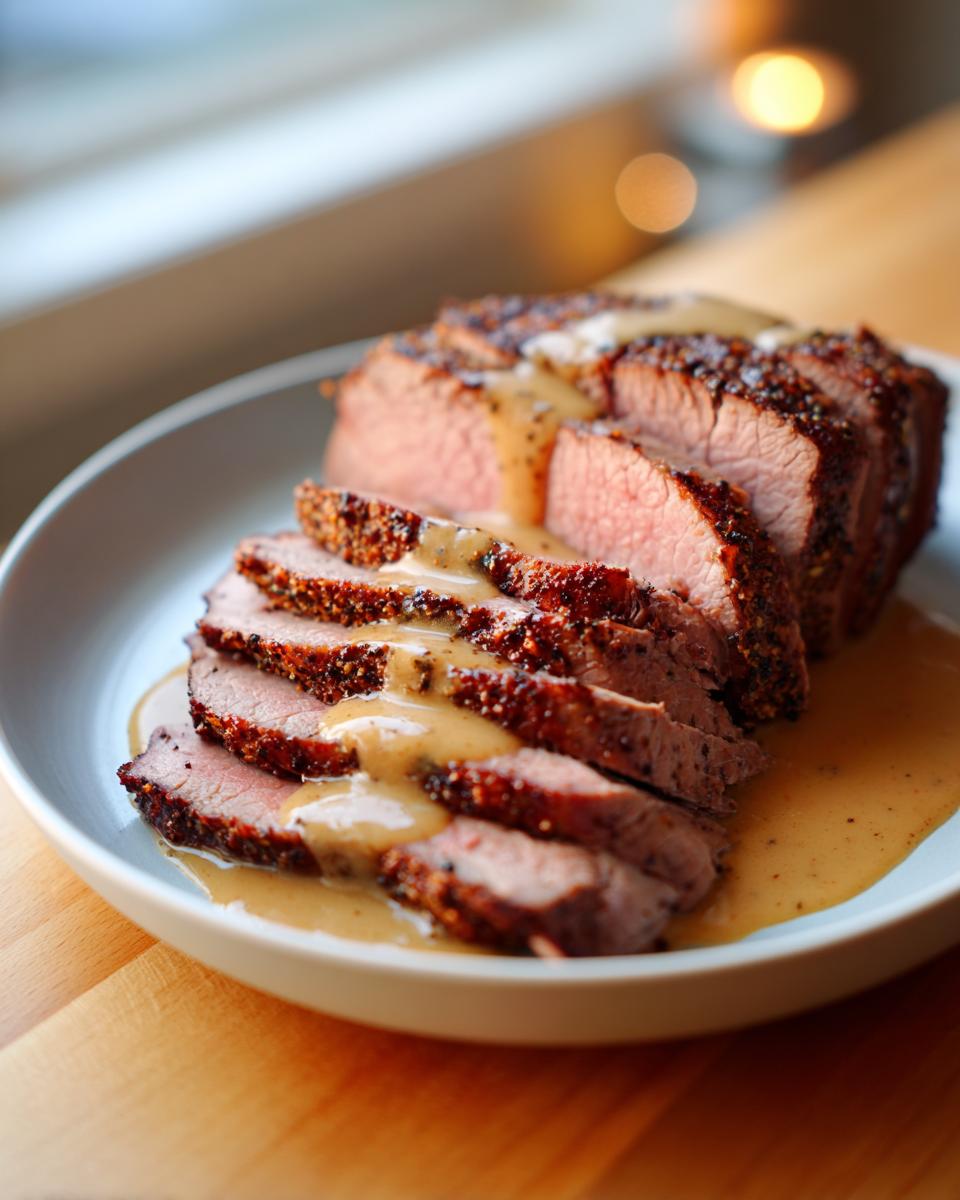
Creating a Simple Pan Sauce Gravy for Your Pork Loin Roast
Now, I know what you’re thinking. You’ve just pulled off a spectacular oven roasted pork, it’s resting beautifully, and you have all these amazing browned bits stuck to the bottom of the roasting pan—you can’t just throw those away! That is liquid gold, my friend. That residue, what the pros call fond, is the absolute backbone of a ridiculously flavorful pan sauce gravy.
This is the simplest, most satisfying gravy you’ll ever make. You only need two things to turn those crispy bits into a luxurious sauce while your pork loin roast rests. First, you need liquid—about one cup of chicken broth works perfectly here. Any good quality stock you have on hand will do the trick!
Here’s the technique: Move your roasting pan right onto the stovetop—make sure it’s stove-safe, of course! Put it over medium heat. Once it starts warming up, take a wooden spoon or a stiff flat spatula and just start scraping the bottom gently. Those yummy browned bits will lift right off into the broth as it starts to simmer. We call that deglazing, and it’s pure flavor engineering!
Let that broth simmer for a minute or two, just reducing slightly. Then, kill the heat—this is important! We are going to swirl in one tablespoon of cold, unsalted butter right at the end. Swirling it in off the heat incorporates it perfectly, giving your pan sauce gravy that glossy sheen and velvety texture without having to whisk like a madwoman. Taste it, adjust for salt and pepper if needed, and pour it right over those beautifully sliced pieces of pork loin roast. You won’t believe how easy it was!
Tips for Success with Your Pork Loin Roast
Even though this recipe is pretty foolproof, I always like to share a couple of little secrets I learned over the years of testing this pork loin roast. These aren’t complicated steps, but they are the difference between a good roast and one that makes everyone ask for the recipe immediately. Think of these as the little nudges that turn reliable into amazing.
The Carryover Cooking Factor
Remember how I told you to pull the roast out when the thermometer hits 145 degrees Fahrenheit? You absolutely must trust that, even though it seems early! I learned the hard way that the cooking process doesn’t stop the second the roast leaves the 350-degree oven. This is called carryover cooking, and it’s your friend, not your enemy.
That retained heat keeps working its way through the roast for those critical 10 minutes it’s resting under the foil. By the time you actually slice into it, you’ll find the temperature has gently ticked up another 5 degrees or so, landing right around that safe and wonderfully juicy 150°F mark. Pulling it earlier guarantees you a juicy pork loin; pulling it when you *think* it’s done usually means it’s already cooked too far!
Want a Deeper Crust? Bring on the Sear!
Sometimes, when I’m planning this for a proper Sunday roast recipe, I want an extra deep, dark crust on the outside of the meat. If that’s you, you can definitely add an extra step before the high-heat blast: searing! This is a great option if you didn’t let your roast sit out long enough to warm up.
Just grab a heavy, oven-safe skillet—I use my cast iron pan for this—get a drizzle of oil smoking hot over medium-high, and sear the roast on all sides for just about 60 seconds per side. You’re not trying to cook it through; you’re just building that beautiful outer texture. Then, transfer that hot skillet right into the preheated 425-degree oven just like using a roasting pan. It adds about five minutes to your total hands-on time but gives you a fantastic visual appeal!
Seasoning Check: Don’t Skip The Dry Rub Foundation
Seriously, take the time to mix that salt, pepper, thyme, garlic, and paprika thoroughly before applying it. The salt needs to be evenly distributed so you don’t end up with salty bites next to bland bites of pork loin roast. When you rub that oil on first, it acts like the perfect glue for your spice mix. Think of this initial rub as the only seasoning you’re really doing, so make it count!
Storage and Reheating Instructions for Leftover Pork Loin Roast
I always hope there’s some left over because this pork loin roast is genuinely fantastic the next day, but storing it correctly is essential if you want that next-day tenderness! Nobody likes sad, dry leftovers, right? So let’s talk about keeping those few precious slices moist until you can enjoy them again.
How to Store Your Leftover Pork Loin Roast
How you store it truly depends on what stage it’s in. If you haven’t sliced the roast yet, keep the whole thing together, wrapped tightly in foil or plastic wrap, and pop it into the fridge. It usually keeps really well like that for three or four days. If you’ve already sliced the pork loin roast, you need to be a bit more proactive to keep those slices from drying out.
My method for sliced pork is to stack the pieces neatly in an airtight container. Before sealing the lid, I pour just a tiny splash of chicken broth or even water over the slices. Don’t drown them! Just enough to keep the air inside the container humid. That simple trick makes a huge difference when you go to reheat it later.
Reheating for Maximum Juiciness
Forget about the microwave here unless you love chewy pork edges! While the microwave is fast, it blasts the moisture out of the meat faster than anything. The best way to reheat this pork loin roast is low and slow, mimicking the initial cooking process.
If you have slices, place them in a small baking dish. Pour just enough broth or water into the bottom of the dish to cover about a quarter inch of the meat. Cover that dish TIGHTLY with foil—this traps the steam we need for moisture. Pop it into a warm oven, maybe 300 degrees Fahrenheit, just until it’s heated through. Check the temperature to make sure it’s just warm, not steaming hot, to keep that beautiful juicy pork loin texture!
If you have the whole roast left, you can slice off what you need for that meal and reheat the remaining portion the same way. The goal is gentle warmth, not aggressive cooking. This way, your leftovers taste almost as good as the original oven roasted pork!
Frequently Asked Questions About the Pork Loin Roast
Can I use a bone-in pork loin roast instead of bone-out?
Yes, you absolutely can! If you find a gorgeous bone-in roast, grab it! The bone adds a little extra flavor and can help insulate the meat, potentially making it even more forgiving. The main thing you have to remember is that the bone takes up space and slows down the cooking time. You’ll need to add about 10 to 15 minutes to the estimated total time based on the weight difference. Always rely on that pork loin internal temp probe; don’t just trust the clock when you add that bone back in!
I don’t have dried thyme. What can I substitute for this easy pork dinner?
If thyme has decided to ghost your spice cabinet, don’t panic! This is supposed to be an easy pork dinner, not a trip to the specialty store. Rosemary is my top substitute; it pairs beautifully with pork, though you might want to use just half the amount of rosemary as thyme because its flavor is stronger. Sage is another excellent choice if you have it! If all fresh and dried herbs fail you, just increase the garlic powder by half a teaspoon and add another quarter teaspoon of black pepper for a little bit more punch.
What is the safest internal temperature for a truly juicy pork loin?
This is the most important question any home cook should ask! For pork loin, the USDA recommends a minimum pork loin internal temp of 145°F, followed by a three-minute rest. That’s what guarantees a safe product that is still delightfully pink and moist. I pull mine right at 145°F and let it rest for 10 minutes. If you check it after resting and it has drifted up to 150°F, you’ve achieved perfection for a juicy pork loin!
Can I skip the initial high heat blast (425°F)?
You certainly *could* if you absolutely needed to shave off a few minutes, but honestly, I wouldn’t recommend it, especially if you want that stunning, flavorful crust we talked about. That initial blast of heat is crucial for the two-stage method; it caramelizes the outside spice rub quickly. If you just start at 350°F, you’ll get something closer to a slow-cooked shoulder texture rather than a beautiful oven roasted pork loin, and it takes longer overall to finish!
Is this recipe adaptable for making a small, weeknight portion?
Yes, this formula scales down beautifully, making it a wonderful weeknight dinner option for two! If you’re using a smaller roast, say 1.5 pounds, you should cut the cooking time almost in half, but you still start the same way: 15 minutes at 425°F, then drop to 350°F. When you look for that 145°F target, it will likely be ready much faster than the full 3-pounder. Just keep checking that thermometer frequently!
Estimated Nutritional Data for This Pork Loin Roast
Now, I always feel a little weird listing out the numbers because, let’s be real, when you’re making a beautiful, tender pork loin roast, you’re focused on the family gathering or the wonderful easy pork dinner you’re about to serve—not counting grams of fat! But since we aim to be thorough here, I’ve included the estimated nutritional breakdown below based on the ingredients listed in the recipe.
Please remember, these numbers are just guides. If you use a different cut of pork, or if you double down on the cracked black pepper (which I totally support!), the final count will change. Also, this data doesn’t factor in any of the glorious pan sauce gravy we made, so factor that richness in mentally!
- Serving Size: 4 oz cooked
- Calories: 280
- Fat: 12g
- Saturated Fat: 4g
- Carbohydrates: 1g
- Protein: 40g
- Sugar: 1g
- Cholesterol: 95mg
We keep the prep simple, which helps keep the numbers clean! Notice that massive protein count? That’s why a good roast like this is such a satisfying centerpiece for your next sunday roast recipe. Enjoy the main event, and only worry about the labels if you’re making the roast for a specific dietary tracking purpose!
PrintJuicy Oven Roasted Pork Loin Roast
Make a tender and juicy pork loin roast using simple steps for a perfect weeknight dinner or Sunday roast. Includes guidance for internal temperature and a simple pan sauce.
- Prep Time: 10 min
- Cook Time: 60 min
- Total Time: 70 min
- Yield: 6 servings 1x
- Category: Dinner
- Method: Roasting
- Cuisine: American
- Diet: Low Fat
Ingredients
- 3 lb pork loin roast, bone-out
- 2 tablespoons olive oil
- 1 tablespoon kosher salt
- 1 teaspoon black pepper
- 1 teaspoon garlic powder
- 1 teaspoon dried thyme
- 1/2 teaspoon paprika
Instructions
- Preheat your oven to 425 degrees Fahrenheit.
- Pat the pork loin roast completely dry with paper towels. This helps create a good crust.
- In a small bowl, mix together the kosher salt, black pepper, garlic powder, dried thyme, and paprika.
- Rub the entire surface of the pork loin evenly with the olive oil, then generously coat it with the spice mixture.
- Place the seasoned pork loin in a roasting pan or on a rimmed baking sheet.
- Roast at 425 degrees Fahrenheit for 15 minutes.
- Reduce the oven temperature to 350 degrees Fahrenheit. Continue roasting until the internal temperature reaches 145 degrees Fahrenheit, which usually takes about 15 to 20 minutes per pound total cooking time. Use a meat thermometer inserted into the thickest part of the roast.
- Remove the pork loin from the oven when it reaches 145 degrees Fahrenheit.
- Transfer the roast to a cutting board, tent it loosely with foil, and let it rest for at least 10 minutes before slicing. This resting period is key for a juicy pork loin.
- While the pork rests, make a quick pan sauce: Place the roasting pan over medium heat on the stovetop. Scrape up any browned bits from the bottom of the pan. Add 1 cup of chicken broth and bring to a simmer, scraping until all bits dissolve. Let it reduce slightly, then swirl in 1 tablespoon of cold butter until melted and smooth.
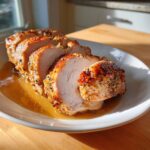
- Slice the pork loin against the grain and serve immediately with the pan sauce gravy.
Notes
- For the best results, take the pork out of the refrigerator about 30 minutes before seasoning to allow it to come closer to room temperature.
- If you prefer a deeper crust, you can sear the roast on all sides in an oven-safe skillet over medium-high heat before placing it in the oven.
- The final internal temperature after resting will be around 150 degrees Fahrenheit due to carryover cooking.
Nutrition
- Serving Size: 4 oz cooked
- Calories: 280
- Sugar: 1
- Sodium: 450
- Fat: 12
- Saturated Fat: 4
- Unsaturated Fat: 8
- Trans Fat: 0
- Carbohydrates: 1
- Fiber: 0
- Protein: 40
- Cholesterol: 95