
Sometimes you just crave that perfect, cheesy, beefy nostalgia of a classic cheeseburger, right? But when you’re focused on making healthy choices, those big bakery buns and salty patties can feel like they derail all your hard work. That’s where my **high protein cheeseburger pockets** step in to save the day! Here at Seventh Flavour, I developed this recipe specifically to bridge that gap. We take the undeniable flavor of a great burger, pack it with that lean beef power, and wrap it up tight in a portable little pocket. It’s fitness friendly comfort food that I can actually eat confidently during a busy week. Trust me, these are a game-changer for quick high protein lunch ideas because they are ready whenever you are!
- Why You Will Love These High Protein Cheeseburger Pockets
- Essential Ingredients for High Protein Cheeseburger Pockets
- Expert Tips for Perfect High Protein Cheeseburger Pockets
- Step-by-Step Instructions for High Protein Cheeseburger Pockets
- Making High Protein Grab and Go Lunches
- Serving Suggestions for Burger Flavor Pocket Recipes
- Nutritional Estimates for High Protein Cheeseburger Pockets
- Frequently Asked Questions About High Protein Cheeseburger Pockets
- Share Your Experience Making Our High Protein Cheeseburger Pockets
Why You Will Love These High Protein Cheeseburger Pockets
I know you’re busy, and that’s why this recipe became an instant favorite for so many people who follow my path. You get all the savory satisfaction but none of the greasy plate cleanup. Here’s the quick rundown on why these pockets earn a permanent spot in your meal rotation:
- Serious Protein Punch: We are using very lean ground beef, which means you get a fantastic amount of protein in every bite to keep you feeling full and support your fitness goals across the board.
- Ready in Under an Hour: Seriously! Between prepping the filling and baking, you’re looking at about 30 minutes total. That makes them perfect for healthy lunch recipes when you need something fast.
- Ultimate Portability: These are fully sealed little packages. You can toss them into a lunch bag, grab one on the way out the door, or pack them for a road trip. They are the definition of grab-and-go.
- Flavor That Delivers: We’ve managed to sneak that classic, juicy, gooey cheeseburger experience into a neat little handheld bite. You won’t feel like you’re missing out!
- Great for Meal Prep: They hold up beautifully in the fridge, making them one of the absolute best options for batch cooking come Sunday night.
Essential Ingredients for High Protein Cheeseburger Pockets
When we talk about making these pockets truly high in protein, the ingredients matter—and I mean *really* matter. I’ve tested ratios in my own kitchen for years to find the sweet spot where protein stays high but the cheeseburger flavor doesn’t disappear into blandness. Don’t even think about swapping out the meat quality here; that’s where the power comes from! If you’re looking for inspiration on other protein boosts, you might want to check out my guide on easy homemade protein bars, but for these patties, stick to the list below.
Here is exactly what you’ll need to gather up for 12 perfect pouches:
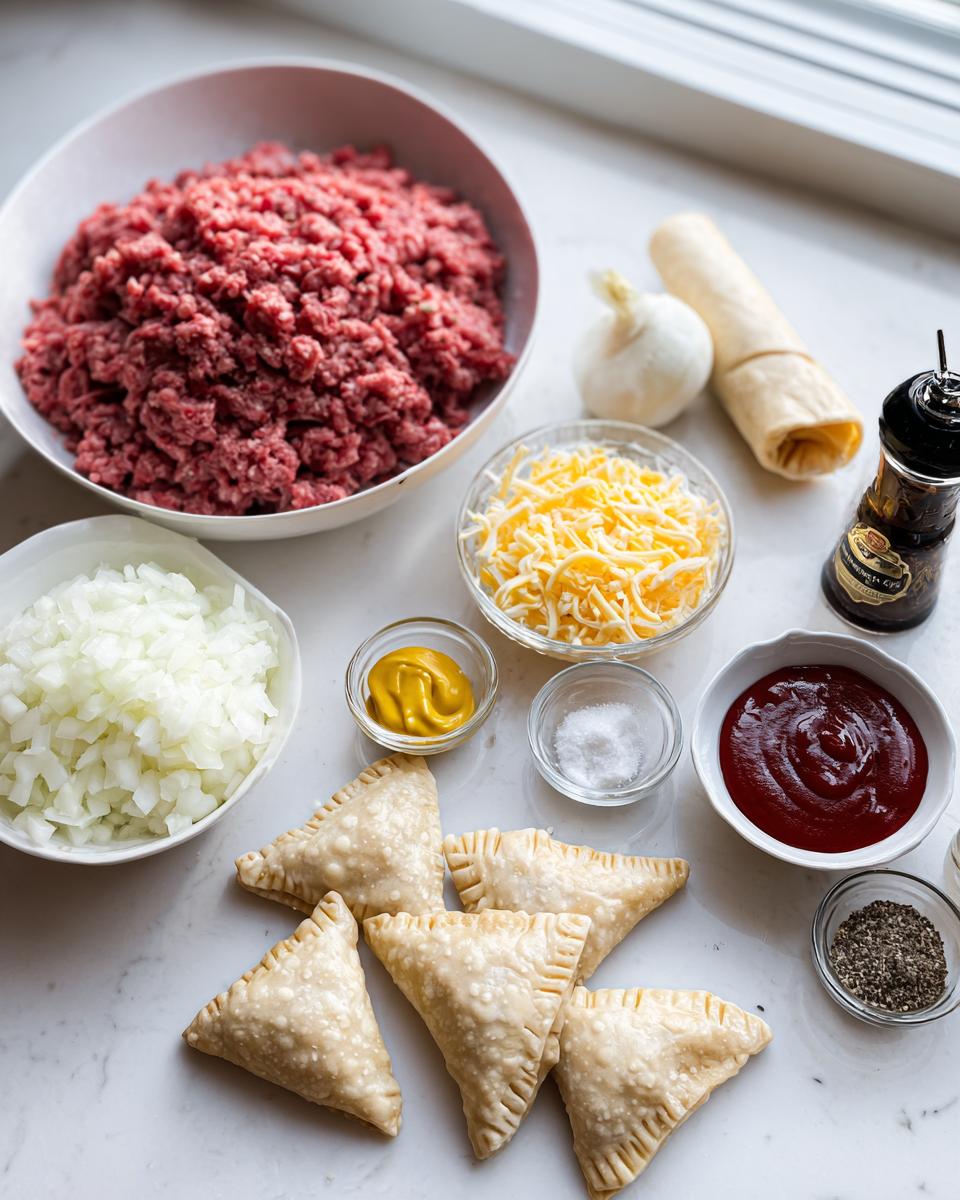
- One whole pound of seriously lean ground beef. I always insist on 93% lean or even higher—don’t skimp!
- Half a cup of finely chopped onion. We want the flavor, not big wet chunks, so dice them small!
- One teaspoon of Worcestershire sauce. This adds that indispensable savory depth.
- Half a teaspoon of garlic powder and a quarter teaspoon each of salt and black pepper. Your base seasoning team!
- One cup of shredded sharp cheddar cheese. Sharp keeps the flavor bright against the beef.
- One full 8-ounce tube of refrigerated crescent roll dough. This is the classic, fluffy carrier, but read closely in the next section for low-carb swaps!
- One large egg, beaten up really well for the egg wash—this is what gives us that gorgeous golden shine.
- A little flavor boost: one tablespoon of yellow mustard and one tablespoon of ketchup, mixed right into the meat, if you like that classic condiment vibe baked in.
Keep these elements pure, and I promise your pockets will taste just like a gourmet burger shrunk down into the perfect handheld format. It’s all about trusting the process and the quality of what you put in!
Expert Tips for Perfect High Protein Cheeseburger Pockets
Listen, I’ve learned the hard way that a cheeseburger pocket can easily turn soggy if you rush the process. We are aiming for crispy golden dough hugging a juicy interior, not a sad, steaming mess! My testing has shown that a few small habits make a huge difference in turning these pockets from good to genuinely reliable for your quick weeknight dinners rotation. The secret sauce isn’t just the seasoning; it’s managing moisture and heat!
Achieving Maximum Protein in Your High Protein Cheeseburger Pockets
If you are chasing that high protein goal, you have to be strict about the beef. That 93% lean mark—or better yet, 96%—is non-negotiable. Why? Because every ounce of extra fat you drain off is a place where protein content takes the lead in the final nutrition breakdown. Yes, cheese adds flavor (and a little protein!), but it also adds fat, so use it as a flavorful sprinkle rather than completely burying the meat mixture under a mountain of mozzarella. It’s about balance!
Dough Choices for Healthy Stuffed Dough Recipes
Most folks reach for the easily available crescent roll dough because it puffs up so wonderfully, creating that flaky exterior we all crave. However, if you’re trying to keep carbs way down—maybe aiming for those healthy stuffed dough recipes with a lower footprint—you absolutely have options. I tested this filling in low-carb tortillas cut into squares, and they work beautifully for creating those potato low carb burger pockets that seal up just as nicely. Just make sure whatever dough replacement you use is sturdy enough to handle the pre-cooked meat.
Step-by-Step Instructions for High Protein Cheeseburger Pockets
This is where the magic truly happens! Because we’re wrapping raw dough around cooked meat, precision in this sequence is key to getting that golden, flaky crust without undercooking the outside or leaving the inside cold. I’ve made this process soup-to-nuts countless times, ensuring that the reliability you need for meal prep is baked right into the instructions. Follow these steps exactly, and you’ll end up with perfectly sealed, delicious pockets every time. You can grab my favorite sauce recipe here if you decide to serve these on the side!
Preparing the Lean Ground Beef Filling
First things first, we need to handle the meat. You want to preheat your oven to 375 degrees Fahrenheit right away and get some parchment paper lined up on a baking sheet—this prevents sticking later, trust me on that one! In a medium bowl, gently mix your ground beef with the finely chopped onion, Worcestershire sauce, garlic powder, salt, pepper, and those optional flavor boosters, the mustard and ketchup, if you’re using them.
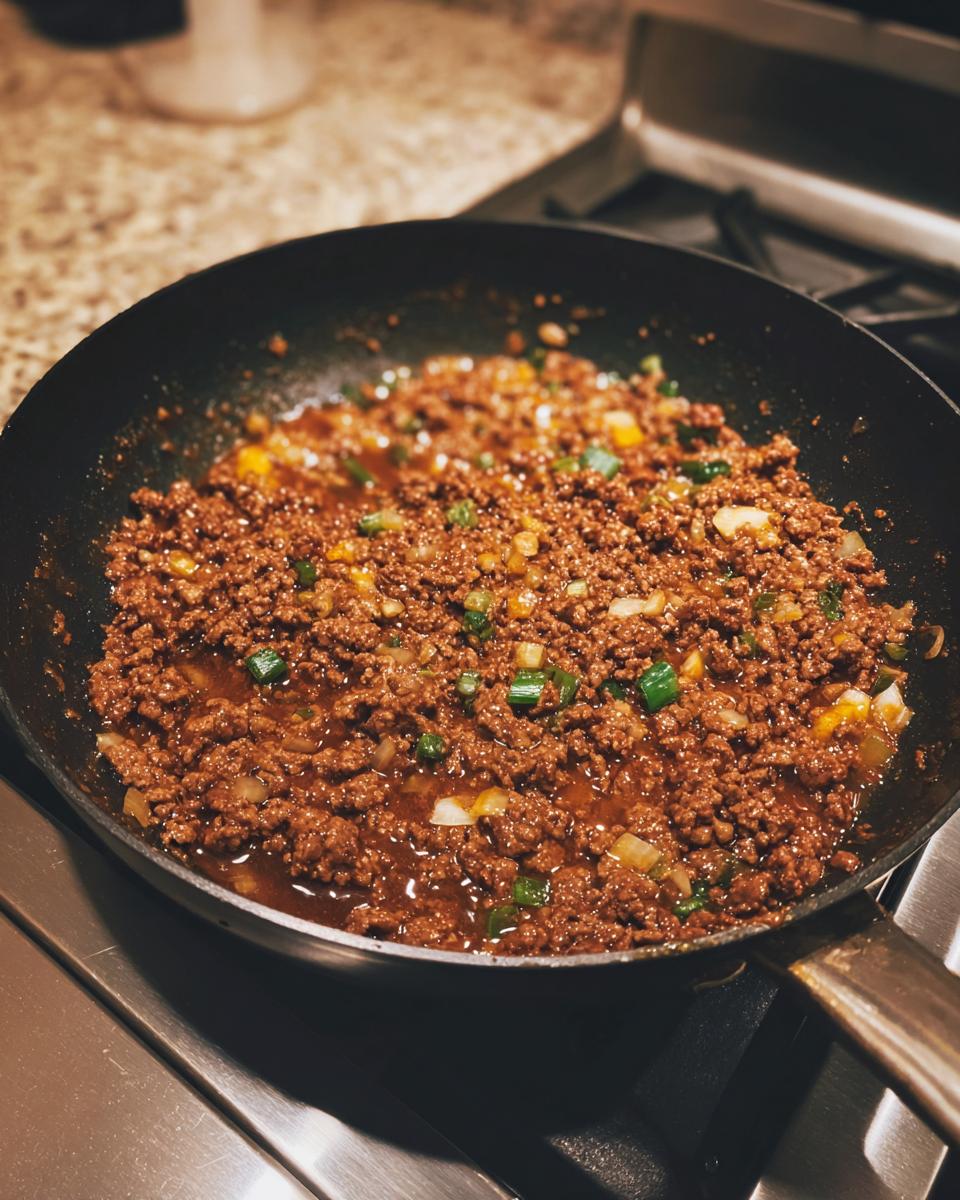
Now, cook this mixture up in a skillet over medium heat until it’s totally browned through. The absolute most important part of this step is draining off every bit of excess grease once it’s cooked. If you leave grease behind, it steams the dough from the inside, and you end up with pockets that aren’t crispy. Once drained, set that beef mixture aside for about 10 minutes to cool down a little. Hot meat melts the dough before you can seal it!
Assembling and Sealing Your Cheeseburger Hand Pies with Protein
Once the beef has cooled down enough to handle—think warm, not scorching hot—it’s time for assembly. Unroll your crescent dough and separate it into the pre-cut triangles unless you are using squares of low-carb dough, in which case, cut them evenly. Place just about two tablespoons of that cooled beef mixture onto the wider end of each dough piece. Don’t overstuff them, or they’ll burst open while baking!
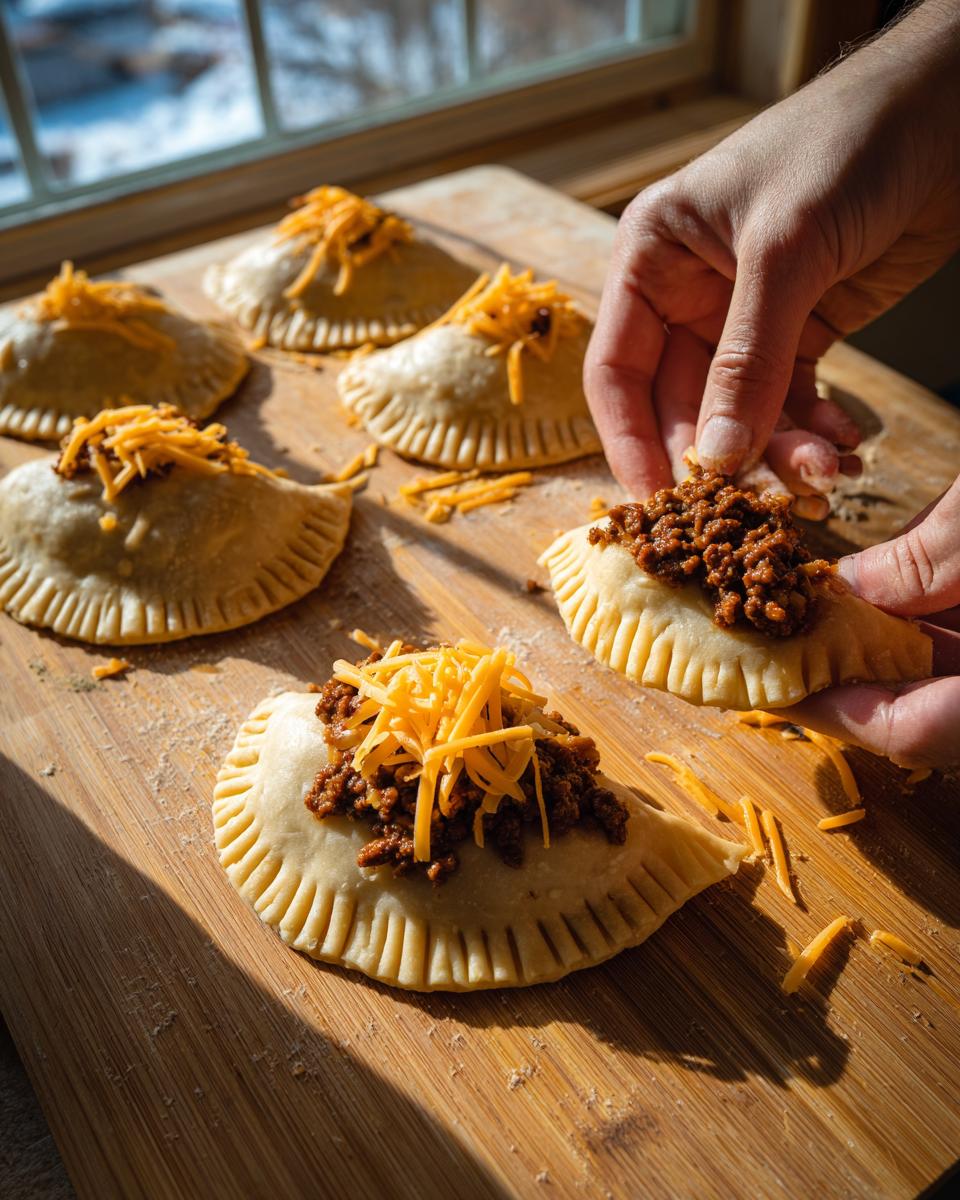
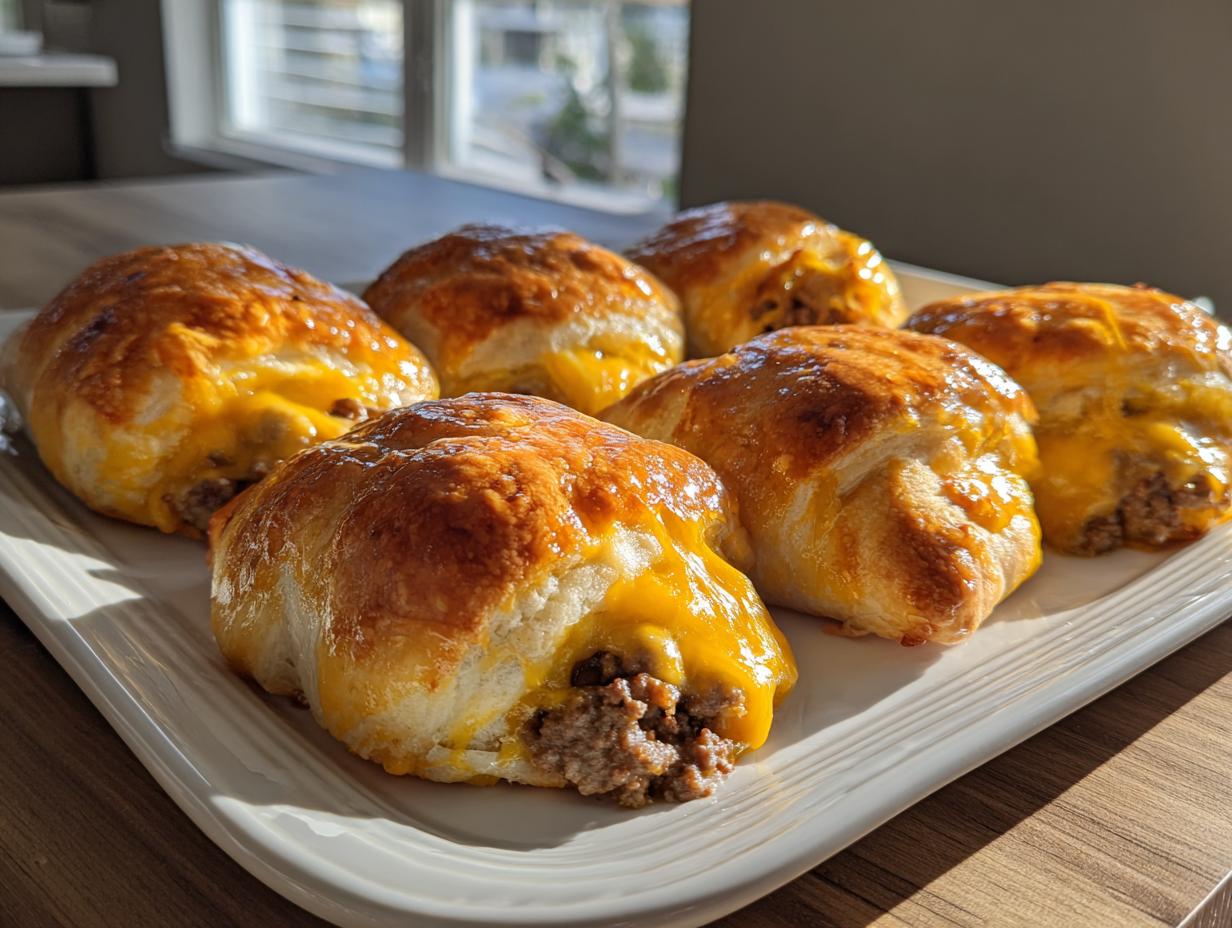
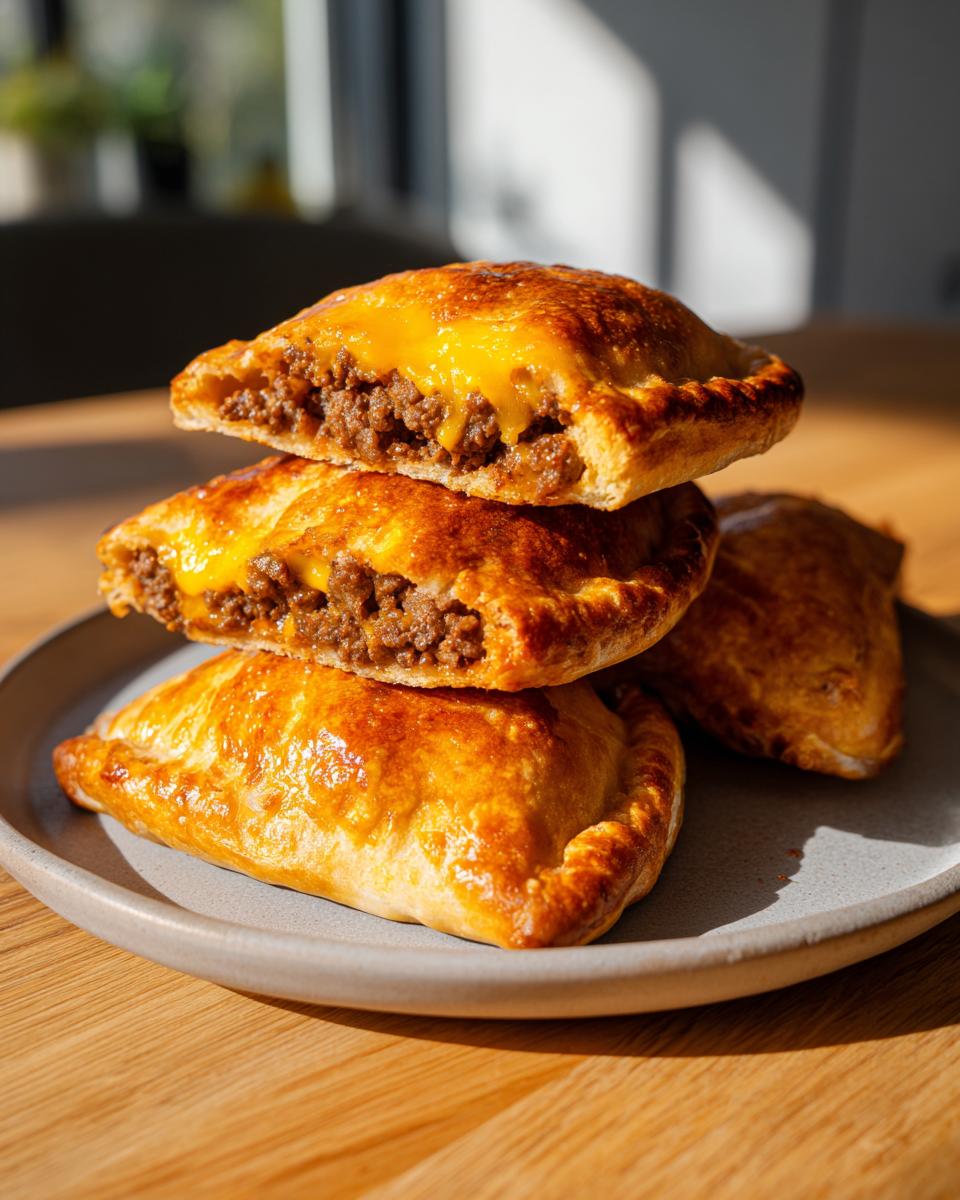
Sprinkle a small, measured amount of your sharp cheddar over the top of the meat. Now, fold that dough right over the filling to create your pocket shape—a triangle if you used crescent dough, or a sealed square. You must pinch the edges together firmly and completely! I usually do a double crimp with a fork along the entire sealed edge just to secure it. This firm seal is critical to keeping all that cheesy goodness inside. Finally, brush the tops lightly with the beaten egg wash. This is what gives your finished pockets that beautiful, bakery-quality golden color.
Making High Protein Grab and Go Lunches
If you made these pockets, you absolutely deserve an easy week ahead, right? That’s why I always make a double batch! These aren’t just great for dinner; they truly shine when you need **high protein grab and go lunches**. The beauty of wrapping that savory filling in dough is that it locks in the moisture and flavor, making them fantastic survivors in the refrigerator. You don’t want to treat them like a fresh-out-of-the-oven burger, though; they need a little refresh to truly sing.
For storage, it’s straightforward. Once the pockets have completely cooled down to room temperature—and I mean cold—stack them loosely in an airtight container. They will stay perfectly tasty in the fridge for up to three days while still keeping that high protein count you are looking for. If you’re packing them for lunch the next day, just toss them in your bag! They hold their shape surprisingly well, which answers perfectly to those searching for **quick high protein lunch ideas**.
Now, about reheating. The microwave is speedy, sure, but it turns that beautiful, flaky crust into something soft. If you have the time, I really recommend reheating these pockets in a toaster oven or a regular oven set around 325 degrees Fahrenheit for about 8 to 10 minutes. This dries out any residual steam and crisps the dough right back up, delivering that satisfying crunch we associate with the best baked burger snacks. You can find some great tips on making your own healthy healthy snack ideas for the rest of the week over on that page!
Serving Suggestions for Burger Flavor Pocket Recipes
After you pull these gorgeous **high protein cheeseburger pockets** out of the oven, your first thought might be to grab a bag of chips, right? I get it! We love those salty, crunchy sides with our burgers. But since these pockets are already packed with beef and cheese, we want to pair them with something that brightens up the plate and keeps that overall meal balanced and feeling purposeful.
In my kitchen, I always lean toward fresh veggies. If you’re doing a lean ground beef pocket meal, you want to balance that richness out. Forget the heavy fries; let’s aim for vibrant sides that enhance that savory burger flavor without adding unnecessary heaviness. This is how we keep these delicious hand pies firmly in the healthy, fitness-friendly category!
Here are a couple of my go-to pairings that work beautifully alongside these baked snacks:
- Crispy Roasted Veggies: If you’re looking for something simple but deeply satisfying, you have to try roasting broccoli or green beans until they are slightly charred. The slight char tastes amazing next to beef and cheese! I seriously love this garlic parmesan roasted broccoli recipe because it brings a salty, garlicky kick that mimics the diner experience perfectly.
- Quick Dill Pickles: Nothing screams ‘cheeseburger’ quite like that sharp, vinegary punch of a pickle. Instead of serving them on the side, try adding finely diced pickles directly into the beef mixture before sealing the dough—or just serve a few spears alongside for dipping the pocket into!
- Simple Side Salad: A light, slightly acidic salad cuts right through the richness of the cheddar. Think mixed greens tossed simply with a tiny bit of red wine vinegar, a drizzle of good olive oil, salt, and pepper. It’s quick, easy, and adds volume without adding calories.
- Unsweetened Ketchup/Mustard Dip: Even if you mixed a little sauce into the meat, having extra on the side for dipping elevates the experience. Just skip the sugary bottled stuff and aim for plain yellow mustard or a simple onion-based dip.
By keeping the sides light and bright, you allow your perfectly seasoned **lean ground beef pocket meals** to really shine as the main event!

Nutritional Estimates for High Protein Cheeseburger Pockets
Okay, let’s talk numbers. I know that when we’re making **fitness friendly comfort food recipes**, we need to be smart about what we’re fueling our bodies with. These estimates are super helpful for tracking, but keep in mind that everything changes based on exactly how much fat you manage to drain off that beef and whether you went for the standard crescent dough or tried out a low-carb wrap alternative. My testing results are based on using 93% lean ground beef, standard crescent dough, and the suggested amount of cheddar.
I always say that while these are packed with protein, they are still technically a treat because of the dough wrapper, but they are infinitely better than grabbing a fast-food burger! Think of these as a far superior option for your **meal prep high protein dinner** plans.
Here is the breakdown per one pocket (Yield: 12 pockets total):
- Calories: Around 240 (Wow, that’s low for a cheeseburger!)
- Protein: 16 grams! That is why we love these!
- Fat: 12 grams total (Remember, this heavily depends on how much grease you drain.)
- Saturated Fat: 5 grams
- Carbohydrates: 18 grams
- Sugar: Only 1 gram!
- Fiber: 1 gram
- Sodium: About 350 mg (Keep this in mind if you salt heavily!)
It’s a solid profile, especially for a satisfying snack or a **low calorie stuffed pastry** replacement. If you use low-carb wraps instead of the traditional dough, you’ll see the Carbohydrate number drop significantly, which is something to keep in mind if you are aiming for stricter macro goals. Happy tracking, and enjoy knowing you are eating something delicious and filling!
Frequently Asked Questions About High Protein Cheeseburger Pockets
I always get questions when I post these—which is fantastic because it means you guys are making them! It’s important that these **cheeseburger hand pies with protein** fit perfectly into your busy life, so here are the answers to the most common concerns I hear about substitutions, flavor customizations, and keeping them fresh for those **high protein grab and go lunches**.
Can I make these keto cheeseburger bites using alternative dough?
Absolutely, you can! This filling is robust enough to handle a **keto cheeseburger bites** conversion, no problem. If you’re keeping the carbs low, skip the crescent roll tube entirely. As I mentioned briefly before, the best bet is usually low-carb tortillas or a specialized low-carb pizza dough that you can cut into squares. Just make sure you cut them large enough to seal well around the filling. Since the dough is thinner, you might want to use a tiny bit less meat filling in each one so you don’t risk splitting during baking. I find they bake up beautifully golden and crispy!
What is the best way to store leftovers of these lean ground beef pocket meals?
This is crucial for anyone planning ahead! If you’ve made these as part of your **lean ground beef pocket meals** prep session, handling the leftovers correctly ensures they taste great later in the week. Store any cooled pockets in a single layer or with parchment paper separating the layers inside an airtight container in the refrigerator. They are perfectly safe and tasty for up to three days this way. When it comes to reheating them to stay crispy, please, please try to avoid the microwave if you can. The oven or a toaster oven at about 325°F for 8 to 10 minutes brings that dough right back to life. That little bit of dry heat is what keeps them from getting sad and soft!
If you have any other burning questions about making these the perfect **fitness friendly comfort food recipes** for your needs, don’t hesitate to reach out to me via the contact page!
Share Your Experience Making Our High Protein Cheeseburger Pockets
Alright, my friends, you’ve reached the end of the road, but this isn’t really an ending! I hope you’re heading off to the kitchen now buzzing with excitement to make these **high protein cheeseburger pockets**. This recipe has been such a lifesaver for me—a way to honor my goals without ditching the flavors I truly love. It’s all about finding that Seventh Flavour in your own baking routine!
Now that you have my tried-and-true method, I really, really want to hear what you think. Did you stick strictly to the 93% lean beef, or did you try a bolder seasoning combination because you know your family’s tastes? Did you manage to get that perfect golden seal? Good cooking is all about sharing notes!
Please take a moment to leave a rating for this recipe down below using the simple 5-star system. Five stars means it’s an instant favorite, and one star means we need to get back in the kitchen and tweak something! Also, if you made any fantastic swaps—maybe you used a different cheese or put pickles right into the filling—drop those brilliant ideas in the comments. I read every single one because that’s how we grow and make our best recipes even better together. Don’t forget to check out the About Page to learn more about how we develop these recipes!
Happy cooking, and I can’t wait to see your glorious, golden pockets!
PrintHigh Protein Cheeseburger Pockets

Make portable, high-protein cheeseburger pockets using lean ground beef wrapped in dough for a simple, satisfying meal or snack.
- Prep Time: 15 min
- Cook Time: 17 min
- Total Time: 32 min
- Yield: 12 pockets 1x
- Category: Lunch
- Method: Baking
- Cuisine: American
- Diet: Low Fat
Ingredients
- 1 pound lean ground beef (93% lean or higher)
- 1/2 cup finely chopped onion
- 1 teaspoon Worcestershire sauce
- 1/2 teaspoon garlic powder
- 1/4 teaspoon black pepper
- 1/4 teaspoon salt
- 1 cup shredded sharp cheddar cheese
- 1 (8 ounce) tube refrigerated crescent roll dough (or low-carb wrap alternative)
- 1 large egg, beaten (for egg wash)
- 1 tablespoon yellow mustard (optional, for mixing)
- 1 tablespoon ketchup (optional, for mixing)
Instructions
- Preheat your oven to 375 degrees Fahrenheit. Line a baking sheet with parchment paper.
- In a medium bowl, combine the ground beef, chopped onion, Worcestershire sauce, garlic powder, pepper, salt, mustard, and ketchup (if using). Mix gently until just combined; do not overmix.
- Cook the beef mixture in a skillet over medium heat until fully browned. Drain off any excess grease thoroughly. Let the mixture cool for 10 minutes.
- Unroll the crescent roll dough onto a clean surface. Separate the dough into the pre-cut triangles. If using a different dough, cut into 12 equal squares or circles.
- Place about 2 tablespoons of the cooled beef mixture onto the wider end of each dough triangle. Sprinkle a small amount of shredded cheddar cheese over the beef.
- Fold the dough over the filling to create a pocket or triangle shape. Pinch the edges firmly to seal. Place the sealed pockets seam-side down on the prepared baking sheet.
- Brush the tops of the pockets lightly with the beaten egg wash.
- Bake for 14 to 17 minutes, or until the dough is golden brown and cooked through.
- Remove from the oven and let cool slightly before serving.
Notes
- For a lower-carb option, substitute the crescent dough with 6 large low-carb tortillas or low-carb pizza dough cut into squares.
- You can add finely diced pickles to the beef mixture for extra cheeseburger flavor.
- These are excellent for meal prep high protein dinner plans; cool completely before storing in an airtight container in the refrigerator for up to 3 days.
Nutrition
- Serving Size: 1 pocket
- Calories: 240
- Sugar: 1
- Sodium: 350
- Fat: 12
- Saturated Fat: 5
- Unsaturated Fat: 7
- Trans Fat: 0
- Carbohydrates: 18
- Fiber: 1
- Protein: 16
- Cholesterol: 55