
Sometimes, you just need that satisfying bite of a juicy cheeseburger, but who has the time to assemble all the fixings, toast the buns, and deal with the inevitable mess? That’s where my kitchen philosophy, forged here at Seventh Flavour, really shines. We focus on that *seventh flavour*—the feeling of comfort and connection a meal brings—often by turning complex cravings into super simple, approachable tasks. This recipe for cheesy cheeseburger pockets is the ultimate answer for those moments. We are talking about a flavorful ground beef filling mixed with sharp cheddar, all tucked into flaky pastry.
I spent years as a home cook perfecting this kind of accessible brilliance, long before I left the corporate world. These pockets are the result of countless weekend kitchen tests, aiming for maximum payoff with minimum fuss. Trust me, using store-bought dough makes this a lightning-fast weeknight dinner solution, all while delivering that recognizable, craveable burger experience in a perfect, handheld package.
- Why You Will Love These Cheesy Cheeseburger Pockets
- Gathering Ingredients for Your Cheesy Ground Beef Hand Pies
- Step-by-Step Guide to Making Savory Pastry Pockets
- Tips for Perfect Cheesy Cheeseburger Pockets
- Ingredient Notes and Substitutions for Cheesy Meat Pockets
- Serving Suggestions for Game Day Burger Pockets
- Storing and Reheating Your Cheesy Cheeseburger Pockets
- Frequently Asked Questions About These Quick Dinner Pockets
- Estimated Nutritional Data for Cheesy Meat Pockets
- Share Your Cheesy Cheeseburger Pockets Creations
Why You Will Love These Cheesy Cheeseburger Pockets
When the urge for a burger hits, waiting around isn’t an option! These pockets are designed for busy weeknights or last-minute game day needs. They deliver huge satisfaction without any complicated steps. Seriously, they’re a total keeper.
-
Speed and Simplicity
We skip the fuss by using pre-made crescent roll dough. This instantly turns a standard burger recipe into fantastic Quick Dinner Pockets. You’ll be amazed how fast the assembly goes!
-
Ultimate Flavor Delivery in Cheesy Cheeseburger Pockets
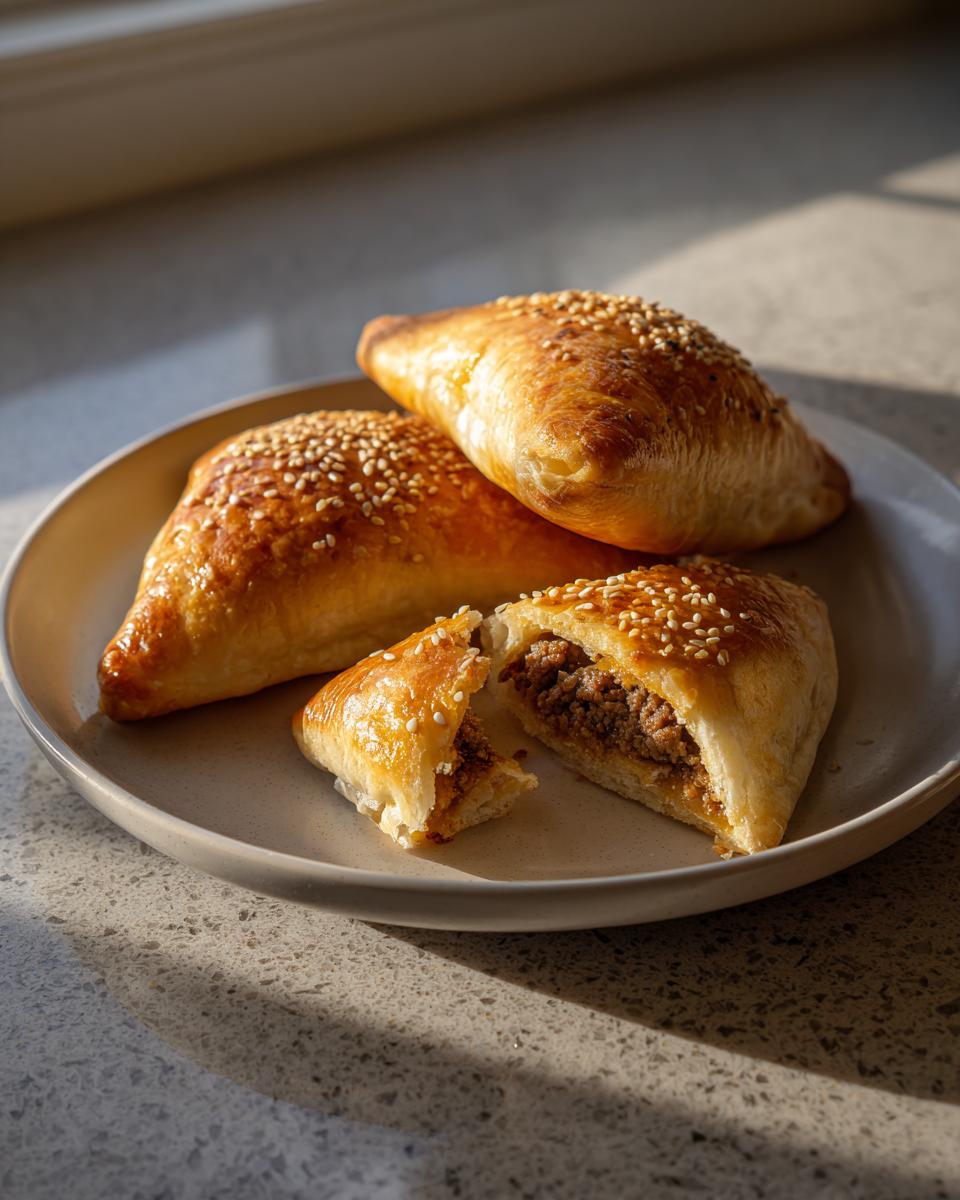
Every bite feels like sinking your teeth into a classic diner burger. The sauce blend tucked inside with that gooey, melted cheddar makes these cheesy cheeseburger pockets absolutely legendary.
Gathering Ingredients for Your Cheesy Ground Beef Hand Pies
When assembling these savory pastry pockets, the success lies in having everything chopped and ready to go. Quality ingredients really make a difference, especially when we’re trying to nail that classic burger flavor profile without the grill. Make sure you grab your favorite sharp cheddar; we need that flavor punch!
-
For the Savory Filling
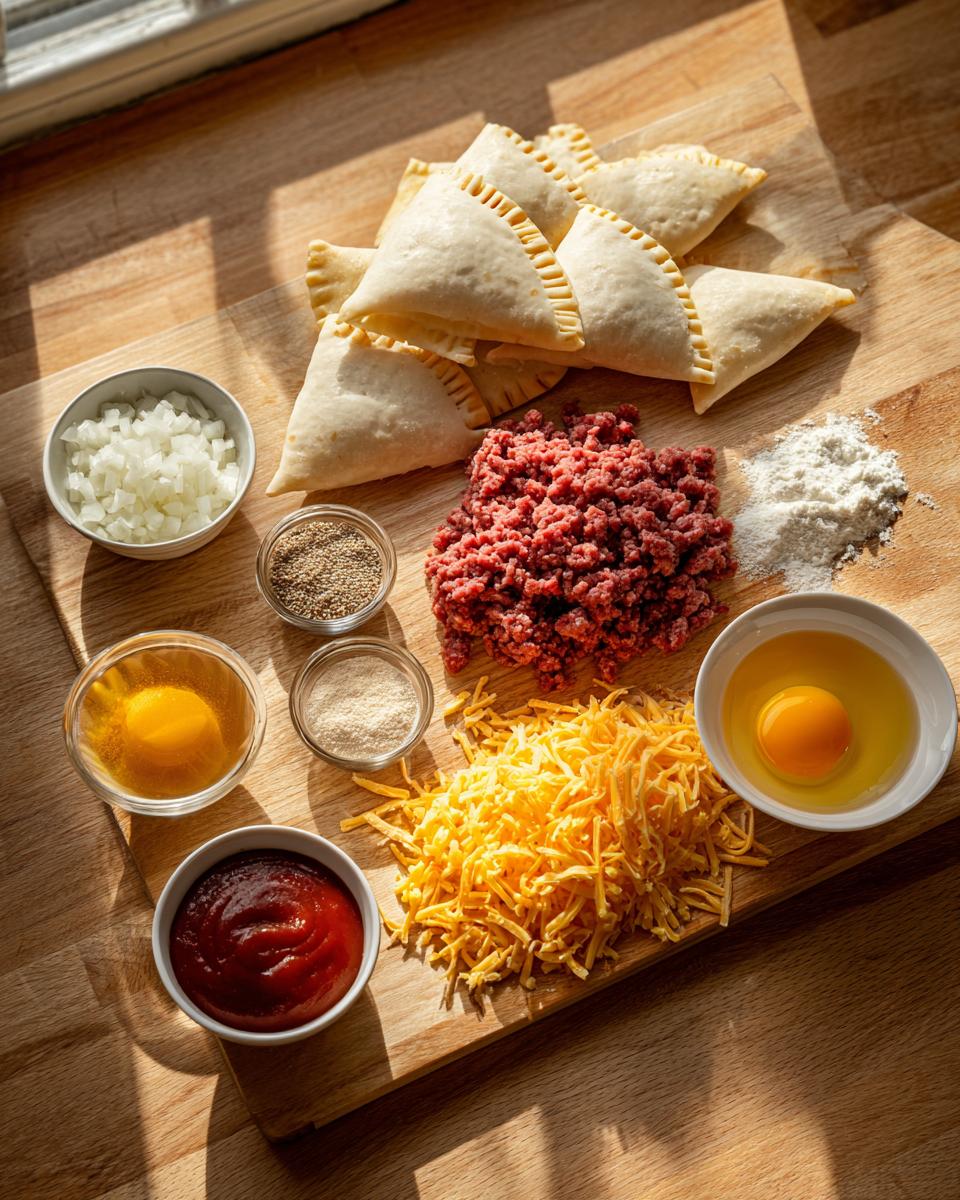
You’ll need one pound of ground beef—and listen to me, after you brown it, you absolutely must drain every last drop of grease. Nobody wants a soggy pocket, right? Finely chop one small onion and have your seasonings measured out: one teaspoon each of garlic powder and onion powder, plus salt and pepper. Don’t forget a tablespoon of Worcestershire sauce, 1/2 cup of ketchup, and 1/4 cup of classic yellow mustard. Get all your sauce components ready!
-
For the Cheesy Cheeseburger Pockets Dough
This is the real shortcut magic here: one full package (that’s eight triangular count!) of refrigerated crescent roll dough. You also need one egg, lightly beaten for our egg wash, which gives us that gorgeous golden color. If you want the full diner look, grab a tiny sprinkle of sesame seeds for the top!
Step-by-Step Guide to Making Savory Pastry Pockets
Okay, let’s get these things assembled! This process is incredibly satisfying, and honestly, it flies by. My goal here is to give you foolproof instructions so you don’t end up with cheesy leaks everywhere. We start hot, but we need a moment of cool before the sealing begins.
-
Preparing the Burger Filling Base
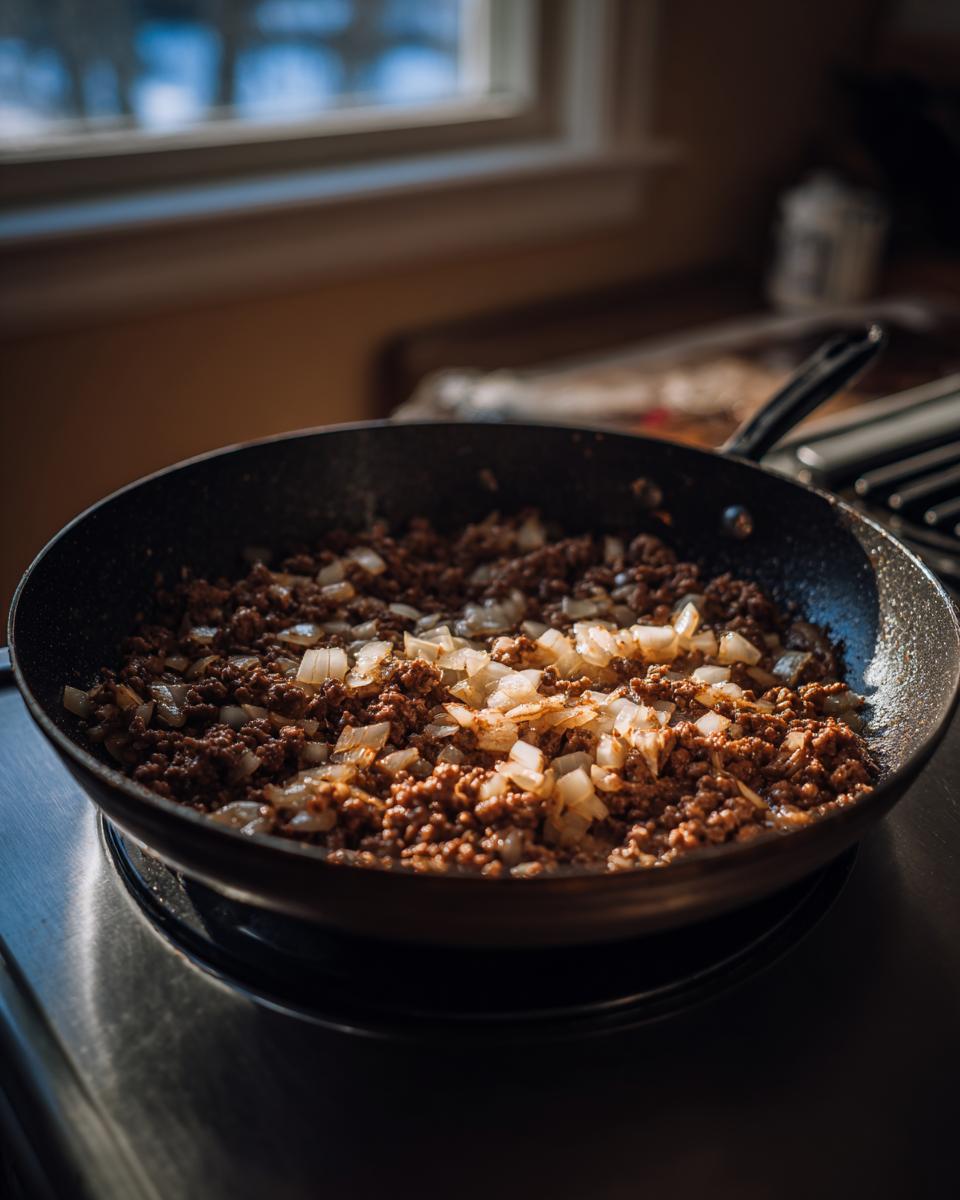
First things first: Preheat your oven to 375 degrees Fahrenheit and line a baking sheet with parchment paper. Now, grab your skillet! Brown that ground beef over medium heat. This is critical: drain OFF all that fat before moving on. Add your chopped onion right back into the skillet with the beef and cook until it gets soft, maybe four minutes. Next, toss in all your spices—garlic powder, onion powder, salt, pepper—plus the Worcestershire, ketchup, and mustard. Stir it all up and let it simmer for just two minutes so those flavors really marry. Then, take the pan OFF the heat! Let this mixture cool down for a good 10 minutes. If you add the cheese when it’s too hot, you’ll get soup instead of filling. Once it’s lukewarm, mix in that cup of sharp cheddar.
-
Assembling the Cheesy Cheeseburger Pockets
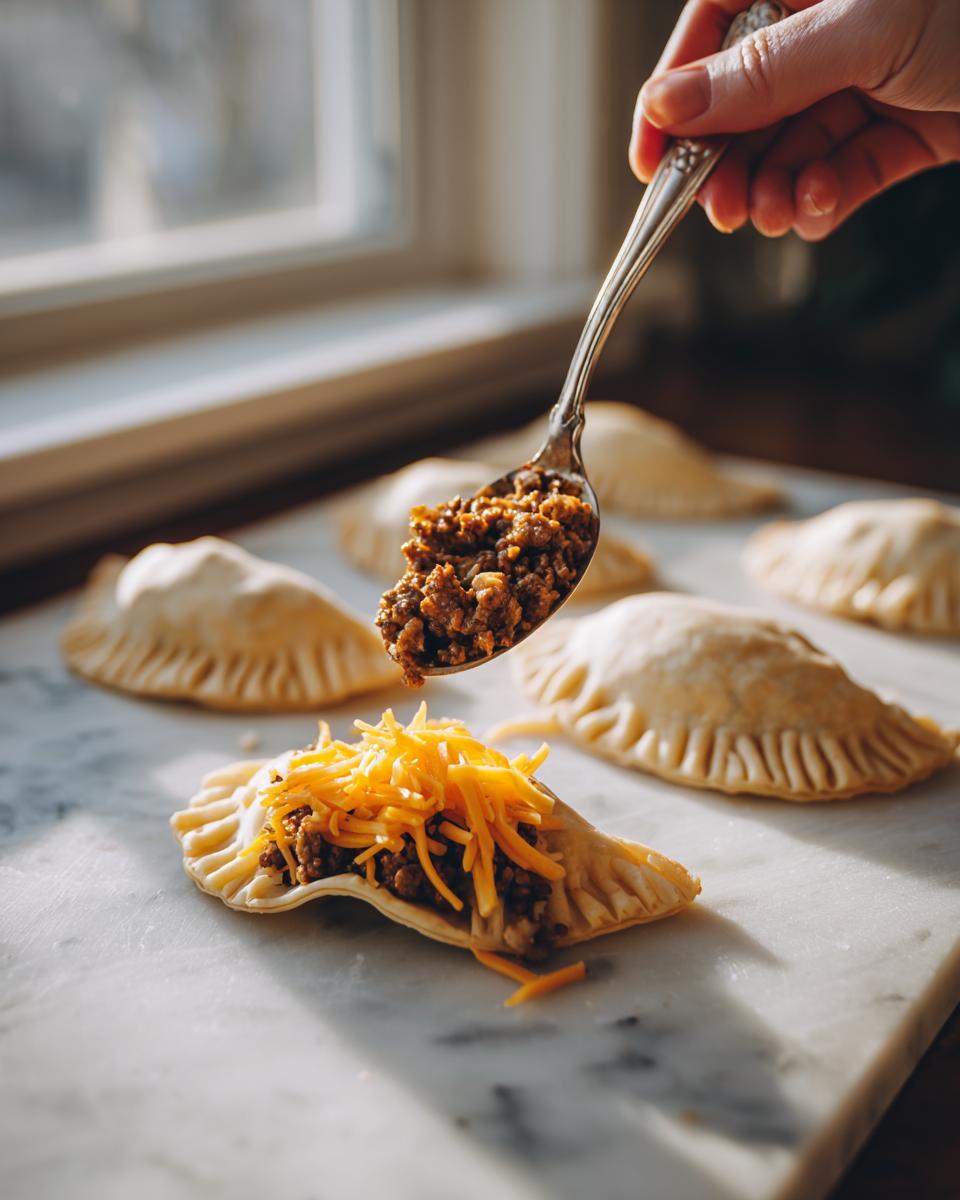
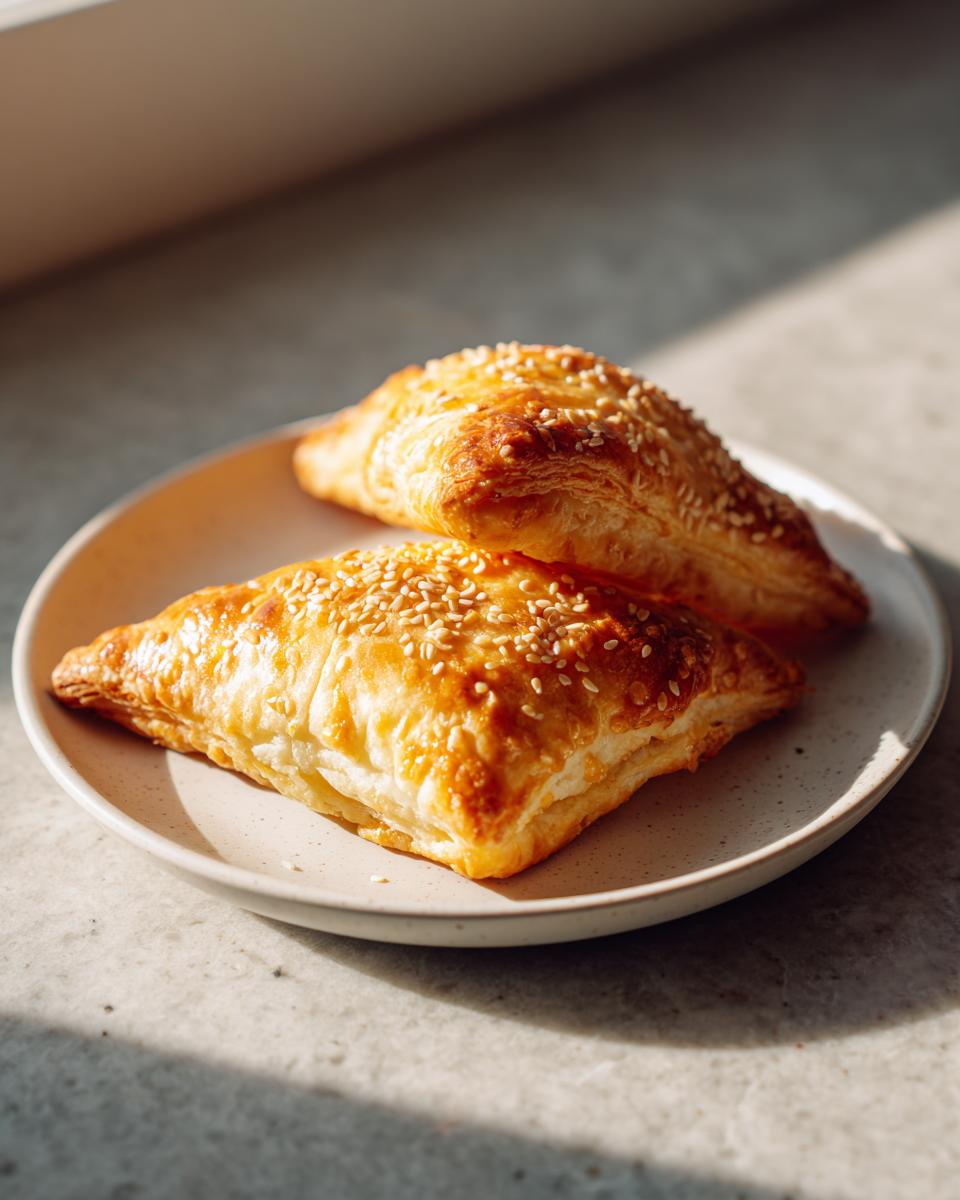
Time to roll out the dough! Unroll your crescent sheets and separate them into the 8 triangles. This shape is perfect for us. Spoon about 2 to 3 tablespoons of that wonderful, slightly cooled filling onto the wide end of each triangle. You need to leave a small border empty, so the dough has room to seal. Now, fold that dough over into a triangle shape. Really press the edges together with your fingers—firmly! Then, grab a fork and crimp those edges down hard. This step locks in all the goodness and ensures you get those beautiful, sealed Golden Brown Pocket Snacks instead of a puddle of beef!
-
Baking for the Perfect Golden Finish
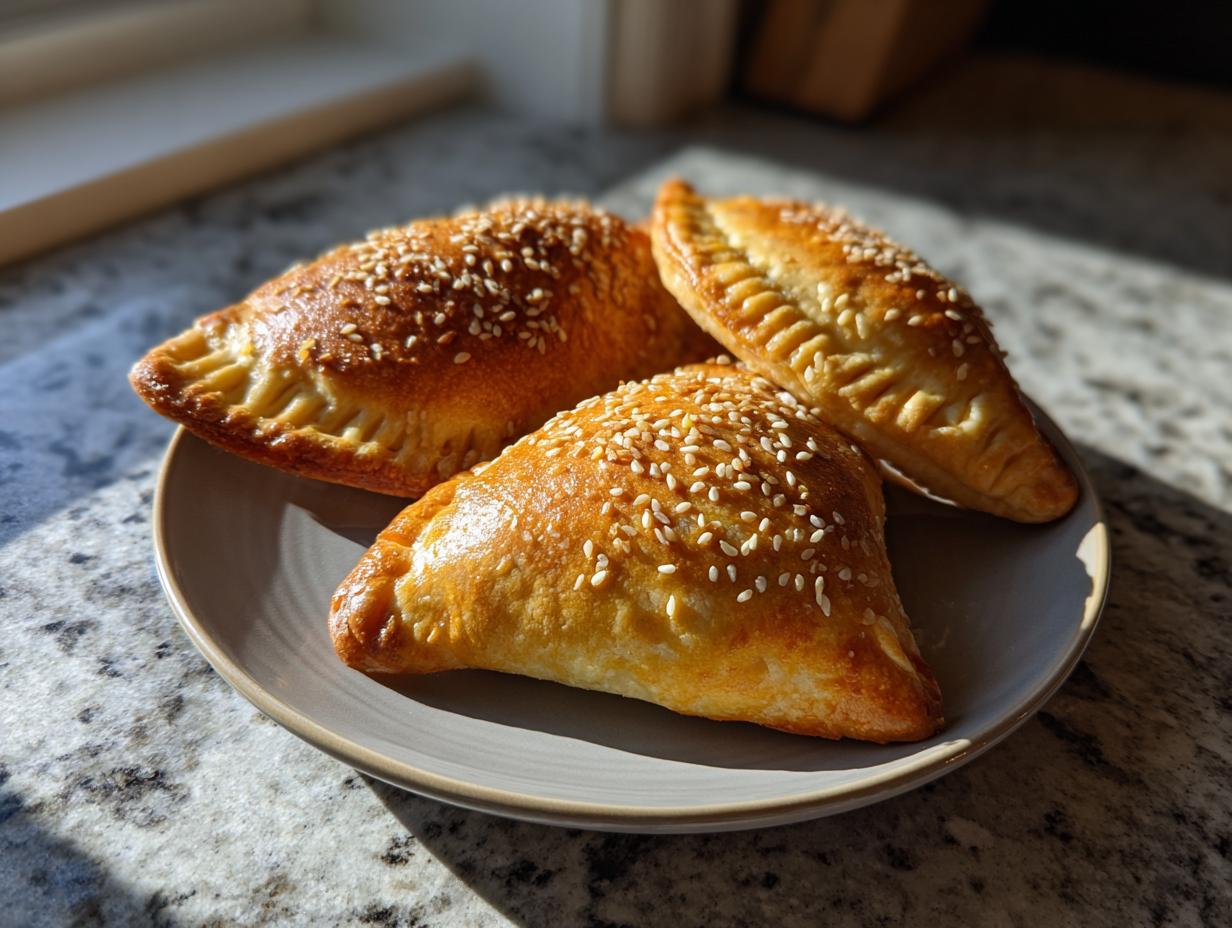
Place your sealed cheesy cheeseburger pockets onto that prepared sheet. Take your beaten egg wash and brush the tops lightly—this is what creates that rich, glossy color. If you’re feeling fancy, sprinkle on some sesame seeds now. Bake them for about 15 to 18 minutes. You’re looking for them to be puffed up and deeply golden brown. Let them rest for just a few minutes before you attack them; that cheese is lava right out of the oven!
Tips for Perfect Cheesy Cheeseburger Pockets
I’ve tested this recipe until my kitchen counter looked like a diner prep station, and I’ve picked up a few tricks to elevate these simple pockets from good to absolutely unforgettable. Don’t skip these extra details—they really make the difference between a great snack and the best cheesy cheeseburger pockets you’ve ever made.
-
Aria’s Pro Tip for Extra Zing
Okay, this is a secret weapon I often turn to! Right after you stir the cooled meat mixture and before you add the cheese, toss in 1/4 cup of finely chopped dill pickles. They bring that essential tangy kick that pickles provide on a real burger, and it just wakes up the whole filling. If you aren’t a pickle fan, a tiny dash of smoked paprika in the spice mix works wonders too. It gives it a deeper, almost grilled flavor.
-
Maximizing the Cheese Pull
Listen, if you want that glorious, stringy cheese moment that makes for the best photos (and the best eating!), you have to serve these warm. When they cool down too much, the cheese sets hard. Also, don’t skimp on the cheddar! While this recipe calls for sharp cheddar, and you should stick to it for that signature bite, make sure your cheddar is high quality. Cheap cheese melts flat and doesn’t give that satisfying pull we are looking for in our cheesy cheeseburger pockets.
Ingredient Notes and Substitutions for Cheesy Meat Pockets
I get asked all the time if we can swap things out, because let’s be real, sometimes the grocery store is just not cooperating, or maybe you have dietary preferences. That’s totally fine! The Seventh Flavour mission is about making food work for *your* life, not the other way around. While crescent roll dough is my absolute favorite for speed and that bubbly texture, we have a few easy workarounds if you don’t have it on hand for these savory pastry pockets.
If you’re out of crescent rolls, don’t panic and definitely don’t order takeout! You can use pre-made puff pastry sheets. Just cut the sheets into squares or rectangles instead of using the triangle shape, and you’ll get a flakier, almost puff-pastry turnover vibe. Another great option is refrigerated biscuit dough; just flatten those biscuits slightly before spooning the filling on. They bake up a little thicker, which is perfect if you’re planning these for a hearty kid friendly cheeseburger recipe.
What about the meat? Ground beef is the classic choice because it has the right fat content to carry all those delicious burger flavors. But if you prefer something lighter, ground turkey or ground chicken work really well too. Just know you might need to sneak in an extra little splash of Worcestershire sauce or maybe half a teaspoon of smoked paprika to boost the savory notes, since poultry tends to be milder than beef.
Remember, the filling needs to be cooled before you seal the dough, regardless of what dough you choose. If the filling is scorching hot, it steams the dough from the inside, making it gummy instead of flaky. Patience for those ten minutes while it rests will pay off big time!
Serving Suggestions for Game Day Burger Pockets
You’ve got these gorgeous, golden brown pockets bubbling hot out of the oven—now what goes with them? Honestly, these homemade cheeseburger turnovers are fantastic all on their own, especially when they are bursting with that cheesy ground beef filling. But since we are aiming for a true game day spread or a fun party appetizer setup, offering a few pairings makes them feel really special.
My absolute, number one recommendation is a homemade dipping sauce. Think about it: these are basically miniature savory pastries filled with burger goodness. A great sauce just elevates the entire experience! You can whip up a batch of my signature burger sauce—it’s tangy, creamy, and uses ingredients you likely already have. I’ve got the full recipe ready for you right here.
If you’re setting up a spread for appetizers, consider these sides to round out the platter:
- A big bowl of crispy baked sweet potato fries—the sweetness cuts through the richness of the beef perfectly.
- A huge, vibrant salad tossed with a light vinaigrette. It’s important to have something fresh next to something this hearty!
- Pickle spears! Always have pickles on hand. They offer that sharp, vinegary burst you need between bites of rich pastry.
For a true crowd-pleaser, arrange the platter with little ramekins of dipping sauce around the game day burger pockets. Everyone loves customizing their handhelds, and trust me, no one will leave your party hungry!
Storing and Reheating Your Cheesy Cheeseburger Pockets
We all know these cheesy cheeseburger pockets are best eaten piping hot with that incredible cheese pull happening live, but let’s be real—sometimes you have leftovers! And that’s okay! These savory pockets hold up really well, which makes them perfect for packing up easy lunches or having a quick snack later in the week.
The key to keeping them great is proper storage. Once they’ve cooled down completely—and I mean completely—you need to get them into an airtight container. If you try to store them warm, they’ll condense moisture inside the container, and you’ll wake up to soggy pastry the next morning, and we absolutely cannot have that!
Once airtight, they are good in the refrigerator for about three to four days. That means you can meal prep a batch on Sunday, and you’ve got satisfying lunches lined up right through Wednesday. They are delicious cold, straight from the fridge, if you’re just looking for a quick bite, but reheating them will bring back that flaky, golden crust we worked so hard for.
When it comes to reheating your leftover cheesy cheeseburger pockets, I have two foolproof methods depending on how much time you have:
For the Best Results (Crispy Crust): Ditch the microwave for this one! You want that crunch back. Pop the slightly cooled pockets onto a baking sheet—you don’t even need to grease it since they already have fat in the dough—and bake them in a preheated 350-degree oven for about 8 to 10 minutes. This revives the pastry perfectly and melts that cheddar again without drying out the beef filling.
For Super-Fast Results (The Quick Fix): If you are sprinting out the door, the microwave will work, but manage your expectations. Microwave one pocket at a time for about 30 to 45 seconds. It will soften the dough and heat the filling, but the pastry will lose its crisp texture. If you use this method, try sprinkling a few drops of water around the edge of the pocket before microwaving; sometimes that helps the dough stay a little softer rather than turning hard.
Frequently Asked Questions About These Quick Dinner Pockets
I know that when you find a fantastic new recipe, you’ve always got a battery of questions buzzing around in your head. That’s totally normal! I’ve been there myself, staring at the ingredients and trying to figure out how this little baked marvel fits into my week. I’ve gathered up the most common things folks ask about these handheld delights, so you can bake with total confidence.
-
Can I make these ahead of time using the Easy Burger Pockets Recipe?
Oh yes, that’s one of the best parts about making these! If you want to save time on a busy weeknight, you can assemble the entire thing—fill, fold, and crimp the edges—but you need to pause before the egg wash. Place the unbaked pockets carefully on the lined baking sheet, cover it loosely with plastic wrap, and pop the whole tray into the freezer. Once they are totally solid, you can transfer them to a large Ziploc bag. When you’re ready to bake, just pull them out and bake them straight from frozen! You’ll need to add about 5 to 8 minutes extra to the baking time until they are golden brown and cooked through. It’s magic, honestly.
-
What makes these Kid Friendly Cheeseburger Recipe favorites?
The handheld aspect is number one! Kids love anything they can pick up without needing a fork, and these are perfectly portioned. Plus, it’s just familiar, comforting burger flavor tucked into something fun and flaky. The biggest thing to remember for the little ones is assembling them while the beef filling is completely cool. If the filling is warm, it creates steam pockets, which can make the dough tear or bubble unevenly, leading to filling leaks. We want all that gooey cheese safely inside the dough! If you ever need ideas for totally different kinds of quick eats—maybe even the morning meal—you should check out my easy breakfast recipes for inspiration.
-
Can I bake these Homemade Cheeseburger Turnovers instead of using crescent rolls?
Absolutely! If you’re feeling ambitious and want a richer, flakier crust, feel free to go the homemade route, whether that’s using your favorite pie dough recipe or even an all-butter pastry. Just remember the filling is already cooked (and flavored!), so you’re really just using the dough to hold the heat in. The most crucial part when using homemade dough is making sure you get a very tight seal around the edges. Use a fork, press down hard, and maybe even give a double-crimp. Since homemade pastry can sometimes be a bit more delicate than the fortified crescent dough, a super tight seal is your best defense against leaks.
Estimated Nutritional Data for Cheesy Meat Pockets
I always try to give folks a general idea of what they’re eating, especially when whipping up comfort food favorites like these. Keep in mind that Seventh Flavour recipes are tested in my own kitchen with brands I love, so your results might shift slightly based on the beef fat content you choose or the brand of crescent roll dough. This data is an honest estimate based on the recipe as written.
For anyone counting macros or watching sodium, here is the breakdown per one of these handheld wonders. We’re aiming for a solid, satisfying portion!
- Serving Size: 1 pocket
- Calories: 350
- Fat: 20g (with about 9g saturated fat)
- Carbohydrates: 25g
- Protein: 18g
- Sugar: 4g
- Sodium: 550mg
- Fiber: 1g
Because we use sharp cheddar and classic condiments, the sodium is naturally a bit higher, which is sometimes just the trade-off for that intense, savory punch we crave in these cheesy meat pockets. But look at that protein count! That’s a seriously satisfying way to end a busy day.
Share Your Cheesy Cheeseburger Pockets Creations
This is where the Seventh Flavour family really comes together! I put everything I have into testing these recipes here in my own kitchen—making sure they are foolproof, delicious, and bring that little spark of joy to your table—but the real fun starts when you get to try them out!
When you bake up a batch of these incredible cheesy cheeseburger pockets, please don’t keep that golden-brown magic to yourself! I absolutely love seeing how they turn out in *your* space. Did you opt for the dill pickles inside? Did the kids decorate them with extra sesame seeds? I want to see it all!
Your feedback is genuinely what helps keep Seventh Flavour going. It lets me know which recipes are hitting the mark and helps other home cooks gain the confidence to step up to their own stoves. So please, when you finish enjoying these handheld burger bites:
- Give the recipe a rating! Five stars lets me know you loved them as much as we do.
- Snap a picture and share it on social media. Tag us so I can cheer you on!
Cooking is all about connection, and when you share your success, you’re sharing that feeling—that seventh flavour—with everyone else. Happy baking, and I can’t wait to see your amazing cheesy cheeseburger pockets!
PrintCheesy Cheeseburger Pockets Using Crescent Rolls

Make these easy, handheld cheesy ground beef hand pies for a quick dinner or game day appetizer. These savory pastry pockets use crescent roll dough for fast assembly.
- Prep Time: 15 min
- Cook Time: 18 min
- Total Time: 33 min
- Yield: 8 servings 1x
- Category: Dinner
- Method: Baking
- Cuisine: American
- Diet: Low Fat
Ingredients
- 1 pound ground beef
- 1 small onion, finely chopped
- 1 teaspoon garlic powder
- 1 teaspoon onion powder
- 1/2 teaspoon salt
- 1/4 teaspoon black pepper
- 1 tablespoon Worcestershire sauce
- 1/2 cup ketchup
- 1/4 cup yellow mustard
- 1 cup shredded sharp cheddar cheese
- 1 package (8 count) refrigerated crescent roll dough
- 1 egg, beaten (for egg wash)
- 1 teaspoon sesame seeds (optional)
Instructions
- Preheat your oven to 375 degrees Fahrenheit. Line a baking sheet with parchment paper.
- Brown the ground beef in a skillet over medium heat. Drain off any excess grease.
- Add the chopped onion to the skillet with the beef. Cook until the onion softens, about 3 to 4 minutes.
- Stir in the garlic powder, onion powder, salt, pepper, Worcestershire sauce, ketchup, and mustard. Cook for 2 minutes, stirring well to combine the flavors. Remove the skillet from the heat and let the mixture cool slightly for 10 minutes.
- Once cooled, stir the shredded cheddar cheese into the beef mixture.
- Unroll the crescent roll dough onto a clean surface. Separate the dough into 8 triangles.
- Spoon about 2 to 3 tablespoons of the cheesy burger filling onto the wider end of each dough triangle, leaving a small border around the edges.
- Fold the dough over the filling to create a triangle shape. Press the edges firmly together with your fingers to seal. Crimp the edges with a fork to make sure the seal is tight and prevent leaks.
- Place the sealed pockets onto the prepared baking sheet.
- Brush the tops of the pockets lightly with the beaten egg wash. Sprinkle with sesame seeds if you are using them.
- Bake for 15 to 18 minutes, or until the crescent roll dough is golden brown and puffed.
- Let the cheesy meat pockets cool for a few minutes before serving.
Notes
- For extra flavor, add 1/4 cup of finely chopped dill pickles to the cooled meat mixture before adding the cheese.
- If you prefer a crispier crust, you can lightly spray the tops of the pockets with cooking spray before applying the egg wash.
- These are best served warm for the maximum cheese pull effect.
Nutrition
- Serving Size: 1 pocket
- Calories: 350
- Sugar: 4
- Sodium: 550
- Fat: 20
- Saturated Fat: 9
- Unsaturated Fat: 11
- Trans Fat: 0.5
- Carbohydrates: 25
- Fiber: 1
- Protein: 18
- Cholesterol: 65