
There are days when only a rich, savory cheeseburger will do, but who has the time for grilling, melting cheese perfectly on a patty, and dealing with all those messy toppings? Trust me, I’ve been there! That’s why I’m sharing what might be my favorite shortcut: these incredible cheeseburger pockets biscuits. This recipe embodies everything Aria Sterling and Seventh Flavour stands for—taking simple, accessible ingredients and turning them into something that brings pure joy and comfort. As I realized during my time in the corporate world, cooking should be a sanctuary, not a chore. We’re skipping the fuss and diving straight into fluffy, golden pockets stuffed with all the deliciousness you expect from a classic burger. It’s proof that amazing comfort food doesn’t need hours in the kitchen to happen.
- Why You Will Love These Cheeseburger Pockets Biscuits
- Gathering Ingredients for Your Cheeseburger Pockets Biscuits
- Expert Tips for Perfect Cheeseburger Pockets Biscuits Assembly
- Step-by-Step Instructions for Baking Your Cheeseburger Pockets Biscuits
- Making the Ground Beef Filling for These Cheeseburger Pockets Biscuits
- Serving Suggestions for Your Game Day Biscuit Bites
- Storage and Reheating for Leftover Cheeseburger Pockets Biscuits
- Common Questions About Cheeseburger Pockets Biscuits
- Nutritional Estimates for Cheeseburger Pockets Biscuits
Why You Will Love These Cheeseburger Pockets Biscuits
Honestly, these little bites are game-changers when dinner needs to happen fast, or when you just want that big burger flavor in a convenient, hand-held package. They seriously check every box for quick kitchen wins. My goal here, inspired by my own rush evenings, was maximum flavor for minimum effort.
- They are lightning fast! Total time is usually under 30 minutes, making them perfect for spontaneous cravings.
- We’re using canned dough, so you get that fluffy texture with zero yeast rising time. Hello, easy biscuit recipes!
- They make fantastic kid friendly dinner ideas using biscuits—my kids devour them before I can even set out the napkins.
- These transform beautifully into quick savory hand pies or appetizers for entertaining.
- Everything you love about a cheeseburger—the beef, the cheese, the little bit of tang—is all wrapped up neatly inside!
- Cleanup is a breeze. Seriously, it’s mostly just one sheet pan.
Gathering Ingredients for Your Cheeseburger Pockets Biscuits
When you’re aiming for speed, the quality of your base ingredients really shines through. For this recipe, we rely heavily on that can of refrigerated dough because it’s just brilliant for these easy weeknight pockets. But don’t skimp on the beef or the cheese! The meat needs enough fat to stay juicy inside the sealed dough, and the cheese needs to be something that melts beautifully.
Here’s exactly what you’ll need to assemble these savory dough creations. I always lay everything out before I even turn on the stove—it keeps things tidy!
- One (16.3 ounce) can of refrigerated flaky biscuits. See? That’s our foundation right there, an amazing canned biscuit hack!
- One pound of ground beef—I lean toward 80/20 because it gives us the best flavor when baked, helping these feel like real comfort food bakes.
- About half a cup of finely chopped onion. Don’t go too large here, or you risk punching a hole in the dough during assembly!
- One teaspoon of Worcestershire sauce. This is non-negotiable for that signature umami depth!
- Spices are simple: half a teaspoon of garlic powder, plus just a quarter teaspoon each of salt and black pepper.
- One cup of shredded cheddar cheese. Sharp cheddar gives a better bite, but mild works great if you’re making these for picky eaters.
- For the sauce drizzle inside, you’ll need one tablespoon of yellow mustard, one tablespoon of ketchup, and, if you’re feeling extra, one teaspoon of pickle relish. If you want a more complex sauce, check out my favorite easy burger sauce recipe, but for these pockets, simple is best!

Expert Tips for Perfect Cheeseburger Pockets Biscuits Assembly
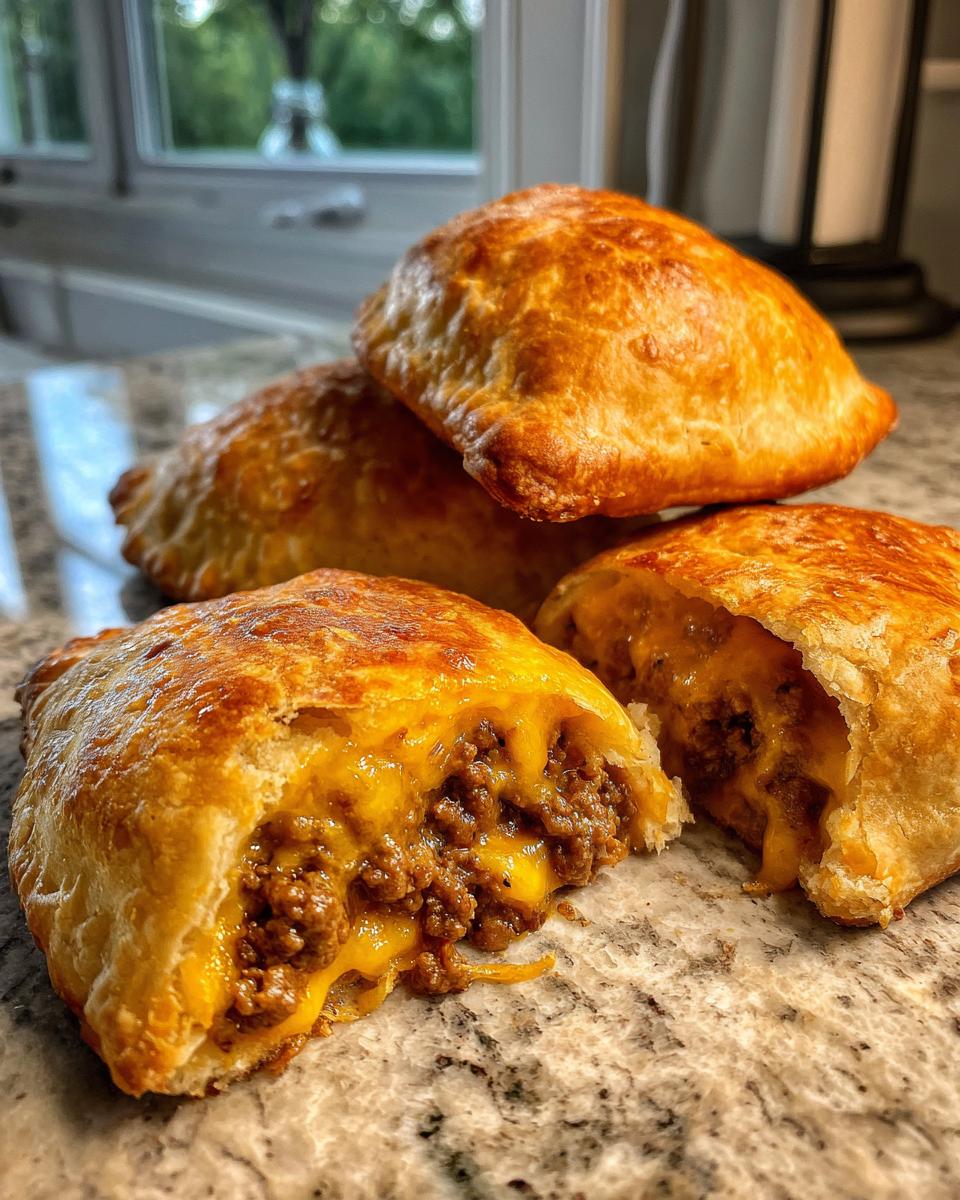
Listen, putting the filling inside is the fun part, but sealing these pockets correctly is absolutely crucial if you want to avoid a melty disaster in your oven. Nobody wants exploded cheese everywhere! As I learned watching countless batches being made, success with these stuffed biscuit snacks comes down to a little patience before you pop them in the oven. Getting the ratios right—not too much meat, not too much cheese—is key to keeping things neat. I promise, once you master the seal, these become brainlessly easy!
Flattening the Dough: Achieving the Right Thickness
Don’t just pull the biscuit apart; you really need to work with it. Take each biscuit—make sure it’s separated cleanly from the others—and gently flatten it out. I don’t use a rolling pin unless I really have to because sometimes that presses the air right out, but your hands work great. Just push it into a rough circle, aiming for about a quarter-inch thick. If you leave it too puffy, you won’t have enough dough margin to actually close the pocket later, and it’ll just tear.
Sealing the Cheeseburger Pockets Biscuits Securely
Once you have your meat, cheese, and sauce inside—and please, don’t overstuff them!—it’s time for the magic seal. Bring the two sides of the dough over the filling to form that classic half-moon shape. Now, press those edges together with your fingers as firmly as you can. I always go back over the entire seam using the tines of a fork. That fork crimp is your insurance policy against cheese blowouts. Press down hard enough that the dough binds together—it needs to be airtight because that escaping cheese burns and makes a sticky mess!
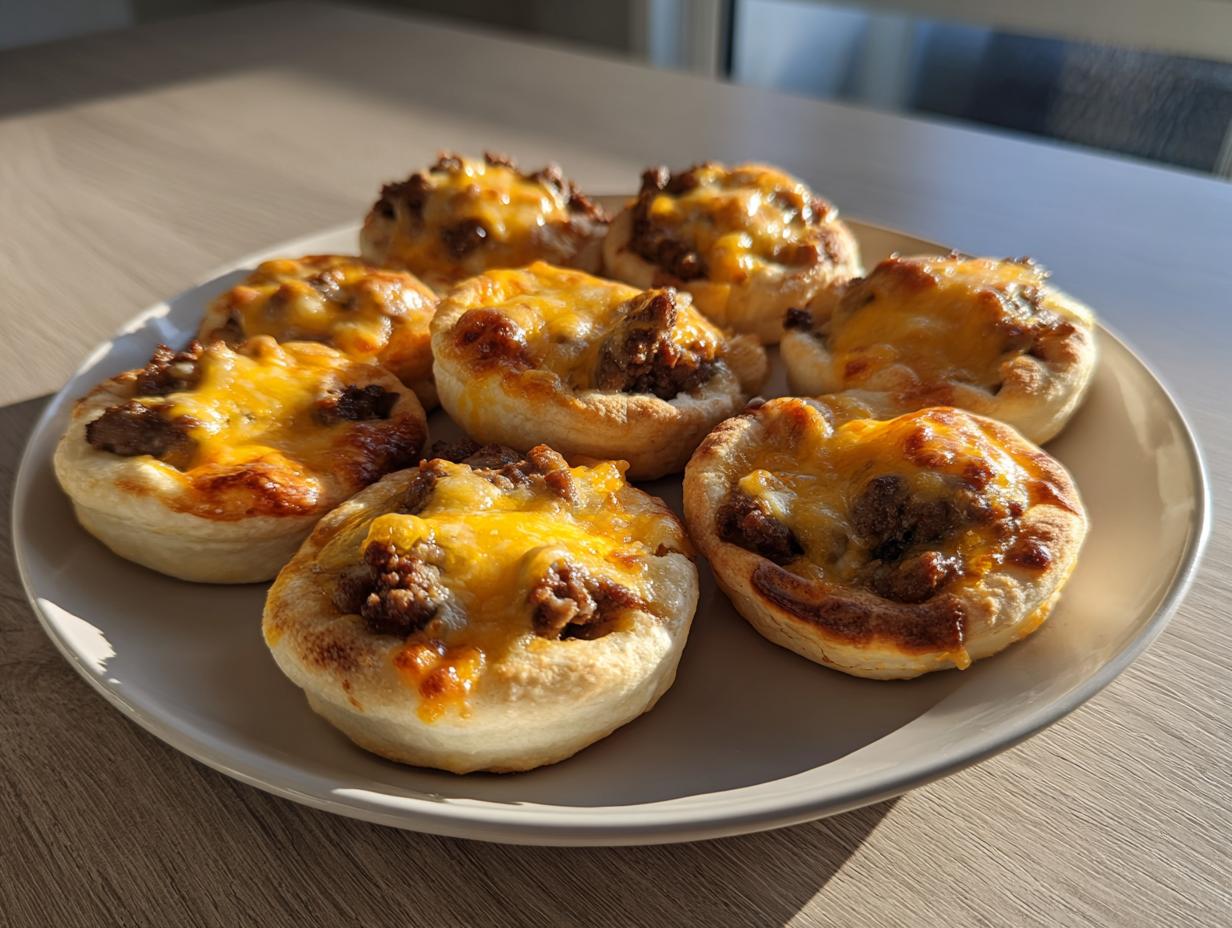
Step-by-Step Instructions for Baking Your Cheeseburger Pockets Biscuits
Okay, assembly is done, and there’s nothing more satisfying than placing those perfectly sealed pockets onto the baking sheet. We’ve done the heavy lifting with the filling, and now it’s just waiting time! Remember, the temperature and timing here are vital for getting that beautiful, fluffy texture we expect from great easy biscuit recipes rather than a dense hockey puck. Trust me, getting the oven ready first saves you so much heartache later!
Here is my straightforward method for cooking these up:
- First things first: Get that oven hot! Preheat it to 375 degrees Fahrenheit. While it’s warming up, quickly grease whatever baking sheet you are using or line it with parchment paper—your choice!
- Take your assembled cheeseburger pockets biscuits and lay them out on that prepared sheet. Make sure they have a little space so they can puff up nicely as they bake.
- Slide them gently into that hot oven. They don’t take long at all! Set your timer for 12 minutes, but be ready to check them around the 14-minute mark.
- You’re looking for that beautiful, deep golden-brown color on top. Once they look completely baked through and puffed, pull them out.
- Let them cool just for a minute on the pan before transferring them to a wire rack, or serve them right off the sheet if you can’t wait! I often brush them with a little melted butter right away for extra shine and flavor, but that’s optional!
Making the Ground Beef Filling for These Cheeseburger Pockets Biscuits
Before we get to the fun part of stuffing dough, we have to create the heart of this snack, which is, of course, the beef filling. This cooking stage is where we set ourselves up for success in keeping these pockets from getting greasy later on. If you skip draining the fat properly, you are basically inviting cheese leaks and soggy bottoms! That’s not the Seventh Flavour way, right?
This is the only part of the process that requires actual cooking, and it’s so fast. When learning how to make meat filled biscuits, remember that we are aiming for a finely textured, savory crumble that fits neatly inside the dough.
Grab a skillet, medium heat, and toss in your pound of ground beef along with that half cup of finely chopped onion. You need to cook this down until the beef is completely browned through. I mean it—no pink allowed! Once the beef is done, this next step is the most important for texture: drain off every single drop of excess grease. I tilt the pan carefully over the sink or even use a paper towel-lined strainer. Don’t leave even a teaspoon in there!
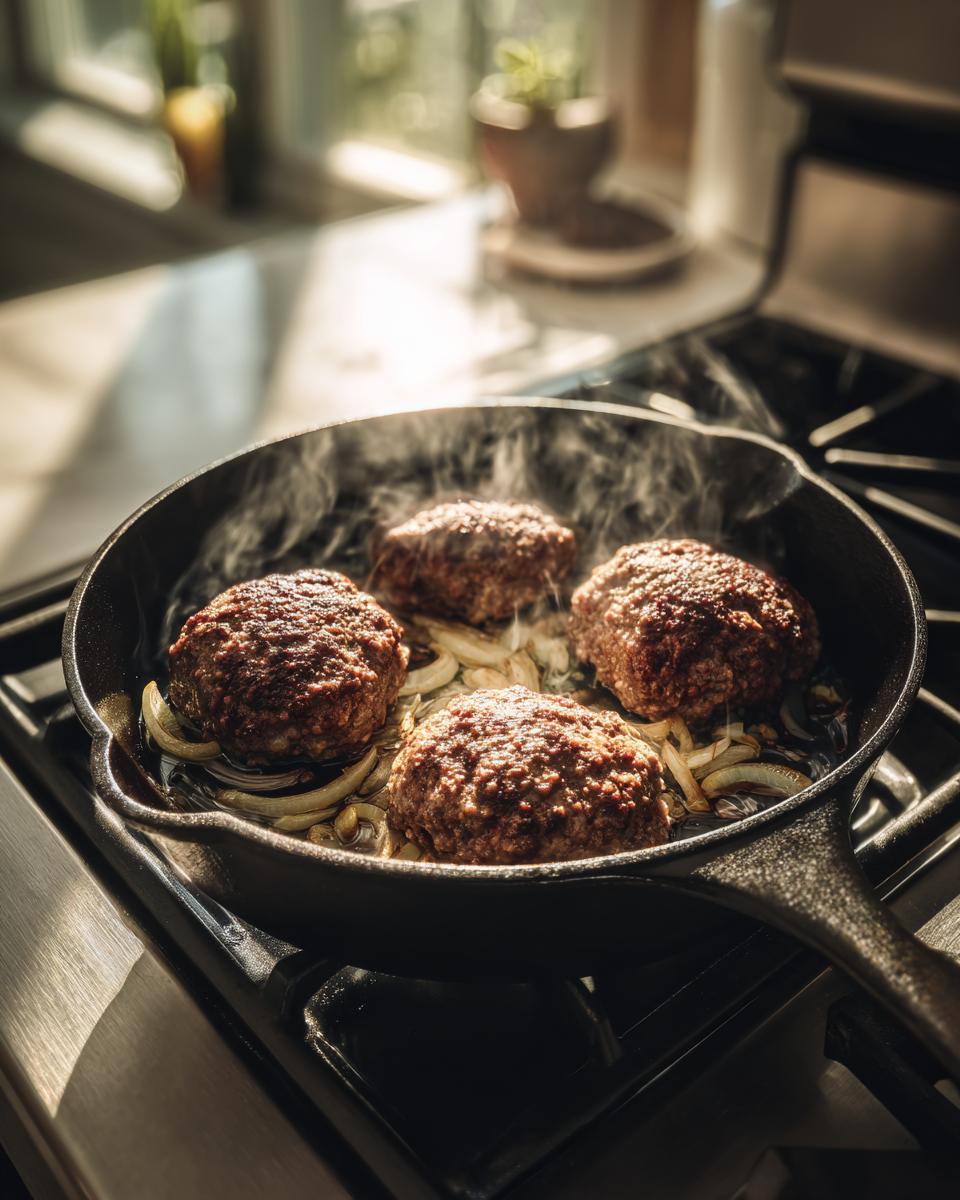
Once it’s drained, take the skillet off the heat. Now we flavor it up! Stir in the Worcestershire sauce—that adds a mysterious depth that canned biscuit dough really needs. Then, sprinkle in your garlic powder, salt, and pepper. Give it all a good mix so everything is evenly coated. Let this mixture sit and cool just slightly while you get your sauce ready. If the meat is piping hot when it hits the cold dough, it can start to melt the biscuit before you even seal it, which inevitably leads to problems later on!

Serving Suggestions for Your Game Day Biscuit Bites
So, your cheeseburger pockets biscuits are golden, hot, and smelling heavenly. Now, how do we present these amazing little handhelds? While they are absolutely perfect all on their own—truly a complete little comfort food bake—I always like to have a little something extra on the table, especially when they are being enjoyed as game day biscuit bites.
Since we’ve already packed in the meat, cheese, and sauce flavors inside, you don’t need anything heavy alongside them. Think simple dips or fresh, crunchy sides for contrast. Here are my favorite ways to serve them up:
- Classic Dippers: Offer up small bowls of extra ketchup, yellow mustard, or even a simple homemade ranch dressing. My signature burger sauce also works beautifully here if you whipped up a batch!
- Crunch Factor: A simple, crisp side salad dressed lightly in vinaigrette cuts through the richness perfectly. Or, for a theme night, serve them alongside some crunchy dill pickle spears.
- More Party Fun: If you’re hosting a gathering and serving these alongside other appetizers, you absolutely have to try my original homemade Chex Mix recipe. It’s salty, savory, and a total crowd-pleaser that contrasts nicely with the soft biscuit dough.

The beauty of these stuffed biscuit snacks is their portability. Pile them high on a platter, add toothpicks if you want, and watch them disappear! Who needs a full plate when you have these perfect little packages?
Storage and Reheating for Leftover Cheeseburger Pockets Biscuits
Let’s face it, sometimes you make a huge batch because, well, they are just too good to stop eating! And while these cheeseburger pockets biscuits are absolutely best eaten fresh out of the oven when the dough is at its fluffiest, they are still fantastic the next day. If you find yourself with extras, the thought of a soggy microwave leftover is never appealing, but don’t worry! We want to keep that biscuit texture intact.
Since this recipe uses all the meat (we don’t really have “leftover meat mixture” unless you double the recipe, which I highly recommend!), storage focuses purely on the assembled pockets. Keep them stored in an airtight container. In the refrigerator, they hold up really well for about three days; the flavors even seem to deepen overnight, much like a great casserole! This makes them an amazing solution for quick meals throughout the week. If you’re looking for more grab-and-go ideas like this, you might enjoy checking out my tips for other simple weeknight pockets.
Reheating is where you need to be mindful. Microwaving them is fast, I won’t lie, but the condensation turns that lovely outer crust soft and a bit chewy. If you want that fresh-from-the-oven snap back, the oven is your best friend. Pop the cold pockets onto a baking sheet—no need to cover them—and bake them at a slightly cooler temperature, say 325 degrees F, for about 8 to 10 minutes. This allows them to warm through gently before the outside starts to brown too heavily. They come out golden and warm, nearly as good as the first batch!
Common Questions About Cheeseburger Pockets Biscuits
It’s funny how even with the simplest recipes, folks always have a few little sticking points! That’s totally normal, especially when you’re trying to adapt a classic flavor profile into a new little package like this. I’ve answered some of the questions I hear most often about making these cheeseburger pockets biscuits so you feel totally confident heading into your kitchen. Remember, these are designed to be forgiving—that’s the whole point of using the biscuit dough!
Can I use crescent roll dough instead of the canned biscuits?
Oh, that’s a great question! You absolutely *can*, and I share a bunch of tips on how to adapt recipes for things like ground beef crescent roll recipes. However, you need to know that the texture will be different. Crescent roll dough is much thinner and flakier, and it often has a slightly sweeter taste profile. If you use crescent rolls, you’ll need to use a little less filling because the dough is harder to fold completely over without tearing. You might also get more cheese leakage because it seals a bit less robustly than the thick, fluffy biscuit dough. If you want something super light, go for the crescent rolls! If you want that fluffy, bread-like casing, stick with the biscuits.
I want more classic burger toppings inside—can I add pickle slices or raw onion?
That’s where you get into the fun territory of making these your own little creation! When it comes to raw elements like onion or pickles, you have to be careful about moisture. Raw onion releases water when heated, which can soften your biscuit bottom. If you want raw onion crunch, chop it *super* fine—almost like a paste—and use very little. As for pickles, fresh pickle slices are a little too wet for these sealed pockets. I use pickle relish in the sauce because it’s finely chopped and dispersed, giving you that tang without soaking the dough. If you must have a pickle chip? Dry it thoroughly on a paper towel first, and place it right next to the meat, away from the dough edges!
Help! How do I guarantee the cheese doesn’t leak out like lava?
Ah, the eternal stuffing struggle! This is the most common issue with any sort of savory dough creation. The main reason cheese leaks is twofold: overstuffing or an inadequate seal. First, look at your meat-to-dough ratio. You only need about a tablespoon of meat filling. Second, you must press those edges together like you mean it. Don’t just gently touch them; squeeze them hard so they fuse. Then, grab that fork and really crimp that edge—that decorative crimp is honestly your best defense system against cheese escape! If you see even a tiny gap, reinforce it by pinching it closed again before baking. That secure seal is what keeps all that deliciousness inside your cheeseburger bombs recipe.
Can I freeze the assembled, unbaked pockets?
Yes, you can! Freezing these assembled bites is a fantastic time-saver for future snacking. Once you’ve sealed your stuffed biscuit snacks, lay them out on a baking sheet lined with parchment paper—make sure they aren’t touching!—and pop that whole sheet into the freezer until they are frozen solid. Then, transfer the frozen pockets into a freezer-safe bag for up to three months. When you’re ready to bake them, pull out as many as you need. You’ll need to add about 5 to 10 minutes to the standard baking time since you’re starting from frozen, and really check that they are cooked all the way through before serving them up.
Nutritional Estimates for Cheeseburger Pockets Biscuits
I always feel a *little* bit guilty sharing recipes that taste this incredibly comforting, but hey, that’s why we preach balance here at Seventh Flavour! Knowledge is power, so it’s good to have a general idea of what’s inside these satisfying little bites. Remember, these numbers are just estimates, and they can change wildly based on the fat content of your ground beef or the brand of biscuits you choose. I always suggest you check the labels on your cans if you are tracking things super closely!
These estimates are calculated based on yielding 8 perfectly sized pocket servings, which means you get a decent portion of protein and fat to keep you full, making these truly excellent simple baked sliders when you need something hearty.
- Serving Size: 1 pocket
- Calories: Approximately 350 per pocket
- Fat: Around 20g (Note: This includes saturated fats from the cheese and beef, which is why draining the grease is so important!)
- Carbohydrates: About 25g
- Protein: Near 18g
- Sugar: Very low, around 2g
- Sodium: This is the highest measurement, hovering near 650mg, primarily coming from the pre-seasoned dough and the cheese.
- Fiber: About 1g
Because we are cooking with pre-made dough and processed cheese, the sodium is higher than if we made everything totally from scratch. But when you’re chasing that ultimate flavor shortcut—and enjoying these as a fun, kid friendly dinner idea—it’s a trade-off lots of us are happy to make sometimes! Enjoy them warm, and don’t sweat the small numbers too much; the joy they bring is the real Seventh Flavour here.
PrintQuick Cheeseburger Pockets Biscuits

Make these easy cheeseburger pockets using canned biscuit dough for a fast, satisfying snack or dinner. They are simple to assemble and bake up fluffy.
- Prep Time: 15 min
- Cook Time: 15 min
- Total Time: 30 min
- Yield: 8 servings 1x
- Category: Dinner
- Method: Baking
- Cuisine: American
- Diet: Vegetarian
Ingredients
- 1 (16.3 ounce) can refrigerated flaky biscuits
- 1 pound ground beef
- 1/2 cup finely chopped onion
- 1 teaspoon Worcestershire sauce
- 1/2 teaspoon garlic powder
- 1/4 teaspoon salt
- 1/4 teaspoon black pepper
- 1 cup shredded cheddar cheese
- 1 tablespoon yellow mustard
- 1 tablespoon ketchup
- 1 teaspoon pickle relish (optional)
Instructions
- Preheat your oven to 375 degrees Fahrenheit. Lightly grease a baking sheet.
- Cook the ground beef and chopped onion in a skillet over medium heat until the beef is fully browned. Drain off any excess grease.
- Stir the Worcestershire sauce, garlic powder, salt, and pepper into the cooked meat mixture. Remove from heat.
- In a small bowl, mix the mustard, ketchup, and pickle relish to create a simple sauce.
- Open the can of biscuits. Separate the biscuits and flatten each one slightly with your fingers or a rolling pin.
- Place about 1 tablespoon of the meat mixture onto the center of each flattened biscuit.
- Top the meat with a small amount of the cheese and a small drizzle of the sauce mixture.
- Fold the biscuit dough over the filling to create a half-moon shape. Press the edges firmly together to seal the pocket completely. You can crimp the edges with a fork for extra security.
- Place the sealed cheeseburger pockets biscuits onto the prepared baking sheet.
- Bake for 12 to 15 minutes, or until the biscuits are golden brown and cooked through.
- Serve warm as a game day biscuit bite or easy weeknight pocket.
Notes
- For extra flavor, brush the tops of the baked pockets with melted butter before serving.
- If you prefer, you can use ground turkey instead of ground beef for a lighter option.
- If cheese leaks out during baking, it means the seal was not tight enough; press harder next time.
Nutrition
- Serving Size: 1 pocket
- Calories: 350
- Sugar: 2
- Sodium: 650
- Fat: 20
- Saturated Fat: 9
- Unsaturated Fat: 11
- Trans Fat: 0.5
- Carbohydrates: 25
- Fiber: 1
- Protein: 18
- Cholesterol: 60