
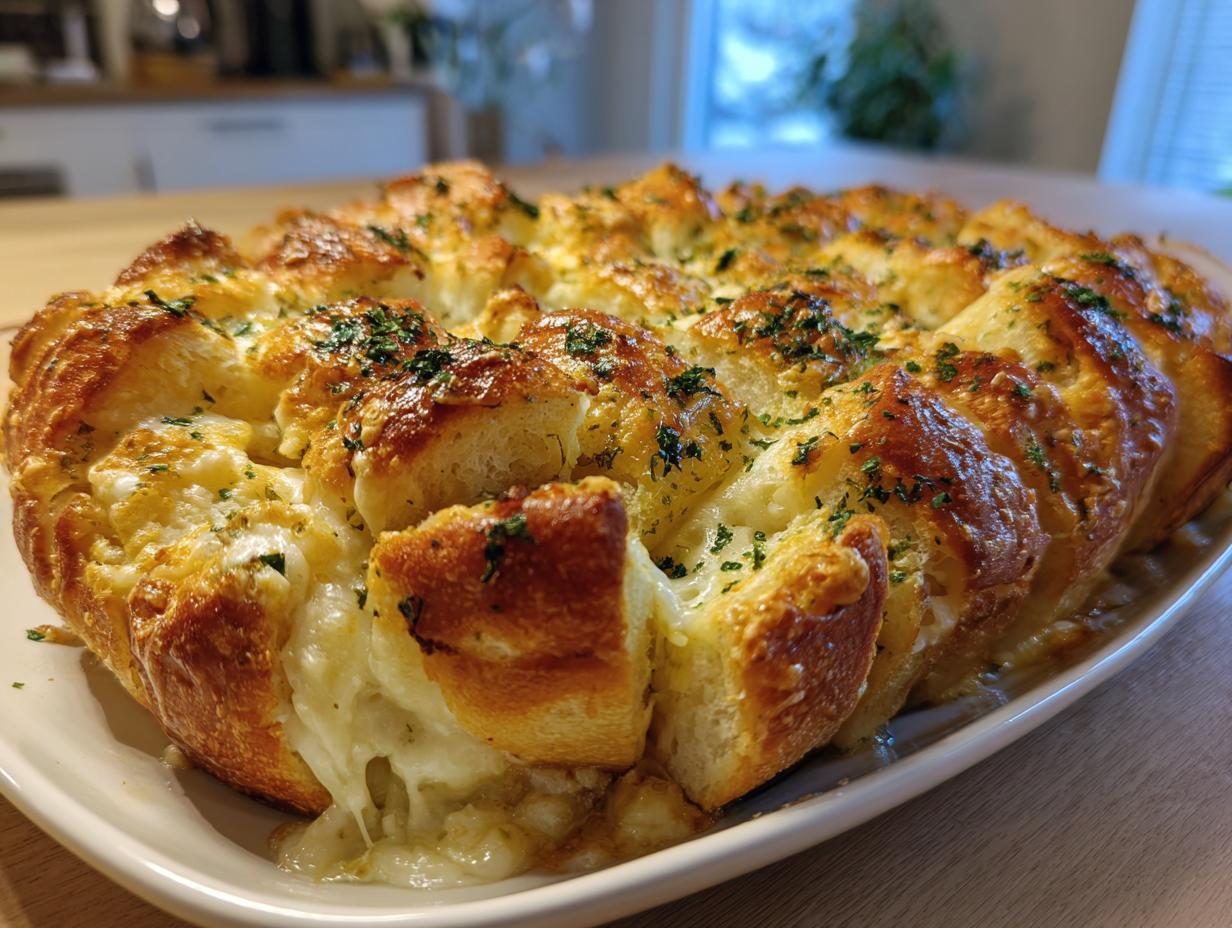
There’s just something about pulling apart warm, buttery bread overflowing with melted cheese that instantly screams ‘comfort,’ isn’t there? Forget fussy dinner rolls; when I want true indulgence on the table fast, I reach for this Ultimate Cheesy Garlic Pull-Apart Bread. My passion here at Seventh Flavour is making reliable, accessible recipes that work every single time, and this spectacular cheese bread is proof of that. It’s rich, savory, and utterly addictive, making it the perfect party appetizer or side dish for those nights when only something gloriously gooey will do. If you love this flavor profile, you might also want to check out my secret formula for the perfect homemade garlic butter to upgrade any dish!
- Why This Pull Apart Cheese Bread Recipe Delivers Comfort
- Ingredients for the Ultimate Cheese Bread
- Step-by-Step: Making Your Homemade Cheese Bread
- Expert Tips for Perfect Cheesy Garlic Bread
- Variations for Your Cheese Bread Loaf
- Serving Suggestions for This Warm Cheesy Appetizer
- Storage and Reheating Instructions for Leftover Cheese Bread
- Frequently Asked Questions About Cheese Bread
- Share Your Seventh Flavour Cheese Bread Creations
Why This Pull Apart Cheese Bread Recipe Delivers Comfort
I developed this style of cheese bread because I truly believe that amazing appetizers shouldn’t require a whole afternoon in the kitchen. This loaf is pure comfort food disguised as a brilliant party savior. It’s designed to look dramatic but come together with shocking ease. Trust me, when this comes out of the oven, everyone will immediately gravitate towards it!
- When you are looking for a warm cheesy appetizer that satisfies immediately, this is the one.
- The unique preparation method ensures maximum butter and cheese penetration in every single slice, guaranteeing flavor throughout.
- The combination of bread crust, soft interior, and melted dairy results in a savory loaf that feels deeply satisfying.
Quick Cheesy Bread Preparation
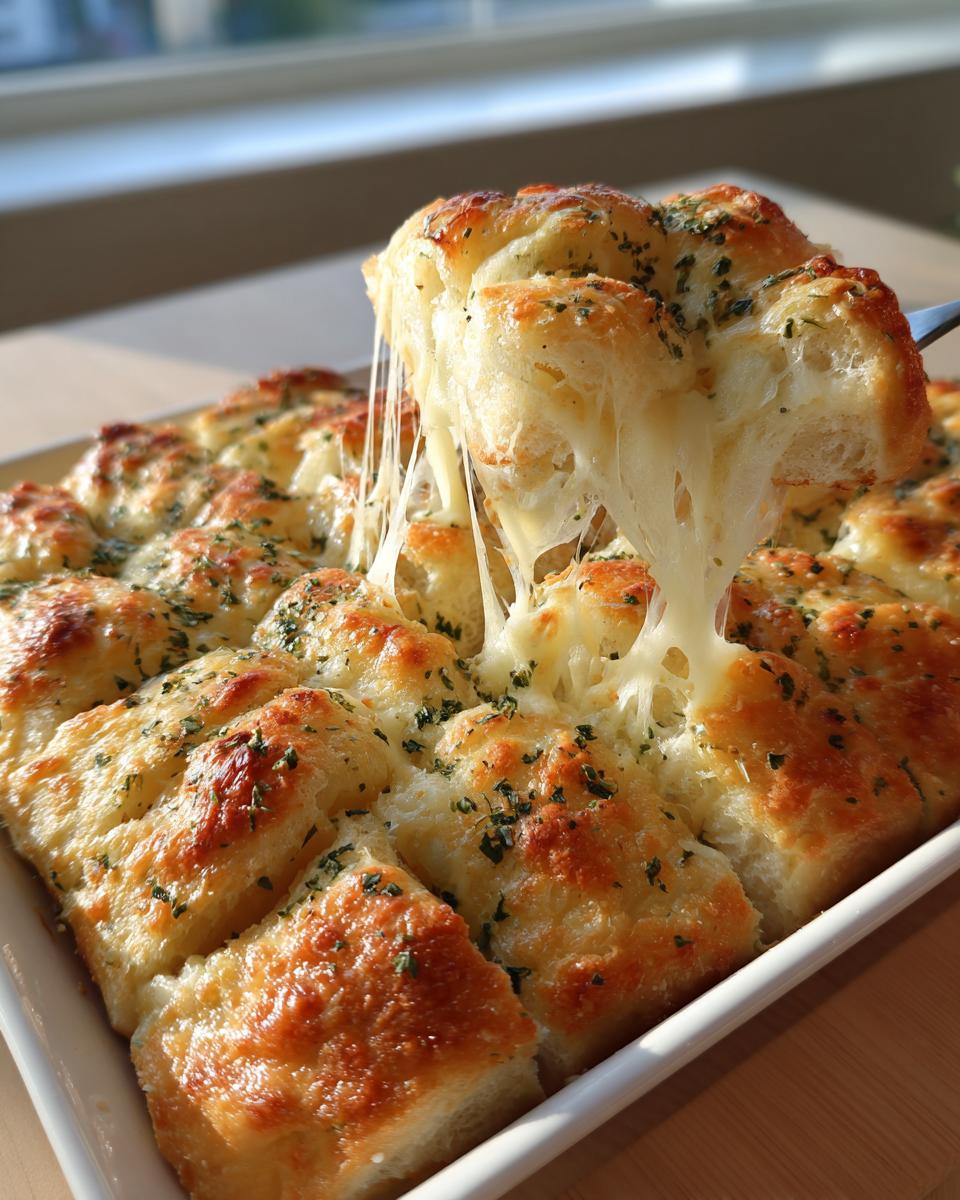
You’re looking at just ten minutes of prep time here. Seriously! The secret is scoring the bread—you just use a sharp knife to make deep crisscross cuts almost all the way to the bottom crust. This creates little pockets for the garlic butter and cheese to seep into. It’s a visual shortcut that tastes like you spent hours on it.
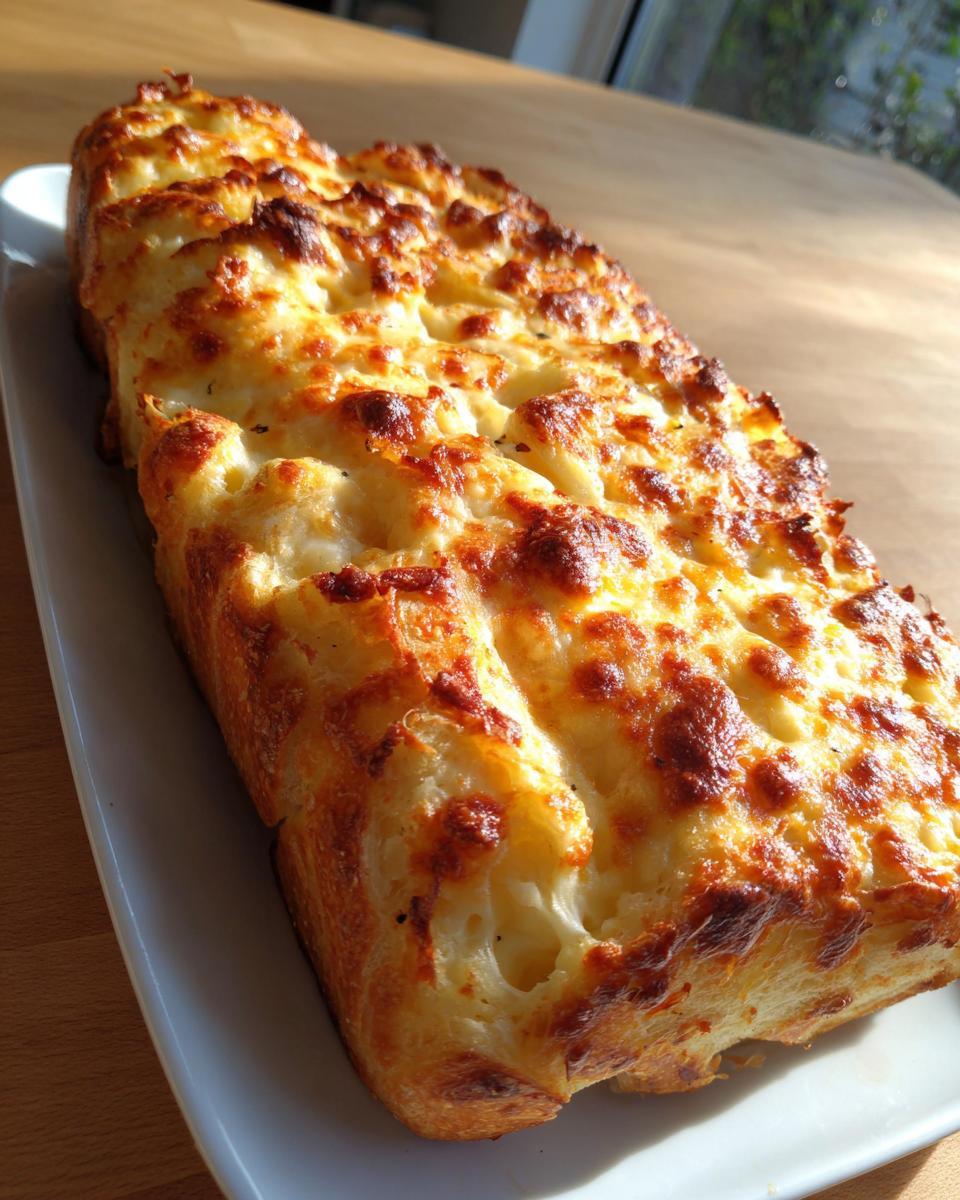
The Gooey Cheese Bread Factor
You can’t skimp on the cheese here, friends. For that ultimate stretch and pull, I always recommend mixing creamy mozzarella with sharp cheddar. The mozzarella gives you that incredible pull, and the cheddar brings the necessary, delicious, savory tang. That perfect mix is what makes this recipe the king of gooey cheese bread.
Ingredients for the Ultimate Cheese Bread
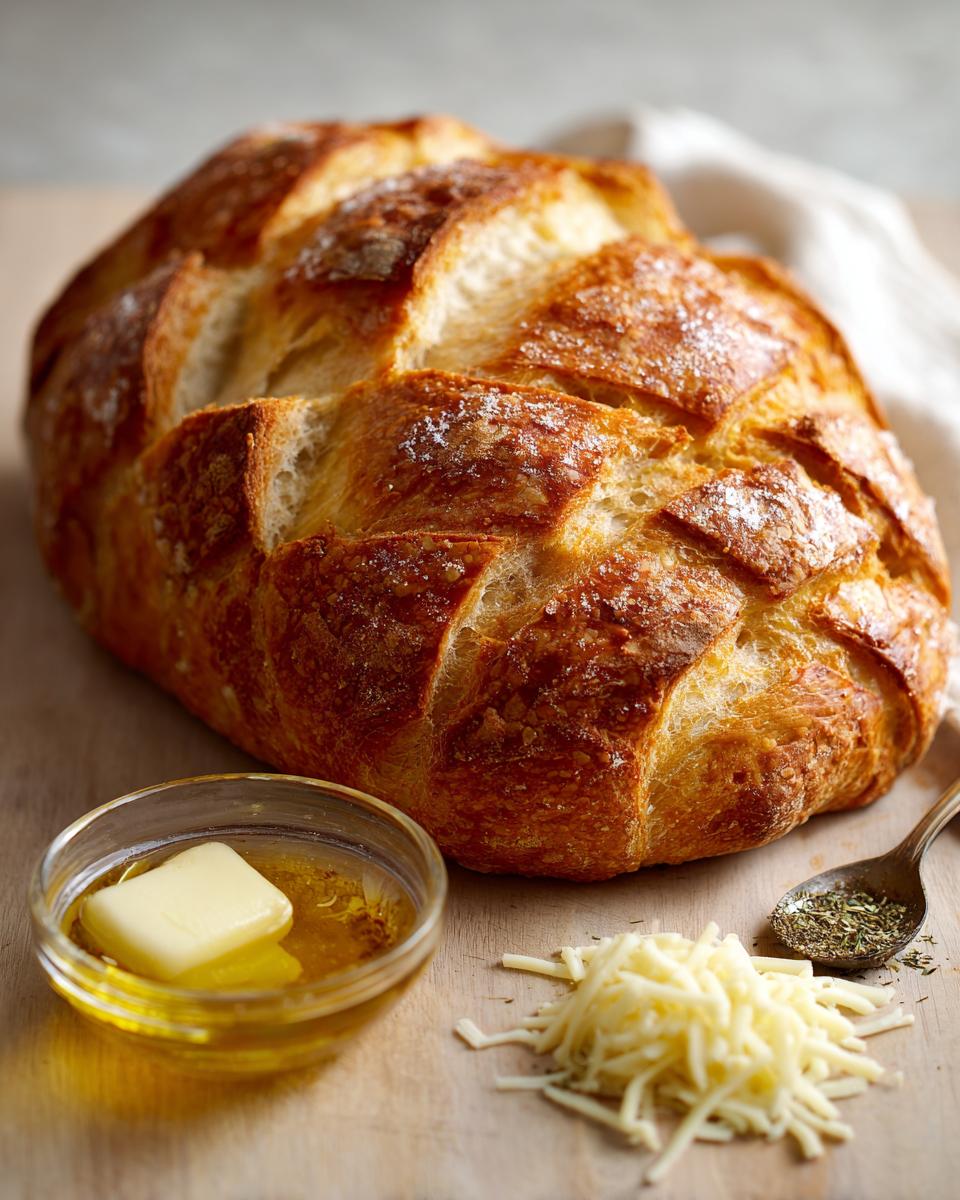
When building something this good, the ingredients need to be spot on, but don’t panic—these are simple items you probably have on hand! Because we rely on the quality of the bread to hold all that delicious butter and cheese, start with a nice, sturdy loaf. Sourdough or a great French loaf works wonders here because they can stand up to all the moisture and heat. Remember, baking well is about great components!
- 1 loaf crusty bread (sourdough or French works well—don’t grab soft sandwich bread!)
- 1/2 cup unsalted butter, melted
- 4 cloves garlic, minced (fresh only, please!)
- 1 teaspoon dried Italian herbs
- 1/4 teaspoon salt
- 1/4 teaspoon black pepper
- 1 1/2 cups shredded cheese blend (I always suggest Mozzarella and Cheddar for the best flavor dynamics)
Step-by-Step: Making Your Homemade Cheese Bread
Okay, now we get to the fun part! This whole process moves surprisingly fast because we aren’t kneading anything—we are just assembling glorious layers of flavor. We get this homemade cheese bread onto the table in about 35 minutes total, which is perfect for last-minute dinner guests. Just make sure your oven is ready to go right when you start mixing the components.
Preparing the Loaf and Garlic Butter Mixture
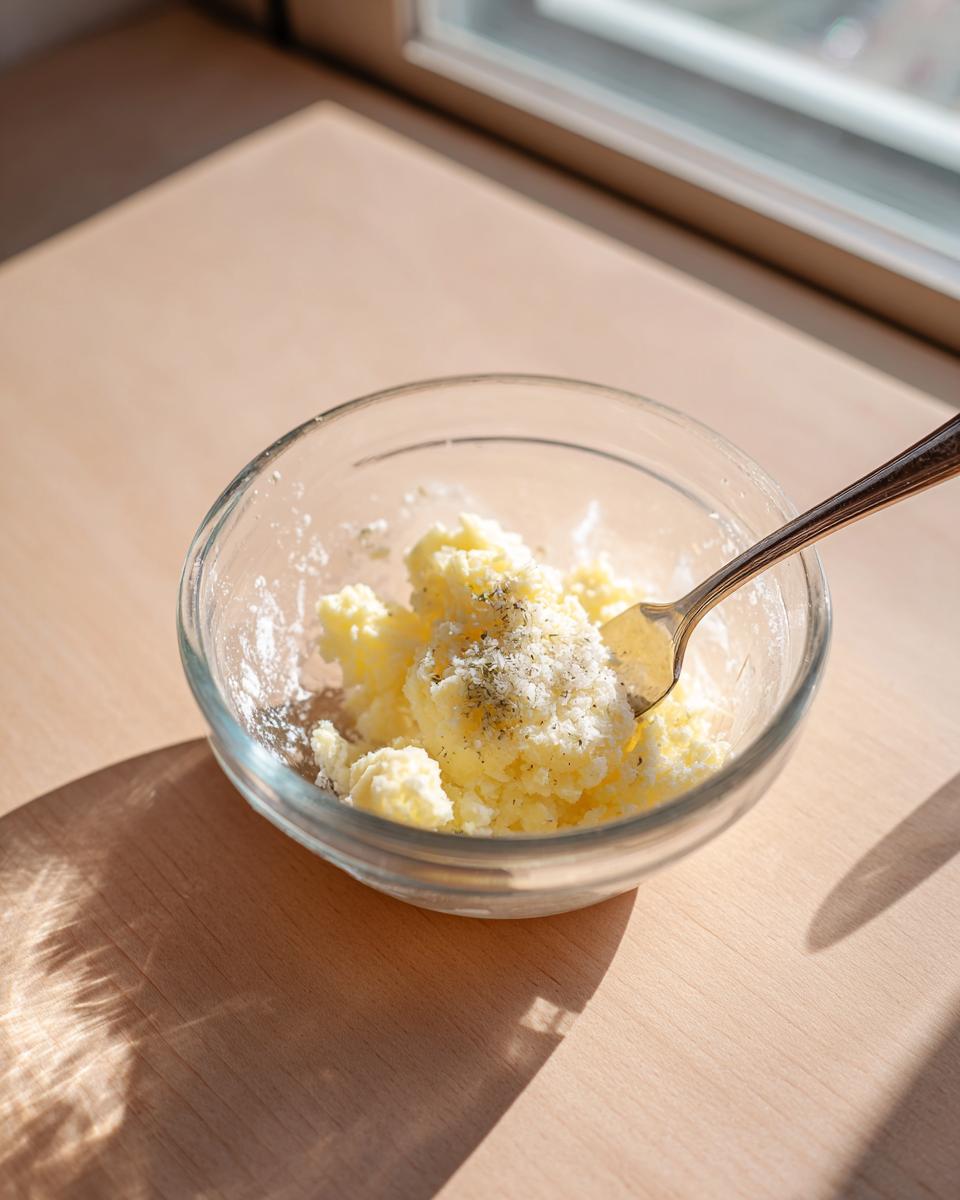
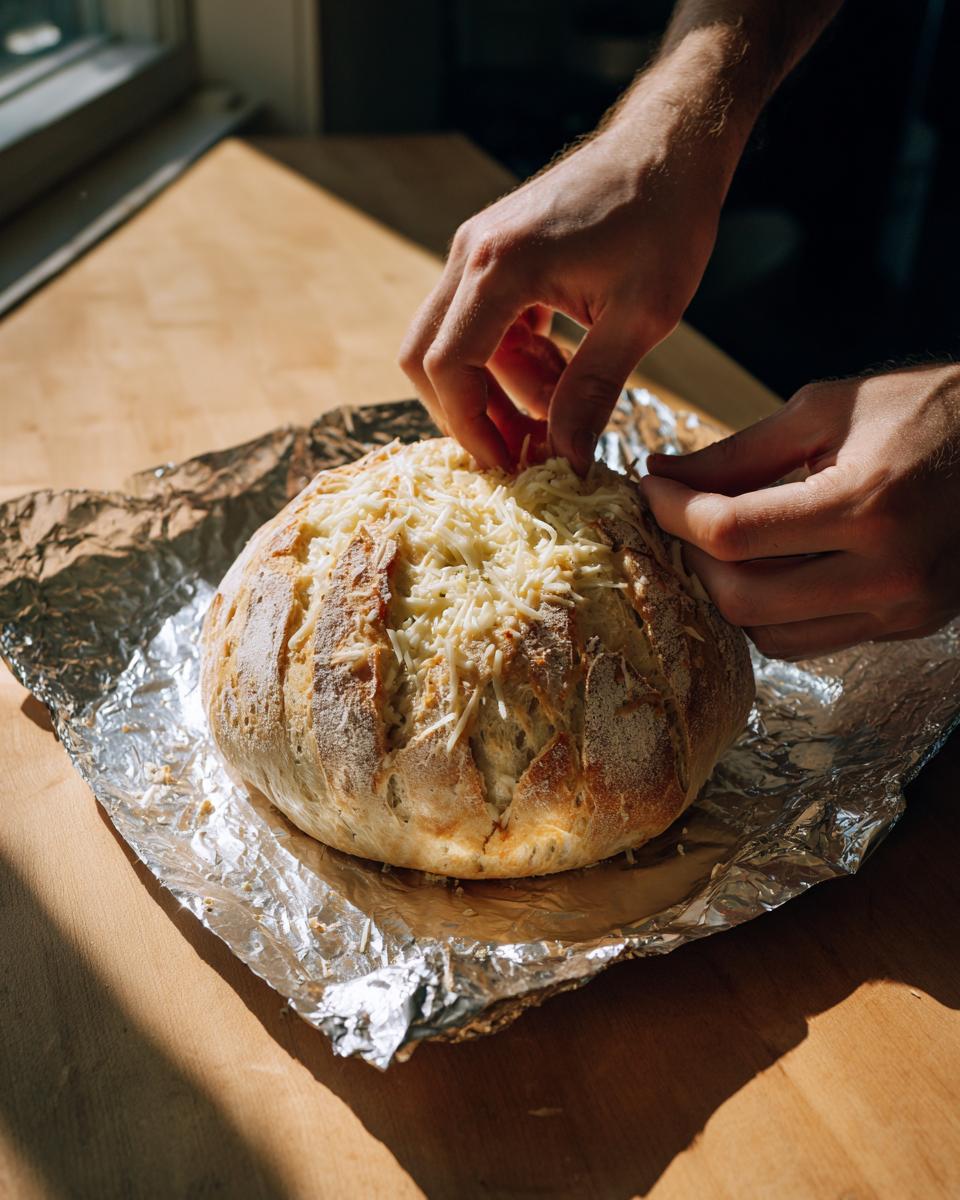
First thing’s first: Preheat your oven to 350 degrees Fahrenheit. You need a big sheet of aluminum foil ready. Take your crusty loaf and slice it deeply in that classic crisscross pattern—think little diamonds on top! The absolute key is stopping just short of slicing through that beautiful bottom crust. That bottom crust is what holds everything together! While that’s warming up, whip up your glorious garlic butter. I just combine the melted butter, minced garlic, Italian herbs, salt, and pepper in a tiny bowl. Take a moment to smell that—wowzers!
Stuffing and Initial Bake of the Cheese Bread
Now, gently pry open those cuts you made and drizzle that amazing garlic butter everywhere. Don’t be shy! Next, take your shredded cheese blend and really work it in. You want cheese packed into every single crevice you created. Once stuffed, wrap the entire loaf up tightly in the foil. This initial wrap traps the steam and melts the cheese from the inside out. Bake it covered for a solid 15 minutes. After that initial bake, carefully unwrap it, exposing the top, and pop it back in uncovered for just 5 to 10 more minutes so you get that gorgeous, bubbly, golden finish. If you want tips on baking crusty bread from scratch, you might love my guide on making a crusty homemade French baguette style loaf!
Expert Tips for Perfect Cheesy Garlic Bread
Even though this recipe for Cheesy Garlic Bread is designed to be totally foolproof, I always have a few little secrets I want to pass along to make sure yours is absolutely legendary. These small adjustments are what elevate a good loaf to an unforgettable one. My goal is for you to feel completely confident every time this comes out of your oven!
When I was nailing down the perfect flavor balance, I discovered that using a sharper cheese really makes a difference. While mozzarella is non-negotiable for the stretch, you absolutely must have sharp cheddar for that satisfying, bold flavor punch you want in savory bread. Also, make sure you’re using freshly grated cheese—the pre-shredded stuff is coated in anti-caking agents that prevent that beautiful melt! Finally, remember what I always say: If you have leftover bread later in the week, a quick zap in a toaster oven (foil off!) brings that gooey texture right back without drying out the crust.
- Use sharp cheddar for a stronger cheese flavor in your cheese bread—it cuts through the richness of the butter perfectly.
- For an extra savory touch, sprinkle a little grated Parmesan cheese over the top before the final unwrapped bake. It adds a lovely salty crust.
- This recipe works wonderfully as a quick cheesy bread side dish for soup or pasta, so feel free to double the batch!
Variations for Your Cheese Bread Loaf
The beauty of this Homemade Cheese Bread loaf is how flexible it is! Once you master the basic butter and cheese combination, you can totally start decorating it based on what you have in the fridge or what you’re craving. I love it when people take a reliable base recipe and start making it their own—that’s where the real kitchen creativity happens, right?
Changing the herbs is the easiest tweak. If you’re serving this with Italian tonight, Italian herbs are perfect. But if you’re leaning into a smoky flavor for a barbecue side dish, try tossing in a teaspoon of smoked paprika with your garlic butter. You can even switch up the bread itself! A rye bread with Swiss cheese suddenly turns dinner into something completely different and unexpected.
If you’re feeling like something a little more sophisticated, you know I always turn to Mediterranean flavors! For inspiration on layering bolder tastes, take a look at my spinach and feta cheese crisps recipe; you can incorporate some of those savory vibes here too.
Adding Heat to Your Cheese Bread
Now, if you are like my brother and simply can’t enjoy anything unless it has a little kick, bringing heat into this loaf is so straightforward. You want to add a little spark without overwhelming that perfect garlic butter smell, so I recommend a couple of options. The simplest way is to mix in about a half teaspoon of red pepper flakes right into your butter mixture before you stuff the loaf. If you want a more subtle warmth, just a tiny dash of cayenne goes a long way! Be careful with cayenne, though; it packs a punch when it gets baked alongside that rich cheese.
Serving Suggestions for This Warm Cheesy Appetizer
This Warm Cheesy Appetizer is fantastic on its own, obviously, but what I really love is finding things that let that rich flavor shine even more. It’s so buttery and garlicky that it really acts as a fantastic sponge for whatever you’re serving alongside it! It pairs beautifully with simple, fresh dishes that need a savory, indulgent counterpart.
For cozy evenings, you absolutely must serve this alongside a big bowl of soup. It’s fantastic for dipping! I find that the cheesy pull holds up really well against broth-based soups, but it’s heavenly dipped into something thick and creamy, like tomato bisque. If you happen to have leftover turkey that needs a fresh purpose, try my recipe for easy leftover turkey soup—the cheese bread is the perfect sidekick!
Beyond dinner, this is legendary at parties. Don’t just set it out plain! Place it near a small crock of marinara sauce or even a creamy spinach dip. People will automatically use the pull-apart sections to scoop up whatever deliciousness is closest to it. It just begs to be shared, making it truly the ultimate party food!
Storage and Reheating Instructions for Leftover Cheese Bread
Life is busy, and sometimes you just can’t finish a whole loaf of this goodness in one sitting—though I certainly try! If you have any leftovers of this cheese bread, seal it up tightly, either wrapped well in plastic wrap and foil or stored in an airtight container. We want to keep that buttery moisture locked in. Don’t worry if the cheese seems hard the next day; that’s normal!
Reheating is key to bringing back that fresh-from-the-oven glory. For the best texture, wrap the section tightly in foil again and set your oven to 325 degrees. Warm it for about 10 minutes. This steams the bread and re-melts the cheese beautifully. Honestly, avoid the microwave if you can, or it gets terribly chewy in the middle!
Frequently Asked Questions About Cheese Bread
I know you might still have a few little things swirling in your head after making this rich, wonderful loaf. That’s totally okay! I get so many questions about how to adapt things or get that perfect melt, so let’s go through the most common ones. When in doubt, just remember that this Easy Cheese Bread Recipe is built on simple quality ingredients, and you can customize it quite a bit!
What is the best cheese for this Easy Cheese Bread Recipe?
Honestly, the blend I used—a mix of gooey mozzarella and sharp cheddar—is my absolute favorite because it delivers both the stretch and the flavor punch we want in Cheddar Cheese Bread. But if you want to experiment with your Homemade Cheese Bread, Monterey Jack works beautifully for melt factor, and if you’re feeling fancy, a little sprinkle of aged Gruyère brings a nutty depth. Whatever you choose, please use freshly shredded blocks! Pre-shredded cheese has powders that stop it from melting into that luxurious blanket you expect.
Can I make this Pull Apart Cheese Bread ahead of time?
Yes, you certainly can save yourself some prep time! For the Pull Apart Cheese Bread, I recommend fully assembling the loaf—scoring it, stuffing it with the butter mixture and cheese—then wrapping it tightly in foil and placing it in the fridge for up to 24 hours. When you’re ready to bake, just add about 10 minutes to the foil-wrapped baking time since the loaf will be cold. I wouldn’t recommend preparing it a day ahead and baking it the next day, as the bread can dry out a bit before it hits the heat.
If you’re looking for creative ways to use up savory leftovers, check out my recipe for the Cheeseburger Bowl—it takes those rich flavors in a totally new direction!
Share Your Seventh Flavour Cheese Bread Creations
If you tried this Ultimate Cheesy Garlic Pull-Apart Bread, I honestly can’t wait to hear what you thought! Leaving feedback—even just a quick star rating—helps me so much when I’m developing future recipes here at Seventh Flavour. Did the cheddar give it the punch you hoped for? Did your family devour it in five minutes flat? Tell me everything!
The joy of cooking isn’t just in the making; it’s in the sharing and the connection that happens around the table. If you snapped a picture of your beautifully golden, gooey loaf, please share it over on social media and tag me! Seeing your beautiful creations lets me know that the Seventh Flavour—that feeling of warmth and satisfaction—is making its way into your home kitchen.
I’m so excited for you to try this recipe, and I truly hope it becomes one of those reliable, comforting recipes you turn to again and again. If you want to know a little more about the philosophy behind why I cook the way I do, you can always read more on my About Page! Happy baking, and enjoy every single pull!
PrintUltimate Cheesy Garlic Pull-Apart Bread

Make this warm, buttery pull-apart bread stuffed with gooey cheese and garlic butter. It is a simple, addictive appetizer perfect for parties or dinner sides.
- Prep Time: 10 min
- Cook Time: 25 min
- Total Time: 35 min
- Yield: 8 servings 1x
- Category: Appetizer
- Method: Baking
- Cuisine: American
- Diet: Vegetarian
Ingredients
- 1 loaf crusty bread (sourdough or French works well)
- 1/2 cup unsalted butter, melted
- 4 cloves garlic, minced
- 1 teaspoon dried Italian herbs
- 1/4 teaspoon salt
- 1/4 teaspoon black pepper
- 1 1/2 cups shredded cheese blend (Mozzarella and Cheddar recommended)
Instructions
- Preheat your oven to 350 degrees Fahrenheit. Prepare a piece of aluminum foil large enough to wrap the loaf of bread.
- Score the loaf of bread deeply in a crisscross pattern, cutting almost all the way through, but leave the bottom crust intact.
- In a small bowl, combine the melted butter, minced garlic, Italian herbs, salt, and pepper. Mix well to create the garlic butter.
- Carefully separate the cuts in the bread and spoon the garlic butter mixture into the crevices.
- Stuff the shredded cheese blend evenly into all the cuts and crevices of the bread. Press the cheese down gently.
- Wrap the entire loaf tightly in the aluminum foil.
- Bake for 15 minutes.
- Carefully unwrap the foil, exposing the top of the bread. Return the bread to the oven and bake for another 5 to 10 minutes, or until the cheese is fully melted and bubbly and the edges are lightly golden.
- Let the bread cool for 5 minutes before serving warm. Pull apart the sections to share.
Notes
- Use sharp cheddar for a stronger cheese flavor in your cheese bread.
- For an extra savory touch, sprinkle a little grated Parmesan cheese over the top before the final unwrapped bake.
- This recipe works well as a quick cheesy bread side dish for soup or pasta.
Nutrition
- Serving Size: 1 section
- Calories: 280
- Sugar: 1
- Sodium: 450
- Fat: 18
- Saturated Fat: 10
- Unsaturated Fat: 8
- Trans Fat: 0.5
- Carbohydrates: 20
- Fiber: 1
- Protein: 10
- Cholesterol: 45