
When the air turns crisp, you know exactly what the soul needs, right? It’s that deep, unmistakable call for comfort food that doesn’t demand three hours of labor. That’s why I’m sharing my favorite apple crisp recipe today! This isn’t just some random recipe I found online; this is the ultimate, foolproof fall dessert that brought me back to myself. Before I built Seventh Flavour, I spent years in marketing—all spreadsheets and deadlines. But every evening, I came home to the stove because cooking was my true sanctuary. This recipe is the culmination of thousands of hours spent testing and tasting in my own kitchen, confirming simple ingredients can create pure magic.
- Why This Classic Apple Crisp Recipe Delivers the Seventh Flavour
- Ingredients for the Best Apple Crisp Dessert
- How to Prepare This Warm Apple Crisp Recipe Step-by-Step
- Tips for the Foolproof Apple Crisp Guide
- Serving Suggestions for Your Warm Apple Crisp Recipe
- Storage and Reheating Instructions for This Apple Crisp Recipe
- Frequently Asked Questions About the Apple Crisp Recipe
- Nutritional Estimate for This Cinnamon Apple Crisp
- Share Your Seventh Flavour Apple Crisp Moment
Why This Classic Apple Crisp Recipe Delivers the Seventh Flavour
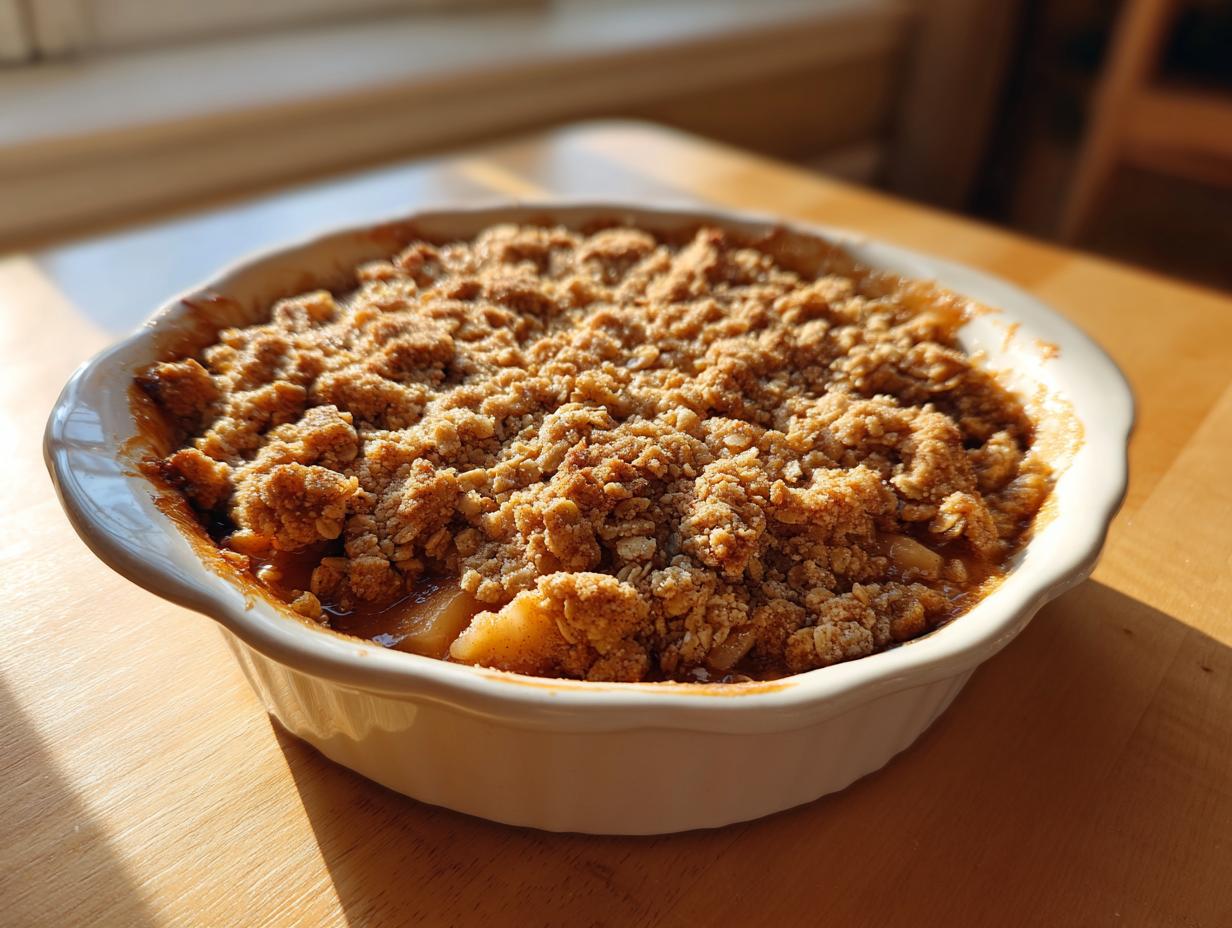
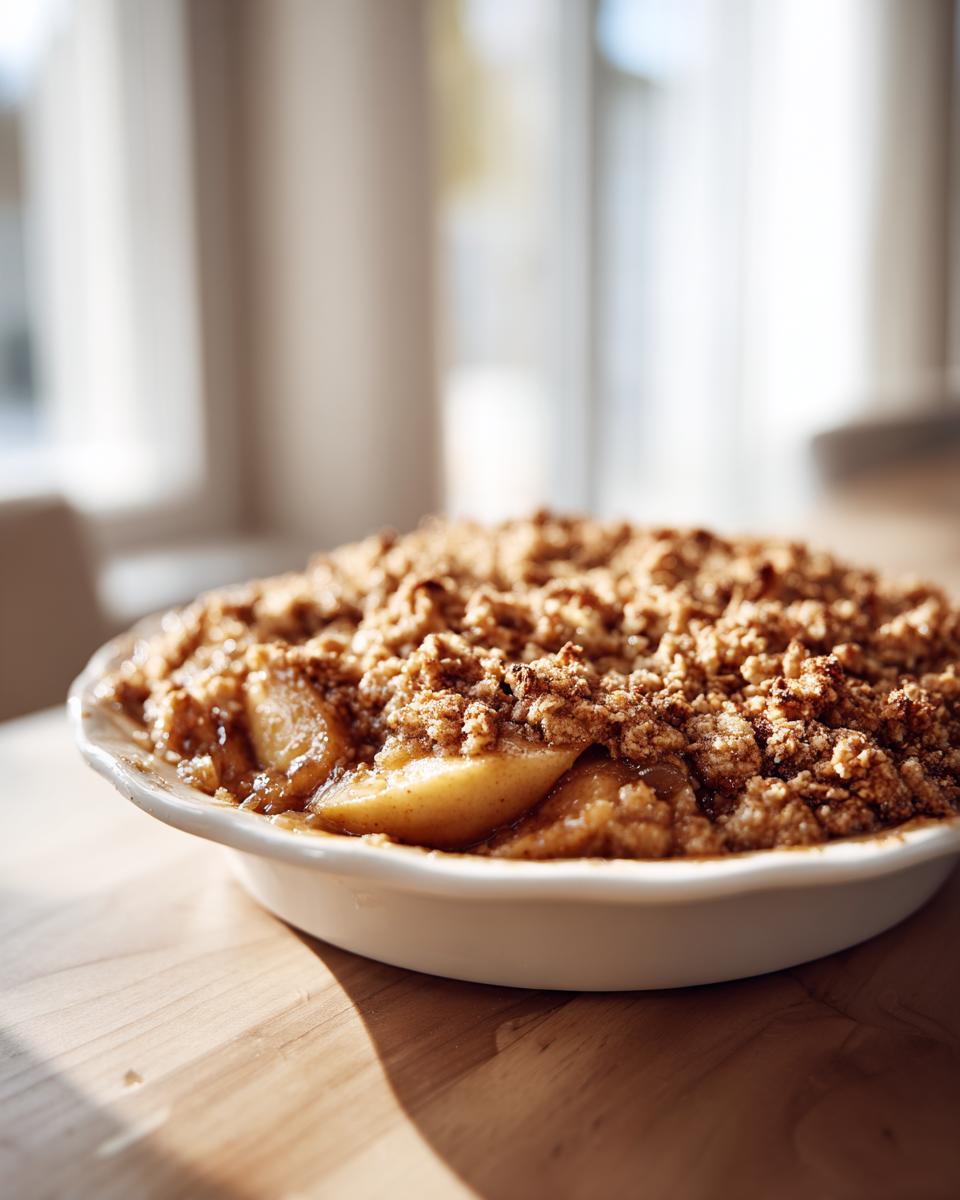
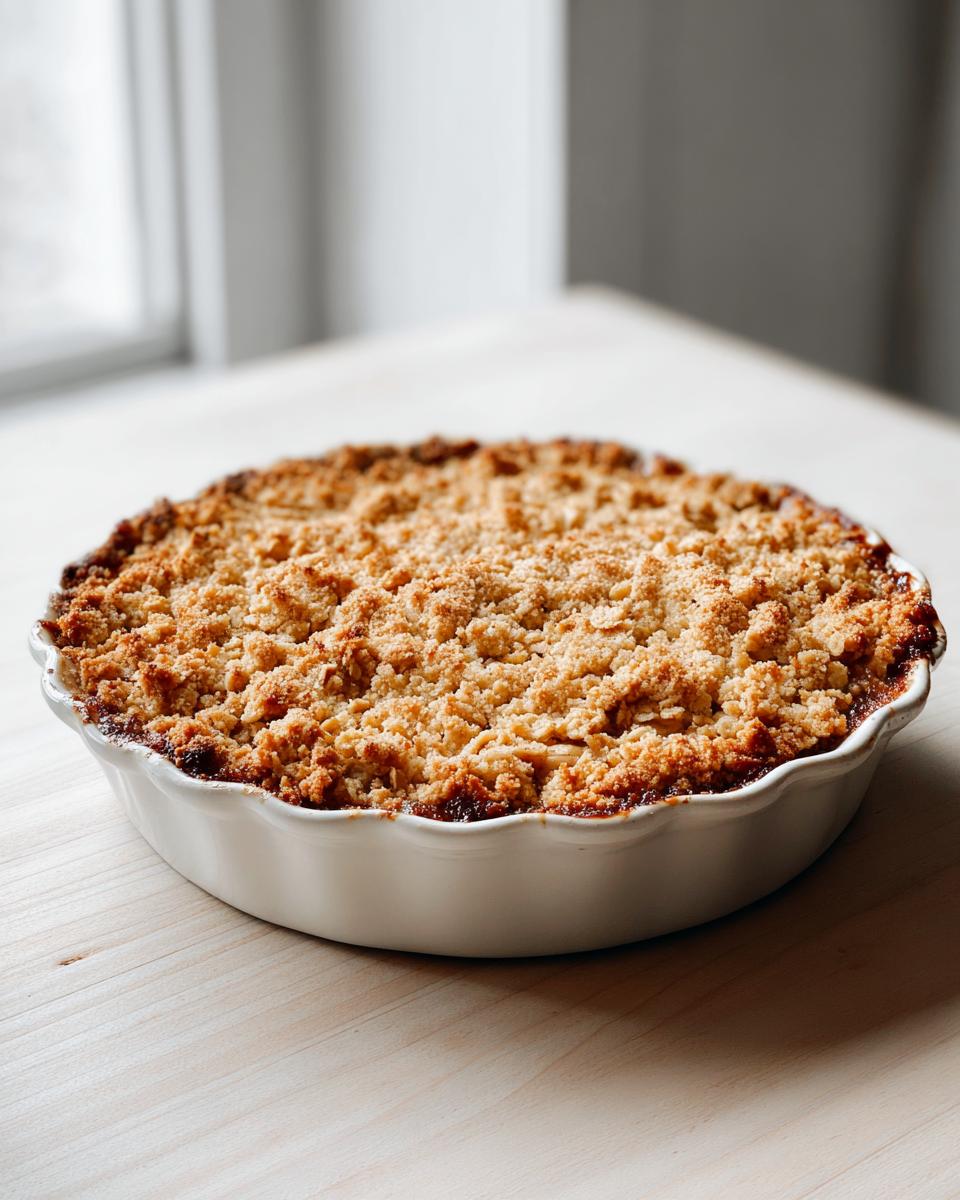
This isn’t just any crumble; this is where comfort meets crunch! What makes this the Classic Apple Crisp Dessert for me is that buttery, crunchy oat topping. Trust me, I spent ages perfecting that texture—it bakes up golden and snaps back when you press it. Underneath, you get those tender, cinnamon-spiced apples that melt in your mouth. This Comfort Food Apple Dessert comes straight from my real kitchen, honed over thousands of hours of testing so you know it works every time. It’s reliable goodness, just what you need when life gets busy. If you’re interested in other kitchen staples, check out my guide on making easy homemade mayonnaise recipe.
Quick Facts for Your Apple Crisp Recipe
- Prep Time: 15 minutes
- Cook Time: 45 minutes
- Yields: 6 glorious servings
Ingredients for the Best Apple Crisp Dessert
Whenever I bake, clarity in the ingredients list is my first step toward confidence. You can’t have a great bake if you’re guessing what needs to go where! For this apple crisp recipe, we separate things into two main acts: the sweet, soft apples, and that perfect, crunchy layer on top. I’ve found that using great ingredients means you don’t need complicated steps later on. If you’re looking for other surprisingly simple recipes, take a peek at my easy breakfast recipes for morning ideas!
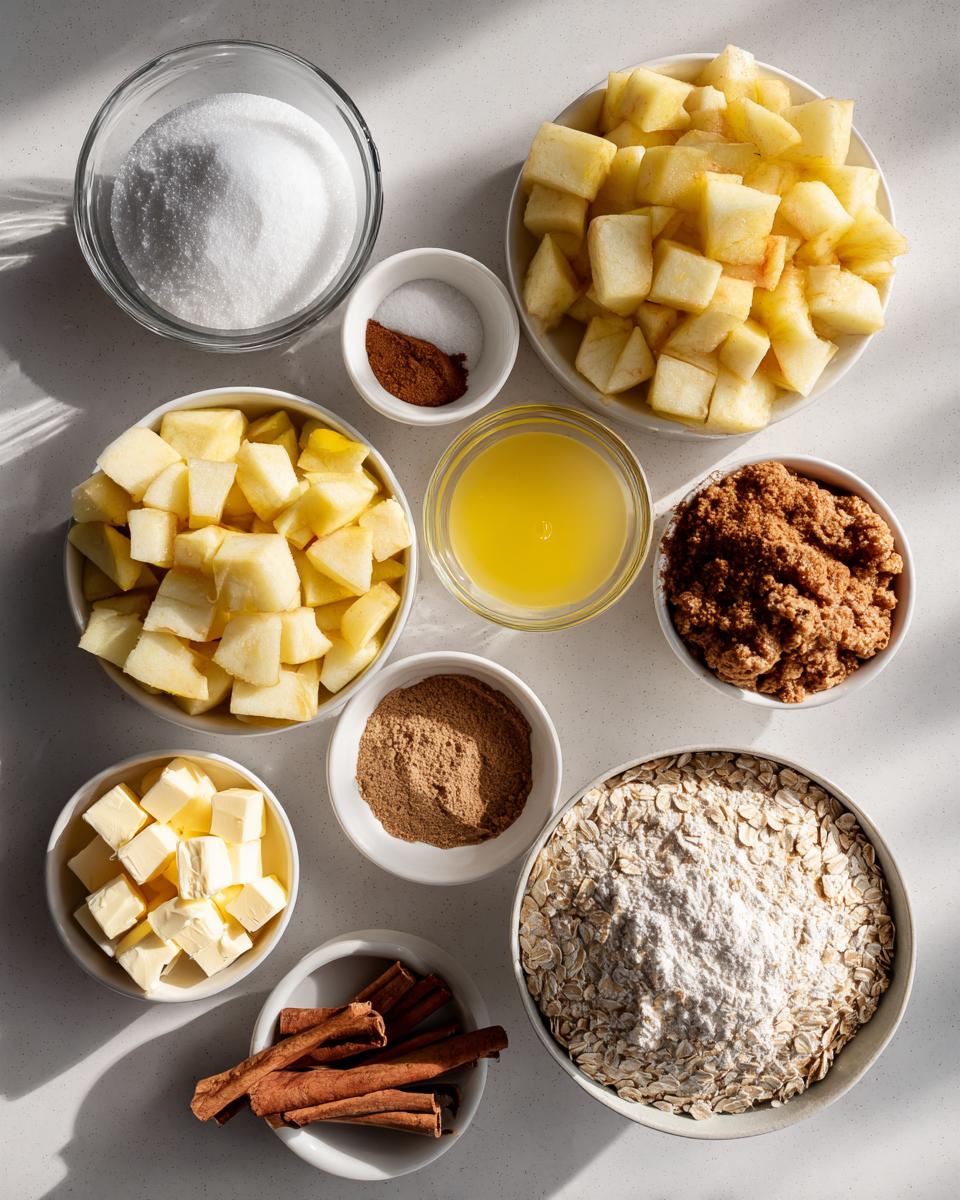
Apple Filling Components
This is where the main flavor lives, so use apples that hold up well! I always insist on mixing Granny Smith—for that lovely tart bite—with Honeycrisp for sweetness and firmness.
- 6 large baking apples (like Granny Smith or Honeycrisp), peeled, cored, and sliced
- 1/4 cup granulated sugar
- 1 tablespoon lemon juice (keeps them bright!)
- 1 teaspoon ground cinnamon
- 1/4 teaspoon ground nutmeg
- 1/4 cup all-purpose flour (this helps thicken the juices)
Buttery Oat Topping Apple Crisp Ingredients
This is the magic layer! The secret here, and I mean this, is making sure your butter is good and cold. If the butter heats up while you’re mixing, you’ll get a dense, soft topping instead of that beautiful, crispy texture we want. You need those little cold pockets!
- 1/2 cup all-purpose flour
- 1 cup rolled oats (I use old-fashioned, but quick oats work in a pinch!)
- 3/4 cup packed brown sugar
- 1/2 teaspoon ground cinnamon (yes, more cinnamon, always more!)
- 1/4 teaspoon salt
- 1/2 cup (1 stick) cold unsalted butter, cut into small pieces
How to Prepare This Warm Apple Crisp Recipe Step-by-Step
Alright, let’s get this apple crisp recipe into the oven! This whole process feels like a warm hug, and honestly, it comes together faster than a lot of my old weekday dinners.
Preparing the Apple Filling
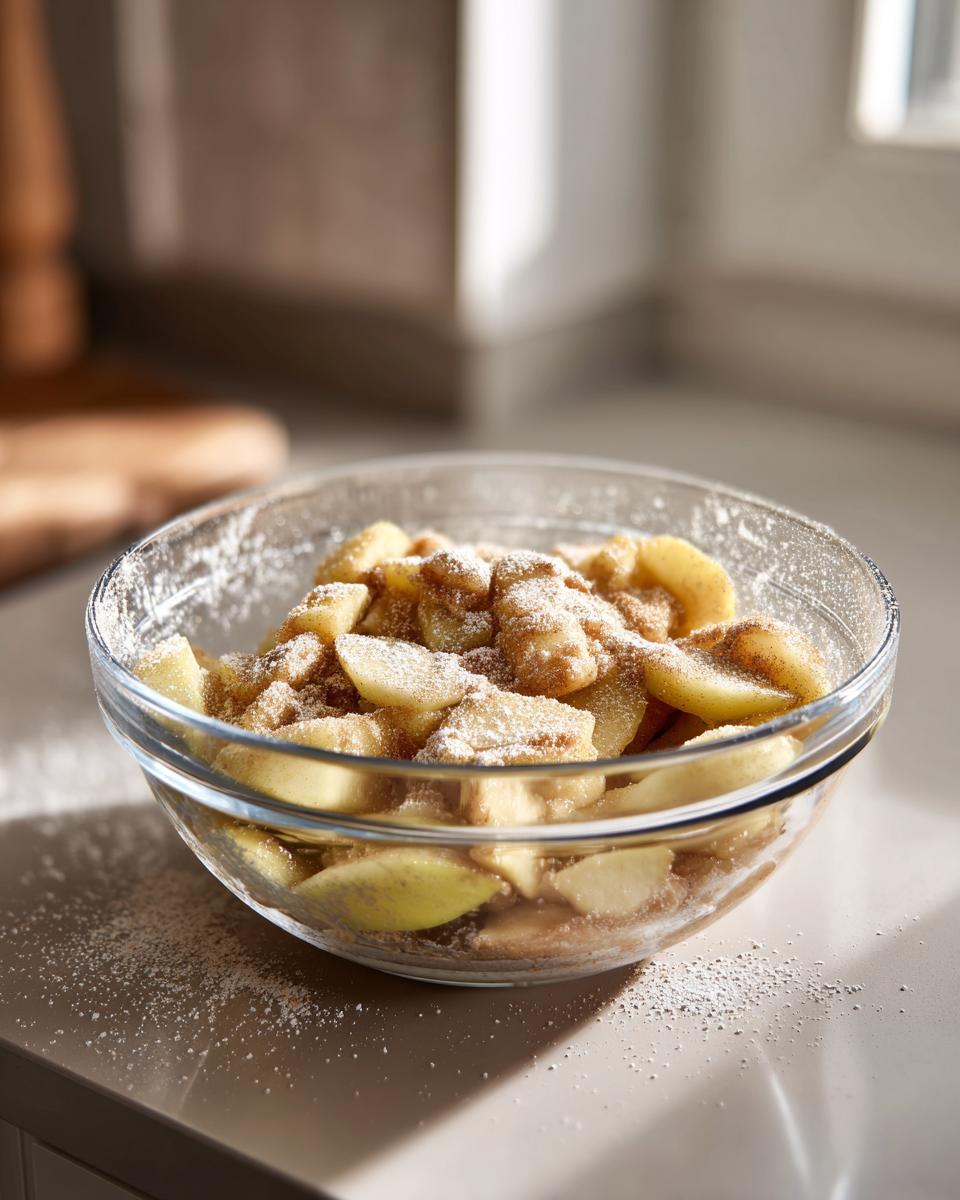
First things first: crank that oven up to 375 degrees Fahrenheit and grease your baking dish—a 9-inch pie dish is perfect. Now, grab that big bowl with your apples. You want those sliced apples to get completely coated in the sugar, lemon juice, spices, and that small bit of flour. Toss it gently with your hands until every slice looks shiny and happy. Then, spread that beautiful mixture evenly across the bottom of your dish. See? Already simple!
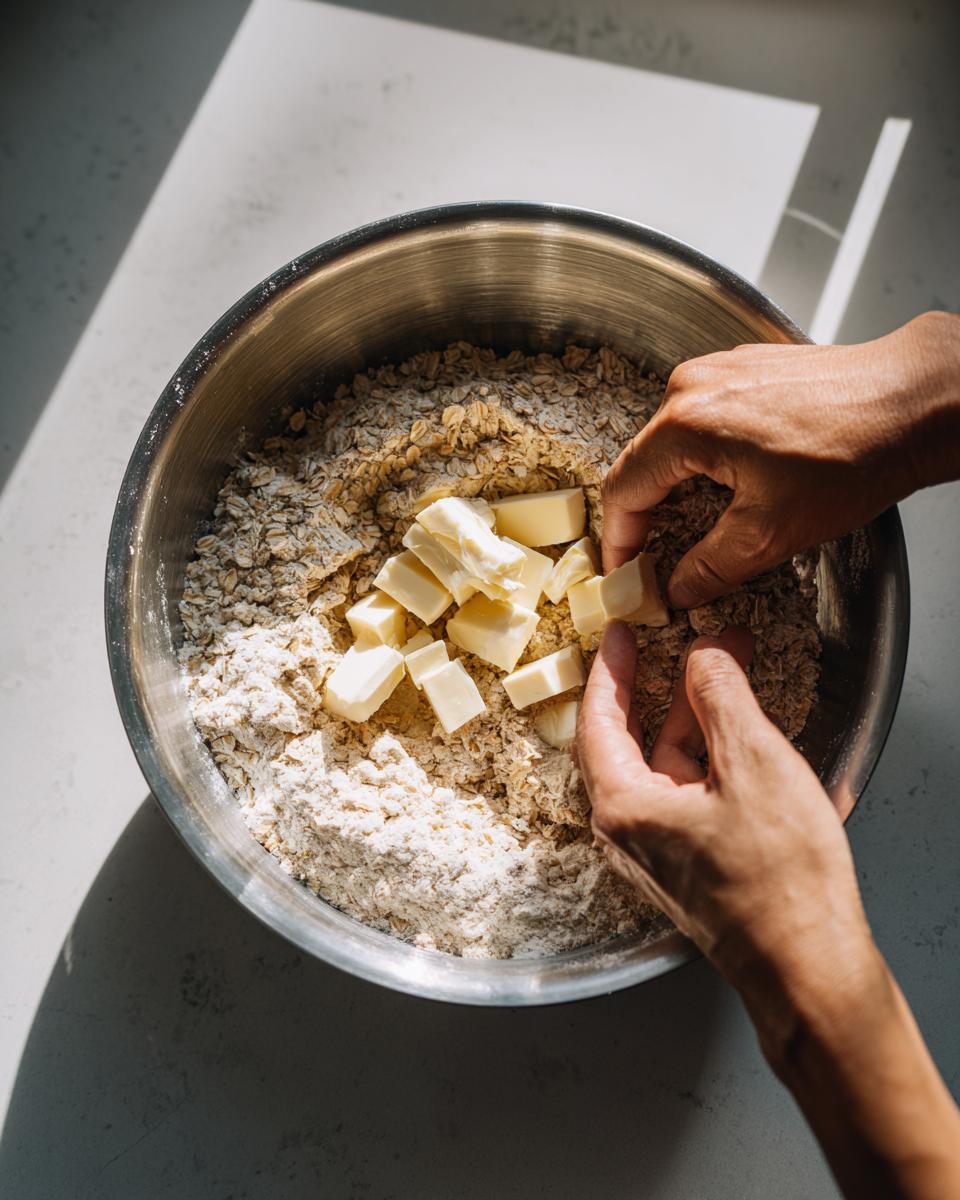
Creating the Buttery Oat Topping
Next up is the crunchy crown jewel! You’ll mix the topping dry ingredients in a separate bowl first: flour, oats, brown sugar, cinnamon, and salt. The key part is cutting in that cold butter. I always tell people, don’t use your hands too much—you want this mixture to look like coarse crumbs, maybe with a few pea-sized chunks of butter still visible. Those chunks are what melt and create those glorious crunchy clusters when they bake. Don’t overwork it, or you’ll lose the crunch we worked so hard for!
Baking and Resting the Apple Crisp Recipe
Sprinkle that topping evenly over the apples and press it down just a tiny bit so it stays put. Pop the whole dish into the preheated oven for 40 to 50 minutes. You’re looking for that apple filling to be totally bubbly—I mean aggressively bubbling—and the topping should be deeply golden brown. If it starts looking too dark before the apples are done, grab some foil and loosely tent it over the top. This is a trick I learned when testing different oven hotspots! After it comes out, and this is important, it needs to rest for at least 15 minutes. Trust me, letting it settle makes serving this **warm apple crisp recipe** so much cleaner. If you ever need an alternative dessert idea, make sure you check out my recipe for quick weeknight dinners to finish up your meal!
Tips for the Foolproof Apple Crisp Guide
Even though this is the Foolproof Apple Crisp Guide, baking always involves little moments where things don’t go exactly to plan. That’s okay! Over the years, I’ve learned what tiny tweaks make the biggest difference in getting that perfect crunch every single time. Remember, this recipe is tested in my real-life kitchen, not a sterile lab, so these tips are born from actual trial and error. If you ever make something delicious and need a spot for a great easy fruit dip recipe later, just know I have those too!
Choosing the Right Apples for Your Apple Crisp Recipe
The apple choice sets the whole foundation for your result. If you use an apple that defaults to mush the second it heats up, you’re going to end up with apple sauce under a crust, not a crisp. That’s why I almost always combine Granny Smiths and Honeycrisps. The Granny Smith is tart and beautifully firm—it really holds its shape while it cooks down. Paired with the sweeter, crisp texture of the Honeycrisp, you get this incredible flavor balance that keeps the filling interesting. Texture is everything here, so stick to baking varieties!
Troubleshooting Common Issues
I’ve definitely pulled a few flops out of the oven in my day, so don’t feel bad if you hit a snag. The most common issue I hear about is a soggy topping. If your topping isn’t crisping up nicely, nine times out of ten, your butter wasn’t cold enough when you mixed it. Next time, chill that butter for just a few extra minutes! Also, if you notice the topping browning too fast but the apples underneath are still hard, that’s when you use that foil tent trick I mentioned earlier and just let the apples finish softening underneath the shield.
Another common worry is sweetness. If you happen to use a batch of apples that just came out extra tart from the orchard, don’t stress! Before you top it, just give the filling a quick taste. If it’s too sharp, sprinkle in an extra tablespoon of brown sugar right over the apples before you dot your topping on. It melts right in during the baking process and saves the whole batch. See? Easy fixes for your apple crisp recipe!
Serving Suggestions for Your Warm Apple Crisp Recipe
Okay, we finally have this glorious, bubbling, golden-topped apple crisp coming out of the oven, and honestly, the aroma alone is worth all the effort. But we aren’t done yet! The best part of any comforting sweet apple dessert idea is what you serve it with. For me, tradition rules here. Nothing beats the classic combination of this Warm Apple Crisp Recipe paired with something cold.
You absolutely *must* try it with a big, perfect scoop of vanilla ice cream. The contrast—that warm, spicy apple filling meeting the cold, creamy ice cream—is just pure bliss. It’s the kind of moment that makes you stop everything else you’re doing. If you’re serving this Easy Homemade Apple Crisp fresh from the oven, the ice cream will start to melt immediately, dribbling down the sides of that crunchy topping. It’s glorious chaos!
But hey, I love to mix things up, especially when company comes over! If you’ve run out of ice cream or just want a different vibe, try a thick drizzle of slightly salted caramel sauce over the top. It brings out the brown sugar in the topping beautifully. For a slightly more decadent experience, you could serve it with a dollop of fresh, lightly sweetened whipped cream seasoned with a tiny bit of nutmeg. Honestly, it’s good enough to eat plain, but putting a little something extra on top just elevates it to that “special occasion” level. If you’re looking for another showstopper dessert that really seals the deal, you have to check out my guide for a crack-free New York Style Cheesecake recipe!
Storage and Reheating Instructions for This Apple Crisp Recipe
I’m hoping you have zero leftovers because this dish disappears fast, but let’s be real: sometimes we bake too much, or maybe you just want to save some for lunch the next day. That’s perfectly fine! The great thing about a sturdy apple crisp recipe is that it stores relatively well.
Once your apple crisp recipe has cooled completely—and I mean completely, otherwise you’ll get gross condensation—you can cover the baking dish tightly with plastic wrap or foil. If you used a glass dish, I find that just covering the top securely is enough. You can keep it on the counter at cool room temperature for about a day, especially if you live somewhere cool. Honestly, because of all that brown sugar and butter, it holds up well.
But for anything longer than 24 hours, you really want it in the fridge. It should last safely for about three to four days in the refrigerator. Now, here’s the catch: the refrigerator is the enemy of crispness. When it comes out of the fridge, that amazing buttery oat topping apple crisp layer will definitely be a little soft, maybe even chewy.
The microwave is not your friend here—it heats the filling faster than the topping, making everything soggy. So, when you reheat, you need to resurrect that crunch! The best way to revive your leftovers is to spread individual portions onto a small, oven-safe plate or cookie sheet. Pop it into a 350°F oven for about 8 to 10 minutes. This gentle heat warms everything through while drying out the topping just enough to bring back that satisfying snap. Trust me on this reheating trick; it saves the whole dish!
Frequently Asked Questions About the Apple Crisp Recipe
Can I make this apple crisp recipe ahead of time?
Oh, you totally can! This is one of those recipes that’s fantastic for meal prepping, especially if you’re hosting. You have two options here. Option one, which I love for potlucks, is building the entire thing—apples in the dish, topping sprinkled over—and covering it tightly. Keep the assembled, unbaked apple crisp recipe in the fridge for up to 24 hours. Just add about 10 to 15 minutes to your bake time since it’s going in cold. Option two is baking it completely, letting it cool, and storing it covered. But remember what I said about reheating? If you bake it all the way through ahead of time, you’ll need that oven blast to bring the topping back to life.
What is the difference between an apple crisp and a simple apple crumble recipe?
That is such a common question, and honestly, people use the terms interchangeably these days, which drives me a little crazy! Technically, the distinction is the oats. A simple apple crumble recipe usually has a topping made mostly of flour, butter, and sugar—giving you a finer, sandier texture. When you add oats, like we do here for the ultimate buttery oat topping apple crisp, it officially becomes a ‘crisp.’ The oats absorb the butter and bake up hard, giving you that amazing, distinct crunch you can hear when you take a bite!
Can I use different fruits in this apple crisp recipe?
Absolutely! While this is the ultimate Cinnamon Apple Crisp, the base structure is fantastic for almost any firm fruit. Pears work wonderfully—they mix in beautifully with the spice. If you’re using berries, like blueberries or blackberries, you might want to reduce the liquid slightly in the filling or add an extra tablespoon of flour just to manage the extra juice they release. You don’t need to adjust the baking time too drastically, but keep an eye on the bubbling juices for those softer fruits! If you ever have trouble deciding on substitutions or need a quick note on baking adjustments, feel free to drop a line on my contact page!
Nutritional Estimate for This Cinnamon Apple Crisp
I always like to give a rough idea of what you’re getting into when you enjoy a big slice of this cozy dessert, even though I’m a cook, not a nutritionist! Remember, this is based on my recipe proportions and general ingredient averages, so nothing here is a guarantee. If you use extra butter or a massive scoop of ice cream on top, those numbers will climb, which is totally fine sometimes!
This information is specifically for one standard serving based on the recipe yielding six portions. Keep in mind that these figures are best used as a general guide—after all, the real reward here is the joy of baking and eating, not counting grams!
- Serving Size: 1 serving
- Calories: Roughly 380
- Sugar: About 35g
- Fat: Around 18g (that’s the buttery topping talking!)
- Saturated Fat: About 11g
- Carbohydrates: Approximately 55g
- Protein: Near 4g
Because we are using apples and oats, we do get a nice little boost of fiber at about 5 grams per serving, which helps us feel satisfied. This estimate doesn’t account for any additions, like that requested scoop of vanilla ice cream or a drizzle of caramel—those are extra layers of goodness that you should definitely factor in when you’re deciding how big your first (or second!) piece will be!
Share Your Seventh Flavour Apple Crisp Moment
So, there you have it—the absolute easiest way to make an authentic, comforting, and perfectly crunchy apple crisp recipe right in your own kitchen. I’ve poured years of cozy weekend baking into these steps, and now it’s your turn to make it your own!
I genuinely want to know what you think. Did the buttery oat topping come out just how you pictured it? Did you sneak a bite while it was still piping hot? Drop a rating at the top of the page and leave a comment below telling me exactly how you served it. Did you go classic with the vanilla ice cream, or did you try something fun?
Sharing food is all about connection, and that connection is the real Seventh Flavour I’m chasing. When you share your creation, jump over to my About Page to see how we keep building our community around real, enjoyable home cooking. Send me pictures of your beautiful golden-brown crisps! I can’t wait to see them!
PrintThe Best Classic Apple Crisp Recipe with Buttery Oat Topping

Follow this easy homemade apple crisp recipe to create a warm, comforting dessert featuring tender cinnamon apples beneath a perfectly crunchy, buttery oat topping. This foolproof guide ensures a delicious result every time.
- Prep Time: 15 min
- Cook Time: 45 min
- Total Time: 60 min
- Yield: 6 servings 1x
- Category: Dessert
- Method: Baking
- Cuisine: American
- Diet: Vegetarian
Ingredients
- 6 large baking apples (like Granny Smith or Honeycrisp), peeled, cored, and sliced
- 1/4 cup granulated sugar
- 1 tablespoon lemon juice
- 1 teaspoon ground cinnamon
- 1/4 teaspoon ground nutmeg
- 1/4 cup all-purpose flour (for filling)
- 1/2 cup all-purpose flour (for topping)
- 1 cup rolled oats (old-fashioned or quick oats)
- 3/4 cup packed brown sugar
- 1/2 teaspoon ground cinnamon (for topping)
- 1/4 teaspoon salt
- 1/2 cup (1 stick) cold unsalted butter, cut into small pieces
Instructions
- Preheat your oven to 375 degrees Fahrenheit. Lightly grease a 9-inch pie dish or an 8×8 inch baking pan.
- In a large bowl, combine the sliced apples, 1/4 cup granulated sugar, lemon juice, 1 teaspoon cinnamon, nutmeg, and 1/4 cup flour. Toss gently until the apples are evenly coated.
- Pour the apple mixture into your prepared baking dish and spread it into an even layer.
- In a separate medium bowl, prepare the topping. Combine the 1/2 cup flour, rolled oats, brown sugar, 1/2 teaspoon cinnamon, and salt. Mix these dry ingredients well.
- Cut in the cold butter using a pastry blender or your fingertips until the mixture resembles coarse crumbs with some pea-sized pieces of butter remaining. Do not overmix.
- Sprinkle the oat topping evenly over the apple mixture in the baking dish. Press lightly.
- Bake for 40 to 50 minutes, or until the topping is golden brown and the apple filling is bubbly and tender when pierced with a fork.
- Remove from the oven and let it cool for at least 15 minutes before serving warm.
Notes
- Serve this warm apple crisp recipe with a scoop of vanilla ice cream for the ultimate comfort food dessert experience.
- For a richer flavor, substitute half of the granulated sugar in the filling with more brown sugar.
- If the topping begins to brown too quickly during baking, loosely cover the dish with aluminum foil for the remaining cook time.
Nutrition
- Serving Size: 1 serving
- Calories: 380
- Sugar: 35g
- Sodium: 150mg
- Fat: 18g
- Saturated Fat: 11g
- Unsaturated Fat: 7g
- Trans Fat: 0.5g
- Carbohydrates: 55g
- Fiber: 5g
- Protein: 4g
- Cholesterol: 45mg