
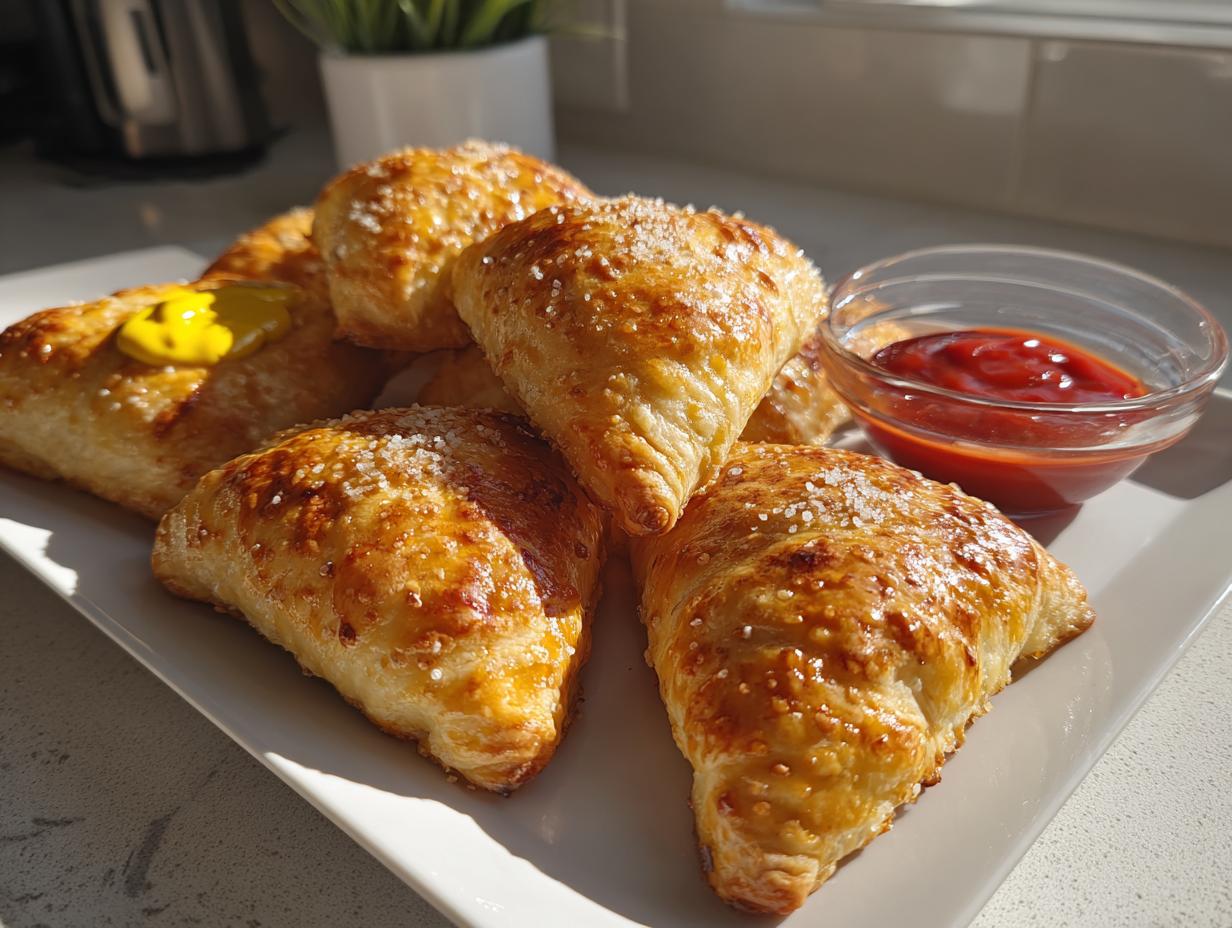
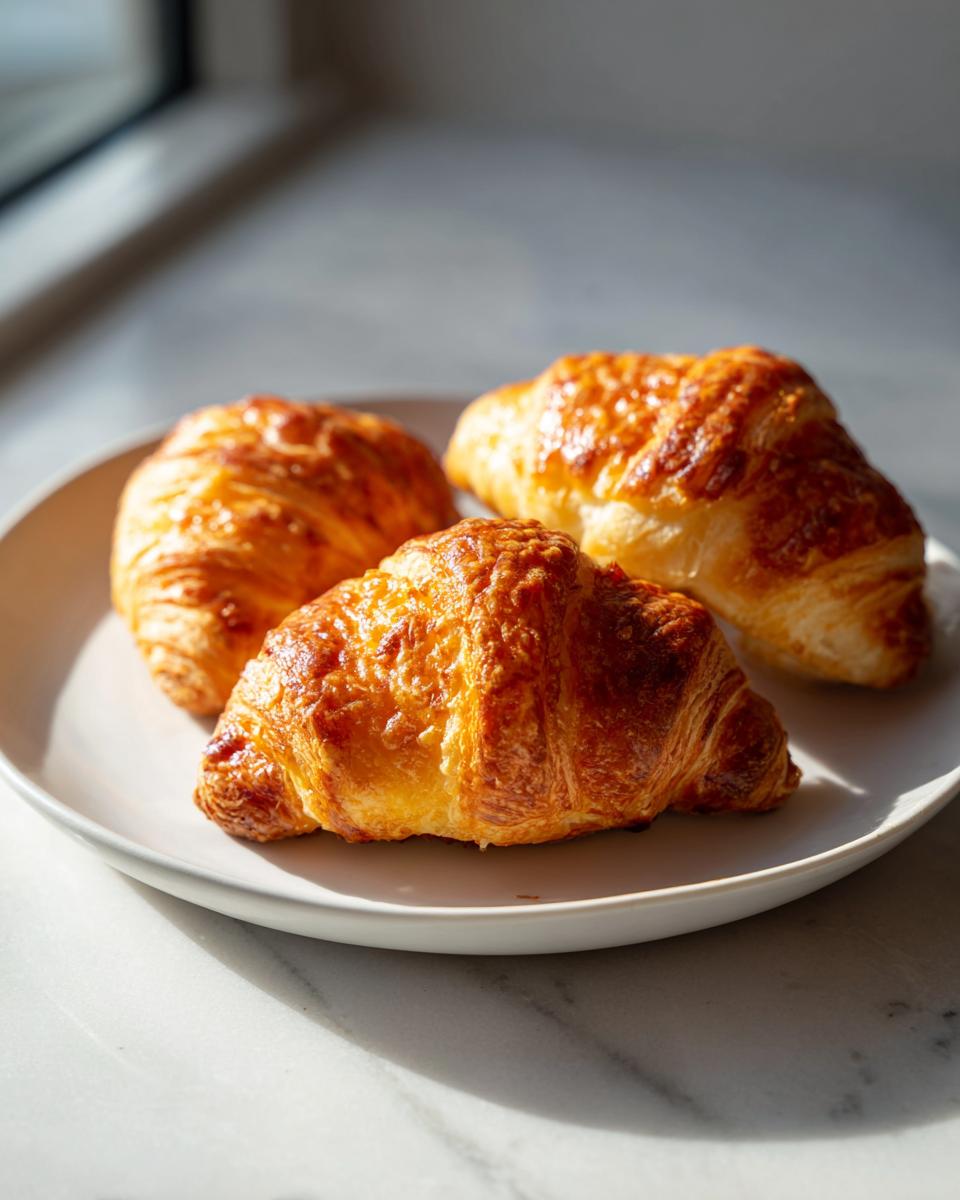
You know that moment when you desperately want a juicy, cheesy cheeseburger but the thought of grilling, assembling, and dealing with all the sticky cleanup just stops you cold? Me too! That’s why I created these absolutely fantastic cheeseburger pockets. They take everything you love about that classic handheld burger—the savory seasoned beef, the gooey melted cheddar—and tuck it all into this unbelievably flaky, golden crust. Seriously, making these at home is so much easier and tastier than heading to the drive-thru. For me, like when I traded my corporate desk for my own kitchen, finding ways to make comforting food simple and accessible is everything. These pockets scream easy weeknight dinner comfort to me! And if you love a good burger flavor, you absolutely must try my recipe for the best easy burger sauce on the side!
- Why You Will Make These Easy Cheeseburger Pockets
- Essential Ingredients for Perfect Cheeseburger Pockets
- Step-by-Step Guide to Making Homemade Cheeseburger Pockets
- Tips for Perfect Golden Brown Cheeseburger Pockets
- Making Ahead and Freezing Your Cheeseburger Pockets
- Serving Suggestions for Your Quick Dinner Pockets
- Storing and Reheating Leftover Cheeseburger Pockets
- Frequently Asked Questions About Cheeseburger Pockets
- Estimated Nutrition Facts for These Portable Beef Meals
Why You Will Make These Easy Cheeseburger Pockets
I know you are busy, so let me tell you exactly why these Easy Cheeseburger Pockets Recipe will become your new hero meal:
- They are lightning fast! We’re talking about a 30-minute total time solution for dinner.
- They use crescent roll dough—no complicated pastry skills required whatsoever.
- These are truly Kid Approved Dinner material; they disappear off the plate instantly.
- You can double the batch right now because they are fantastic for Freezer Friendly Meals later in the week.
If you need more ways to keep your evenings streamlined, you should check out my guide to quick weeknight dinners!
Essential Ingredients for Perfect Cheeseburger Pockets
Getting these Homemade Cheeseburger Pockets right starts with honoring the core flavors of a great burger, but simplified for speed. Remember, the quality of your simple ingredients really makes the difference here. You’ll need exactly one pound of good ground beef, and don’t skimp on flavorings—we use a little Worcestershire sauce for that deep, savory note that makes all the difference. Cheese-wise, I stuck to the classic, easy-to-melt cheddar, but honestly, any good melting blend works beautifully.
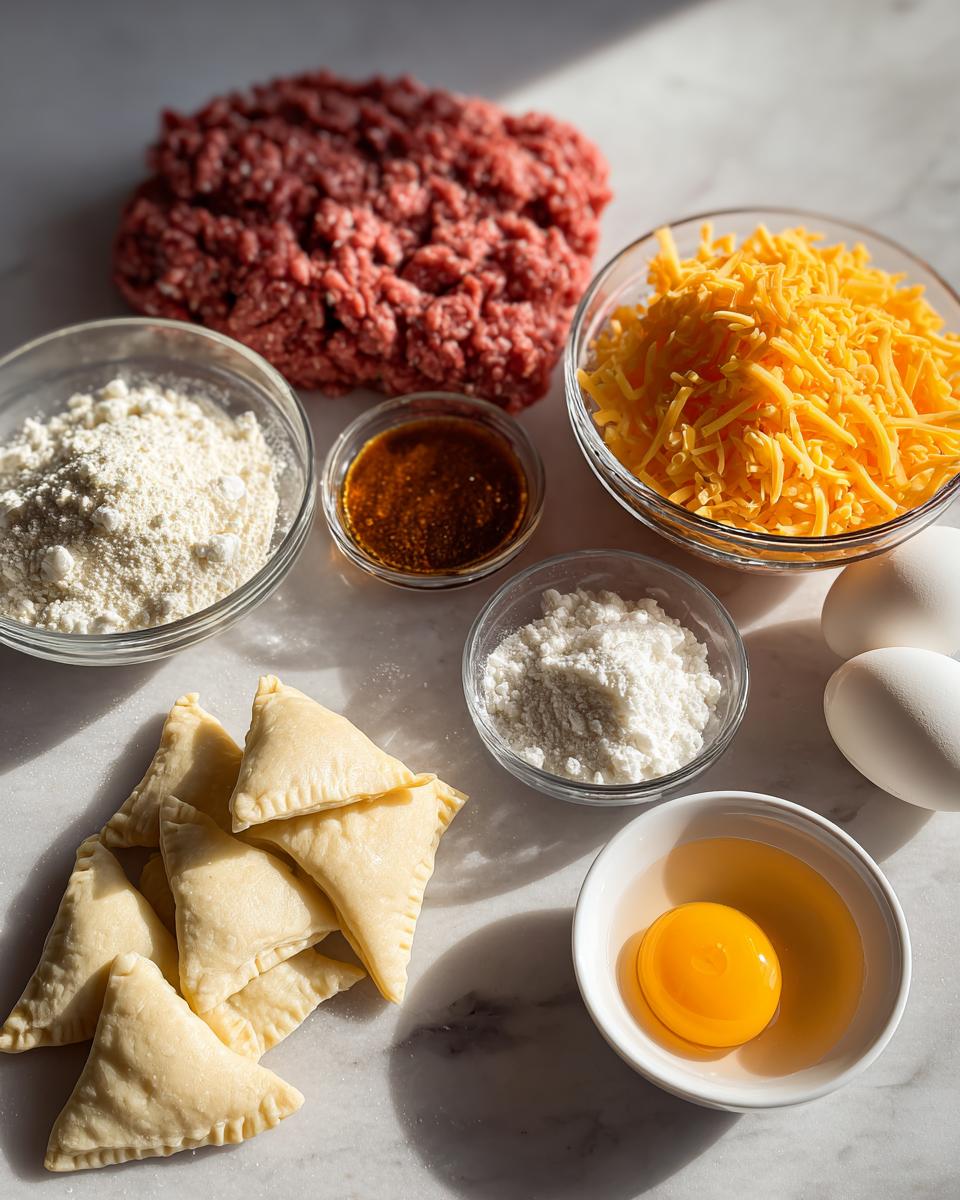
We keep the spice blend simple—just the essentials like garlic powder and onion powder, because we aren’t going for a complicated meatloaf here; we want pure Cheeseburger Pockets flavor!
Ingredient Notes and Substitutions for Your Cheeseburger Pockets
Now, let’s talk crust. These rely on that amazing, fluffy texture from store-bought crescent roll dough—that’s what makes them Crescent Roll Cheeseburger Pockets and keeps the prep time down. Make sure you don’t open that can until everything else is ready to go! If you want to get really wild, you can absolutely use puff pastry sheets cut into squares, but just know the texture shifts from fluffy crescent to buttery and flaky.
For the cheese, I just use sharp cheddar because it melts so nicely. But here’s a secret tip from the notes: if you want that real diner taste in your Ground Beef and Cheese Pockets, chop up some dill pickles super fine and mix them right into the cooled beef. It gives everything a nice little bright, tangy punch. For an extra gooey experience, you might want to check out my tips for the gooey secret in my cheese bread, which applies here too!
Step-by-Step Guide to Making Homemade Cheeseburger Pockets
Okay, this is where the magic happens! Turning raw ground beef into these amazing, sealed, Handheld Burger Meals is shockingly easy. First things first, make sure your oven is ready to go—preheat it to 375°F and get that baking sheet lined with parchment paper. That parchment paper is your best friend, trust me, especially when dealing with buttery crescent dough.
Preparing the Beef Filling for Your Cheeseburger Pockets
You need to start by browning your meat and onions together in a skillet over medium heat. Get that beef nice and crumbled, and let the onions soften up—no one wants hard onion bits inside their soft pocket!
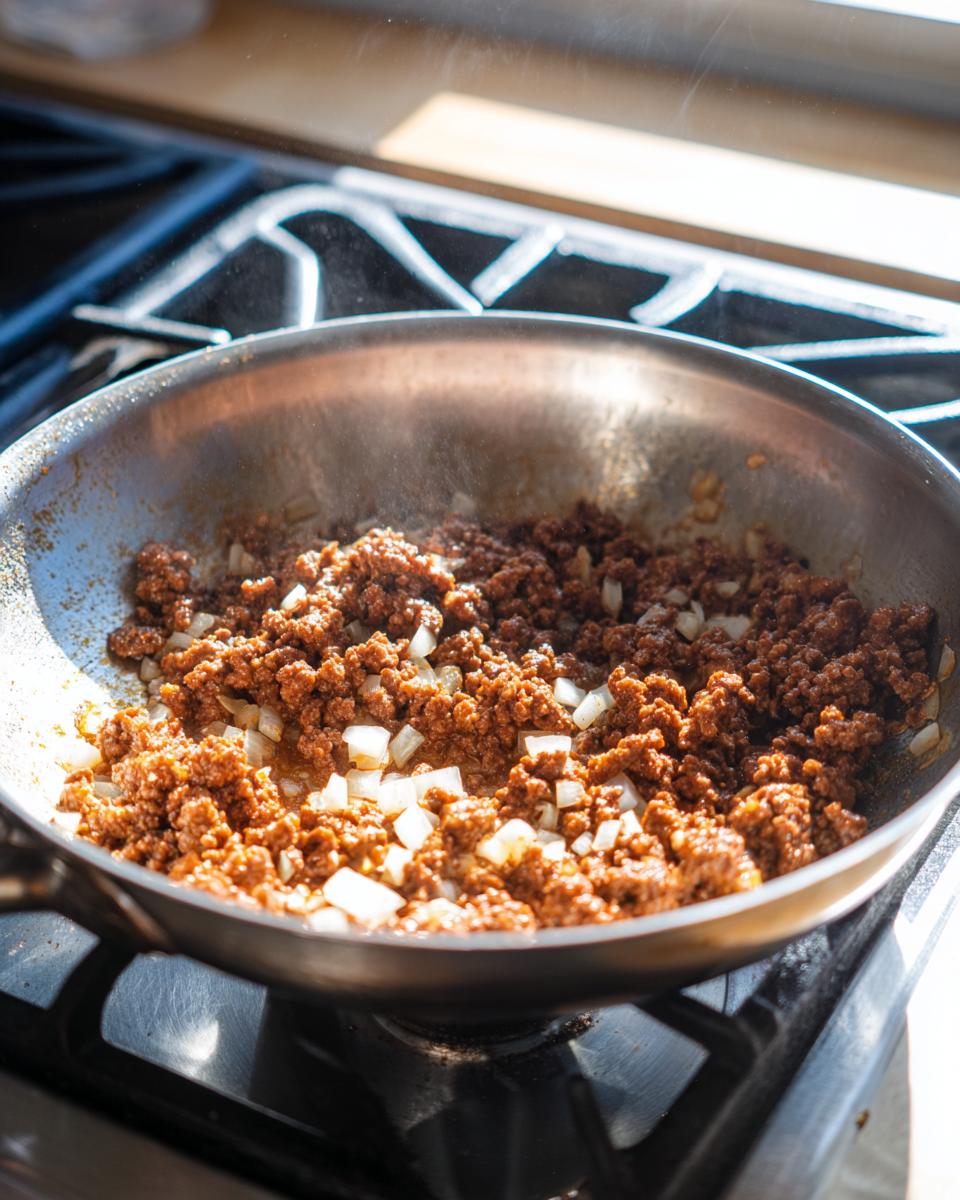
Once it’s browned, you absolutely must drain off every drop of extra grease. Nobody wants greasy pockets! Then, stir in all those wonderful seasonings—garlic powder, onion powder, salt, pepper, and that splash of Worcestershire sauce. Let that smell bloom for just a minute on the heat, then yank it off the stove immediately. This next part is crucial for success: let the mixture cool down a bit! If it’s too hot when you touch the dough, it melts the butter in the crescent rolls and you’ll end up with ripped dough and leaking filling—we want sealed pockets, not messy spills!
Assembling and Sealing the Flaky Pastry Beef Pockets
Next, unroll your dough triangles onto your clean counter. Give each triangle a small scoop, maybe just a tablespoon or a tablespoon and a half, of that cooled beef mixture right on the wide end. Sprinkle a little bit of that shredded cheese right on top of the beef.
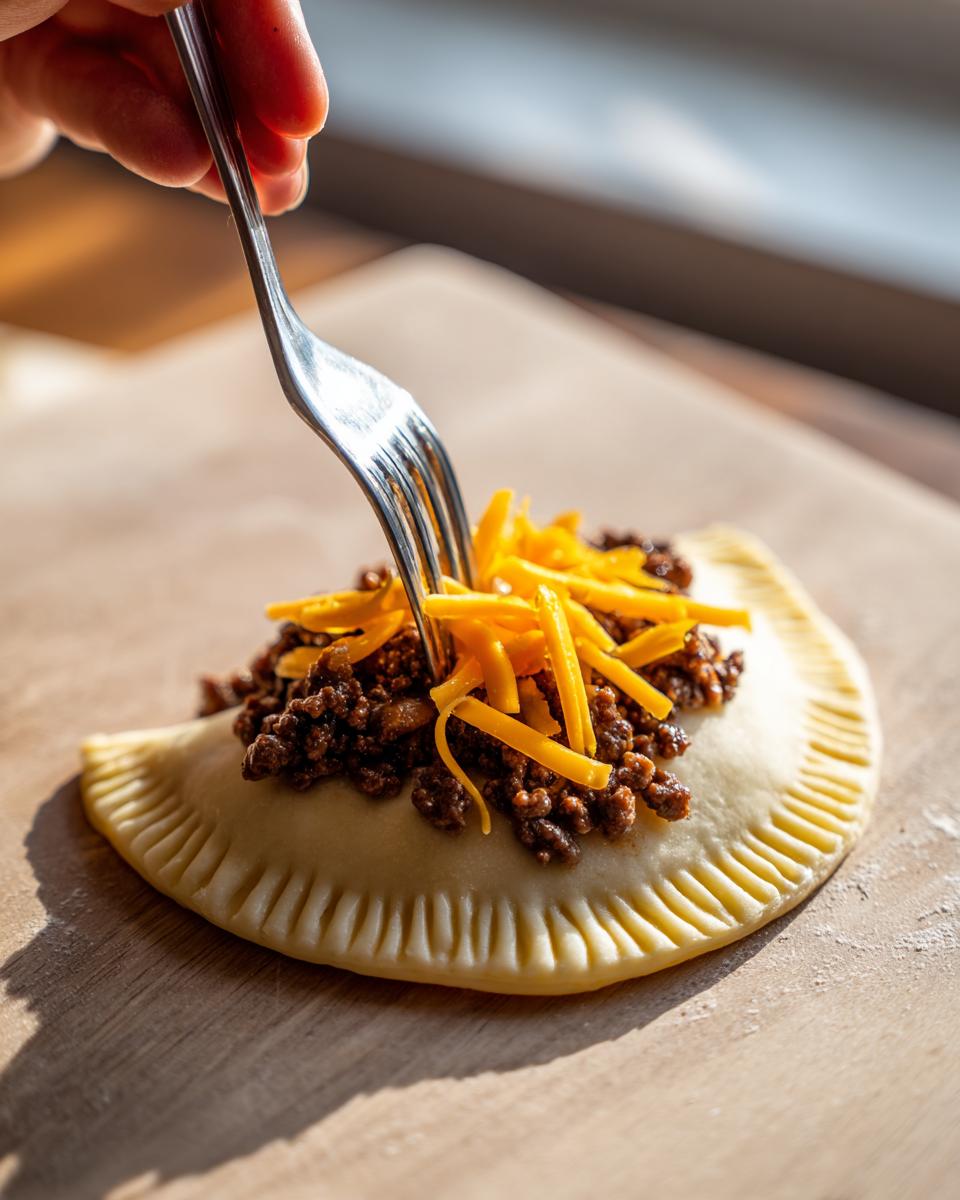
Now, fold that dough over to make your triangle shape! You need to press those edges together really firmly. I always grab a fork and give the crimp a good press around the whole edge. This is what locks in the steam and stops any cheesy disasters from happening during baking.
Put your finished Simple Baked Pockets onto your prepared sheet. Before they go into the oven, give them a quick brush with that beaten egg wash. That’s what gives them that gorgeous, shiny, golden color when they come out!
If you’re looking for other fast and flavorful dinners while you wait for these to bake, maybe try my easy chicken marsala next week!
Tips for Perfect Golden Brown Cheeseburger Pockets
Getting these Simple Baked Pockets to look restaurant-worthy is all about a few tiny adjustments that really elevate them. Since we are using that delicate crescent roll dough, we have to respect its baking time. Keep your oven set exactly to 375°F. Resist the urge to crank it up thinking it will speed things along because you risk burning the outside before the cheese fully melts inside!
Make sure your baking sheet is on the middle rack. This ensures even heat circulation around the bottom and top, giving you that structurally sound, golden crust all the way around. And definitely don’t skip the egg wash! That light brushing of beaten egg is the secret weapon for that gorgeous, deep, shiny finish. If you want to add a tiny bit of texture on top, you can sprinkle a few grains of coarse salt on the egg wash right before baking. For more pastry perfection secrets, check out my tips for baking the chewiest cookies—the principles of heat distribution are very similar!
Making Ahead and Freezing Your Cheeseburger Pockets
I mentioned these are great for Freezer Friendly Meals, and that’s because they are almost *better* when you reheat them later! If you want to prep these cheeseburger pockets ahead of time, assemble them completely—fill them, seal them tight with a fork crimp, and brush them with that egg wash, just like you would for immediate baking.
Lay the sealed pockets on a baking sheet lined with parchment paper. Pop that whole sheet right into the freezer! Once they are rock solid—this is important, make sure they are hard—transfer them into a zip-top freezer bag for long-term storage. When dinner rolls around next week, don’t thaw them! Just pop them straight from the freezer onto the parchment-lined sheet and add about 5 to 10 minutes longer to your usual bake time. It’s a lifesaver for those nights when you truly have zero time to cook. If you need more quick dessert hacks, check out my post on easy creamy fudge!
Serving Suggestions for Your Quick Dinner Pockets
Okay, these Quick Dinner Pockets are perfect just as they are, especially when you’re looking for a super easy Weeknight Ground Beef Dinner. But honestly, serving them with something dippable just triples the fun! You have to have ketchup and mustard on the side, just like a classic burger joint, but I have another suggestion I think you’ll love. If you’re feeling fancy, whip up my recipe for creamy pickle dip; it is insanely good with the savory beef filling.

For a complete meal, keep it light and fresh. A simple crisp side salad or some oven-baked sweet potato fries go perfectly here without adding too much heaviness to this perfectly portable meal!
Storing and Reheating Leftover Cheeseburger Pockets
If you somehow manage to have any of these amazing cheeseburger pockets left over—which, honestly, I find hard to believe!—storing them is simple. Once they’re completely cool, tuck them into an airtight container and keep them in the fridge for up to three days. They are still pretty great cold, honestly, like a little handheld meat pie!
When you want to reheat them, please, please, please skip the microwave if you can manage it! The microwave makes that beautiful crescent dough go soft and chewy in a sad way. I always toss them back into a 350°F oven for about 5 to 8 minutes. That little blast of heat brings the pastry right back to that lovely, flaky texture. If you need inspiration for using up other leftovers, you might want to bookmark my post on easy leftover turkey soup, although these usually don’t last long enough to need that!
Frequently Asked Questions About Cheeseburger Pockets
Can I use puff pastry instead of crescent rolls?
Oh, absolutely! If you prefer a super flaky, almost croissant-like texture, you can definitely swap the crescent dough for puff pastry sheets. Just make sure you cut the pastry into squares instead of using the triangles. You’ll still want to seal the edges well, but the baking time might be just slightly longer—maybe 16 to 20 minutes. They bake up beautifully this way, making them even more luxurious than the standard Cheeseburger Hot Pockets Homemade version.
What is the best cheese for these savory dinner pockets?
I stuck with sharp cheddar because it delivers that familiar, tangy burger flavor, but honestly? The melty factor is key! Monterey Jack or Provolone are fantastic if you want that epic cheese pull. Honestly, any cheese that melts well works perfectly in these Kid Approved Dinner pockets. Just cut the cheese into small shreds so it heats through quickly.
Can I add other fillings, like bacon or mushrooms?
Yes, you can totally customize these! If you add bacon, make sure it’s cooked completely crisp and crumbled super small so it doesn’t poke through the dough when you seal it. Mushrooms are also great, but you must sauté them first to cook out all the moisture. Watery fillings lead to soggy crusts, and we don’t want that.
How long do these pockets last in the fridge?
If you have any leftovers, they keep really well in the fridge for about three days in an airtight container. They are genuinely good cold, but I highly recommend reheating them in the oven or an air fryer to revive that crispy crust. Don’t forget to check out my ideas for easy breakfast recipes for the morning after!
Estimated Nutrition Facts for These Portable Beef Meals
I always get questions about the nutrition when I share recipes that are pure comfort food, and I totally understand! When you’re enjoying these delicious, Portable Beef Meals, it’s helpful to have a ballpark idea of what’s fueling you, right?
Based on the list of ingredients provided, here are what my nutritional testing came out to for one of our yummy cheeseburger snacks. Please remember, since we all use slightly different brands of crescent rolls or ground beef, these numbers are just a good estimate—think of them as a helpful guide rather than exact science!
- Serving Size: 1 pocket
- Calories: 320
- Fat: 18g
- Saturated Fat: 8g
- Carbohydrates: 22g
- Protein: 17g
- Fiber: 1g
- Sugar: 2g
- Sodium: 450mg
This is just a starting point, of course! If you decide to load yours up with pickles or use a low-fat cheese blend, those numbers will shift a bit. If you’re looking for a way to lighten things up but keep that amazing beef and cheese flavor, you might want to check out my recipe for the low-carb cheeseburger bowl. But for a flaky pastry treat like this? I think these numbers are pretty respectable for a Quick Dinner Pocket!
PrintEasy Homemade Cheeseburger Pockets with Crescent Rolls

Make these simple, handheld cheeseburger pockets using crescent roll dough for a quick dinner or lunch. They are filled with seasoned ground beef and melted cheese, offering classic burger flavor in a portable, flaky pastry.
- Prep Time: 15 min
- Cook Time: 18 min
- Total Time: 33 min
- Yield: 8 servings 1x
- Category: Dinner
- Method: Baking
- Cuisine: American
- Diet: Vegetarian
Ingredients
- 1 pound ground beef
- 1 small onion, finely chopped
- 1 teaspoon garlic powder
- 1 teaspoon onion powder
- 1/2 teaspoon salt
- 1/4 teaspoon black pepper
- 1 tablespoon Worcestershire sauce
- 1 cup shredded cheddar cheese (or cheese blend)
- 1 (8 ounce) package crescent roll dough
- 1 egg, beaten (for egg wash)
Instructions
- Preheat your oven to 375 degrees Fahrenheit. Line a baking sheet with parchment paper.
- In a skillet over medium heat, cook the ground beef and chopped onion until the beef is browned and the onion is soft. Drain off any excess grease.
- Stir in the garlic powder, onion powder, salt, pepper, and Worcestershire sauce into the beef mixture. Cook for one minute until fragrant. Remove from heat and let the mixture cool slightly.
- Unroll the crescent roll dough onto a clean surface. Separate the dough into individual triangles.
- Place about 1 to 1.5 tablespoons of the cooled beef mixture onto the wider end of each dough triangle. Sprinkle a small amount of shredded cheese over the beef.
- Fold the dough over the filling to form a triangle or half-moon shape. Press the edges firmly together to seal. You can crimp the edges with a fork for extra security.
- Place the sealed pockets onto the prepared baking sheet. Brush the tops lightly with the beaten egg wash.
- Bake for 14 to 18 minutes, or until the pockets are golden brown and puffed.
- Let the cheeseburger pockets cool slightly before serving. Serve with your favorite burger condiments like ketchup or mustard on the side for dipping.
Notes
- For a freezer-friendly meal, assemble the pockets completely, brush with egg wash, and freeze them on a baking sheet until solid. Transfer the frozen pockets to a freezer bag. Bake from frozen, adding 5-10 minutes to the bake time.
- You can add finely diced pickles to the beef mixture for an extra authentic cheeseburger taste.
- If you prefer a different crust, substitute the crescent roll dough with puff pastry sheets cut into squares.
Nutrition
- Serving Size: 1 pocket
- Calories: 320
- Sugar: 2
- Sodium: 450
- Fat: 18
- Saturated Fat: 8
- Unsaturated Fat: 10
- Trans Fat: 0.5
- Carbohydrates: 22
- Fiber: 1
- Protein: 17
- Cholesterol: 60