
Oh, the heat is really climbing, isn’t it? When the weather makes you crave something bright, tart, and utterly refreshing, nothing beats that pop of sunshine you get from citrus. That’s why I’m handing over my absolute favorite way to cool down: my Easy No-Bake Key Lime Cheesecake. Forget fussy ovens and cracked tops; this recipe gives you that stunningly creamy texture and intense flavor you dream about, all in one simple, no-bake package. My corporate life felt so complicated, but returning to the kitchen for things like this—simple, impressive desserts—was my true sanctuary. Trust me, this is the best key lime cheesecake you’ll ever chill!
- Why This No-Bake Key Lime Cheesecake is Your New Favorite Summer Cheesecake Recipes
- Gathering Ingredients for Your Easy Key Lime Cheesecake
- How to Prepare the Best Key Lime Cheesecake
- Tips for Success Making a Perfect Key Lime Cheesecake
- Variations for Your Tangy Citrus Cheesecake
- Storage and Reheating Instructions for Key Lime Cheesecake
- Frequently Asked Questions About This Creamy Lime Cheesecake Dessert
- Nutritional Estimates for Your Key Lime Cheesecake
- Share Your Key Lime Cheesecake Creations
Why This No-Bake Key Lime Cheesecake is Your New Favorite Summer Cheesecake Recipes
If you’re looking for truly refreshing cheesecake ideas that won’t turn your kitchen into a sauna, this is it! Since we skip the oven entirely, this is perfect for those scorching afternoons. It hits all the right notes for a spectacular summer cheesecake recipes entry: intensely tangy, wonderfully sweet, and unbelievably creamy. It’s the kind of dessert that tastes like vacation, and honestly, who doesn’t need a little more of that?
The Secret to a Truly Creamy Lime Cheesecake Dessert
The magic behind achieving that perfect, silky texture for a creamy lime cheesecake dessert when baking isn’t involved lies totally in two helpers: softened cream cheese and the sweetened condensed milk. These two ingredients emulsify beautifully. They whip up into something rich without needing eggs or heat to set it. It’s pure indulgence, I promise!
Building the Best Graham Cracker Crust Recipe
You can’t have a truly great lime cheesecake without a sturdy base! Forget flimsy crumbs; we want real texture here. Developing the best graham cracker crust recipe means using just enough melted butter to make it stick, but not so much that it turns greasy. My biggest tip? Press it down firmly using the bottom of a flat measuring cup. That initial pressure is what keeps it from crumbling when you slice it later.
Gathering Ingredients for Your Easy Key Lime Cheesecake
Okay, let’s talk about what you need to grab before you dive into mixing. Since this is our favorite easy key lime cheesecake, I made sure the ingredient list is super accessible. You don’t need any specialty items that require a trip across town—just the good stuff that brings that bright, zesty flavor we’re after. We’re mixing up the crust and the filling separately, so let’s break down what goes where. Remember, quality ingredients make all the difference, especially when you’re keeping things simple!
Ingredient List for the Tangy Citrus Cheesecake Filling
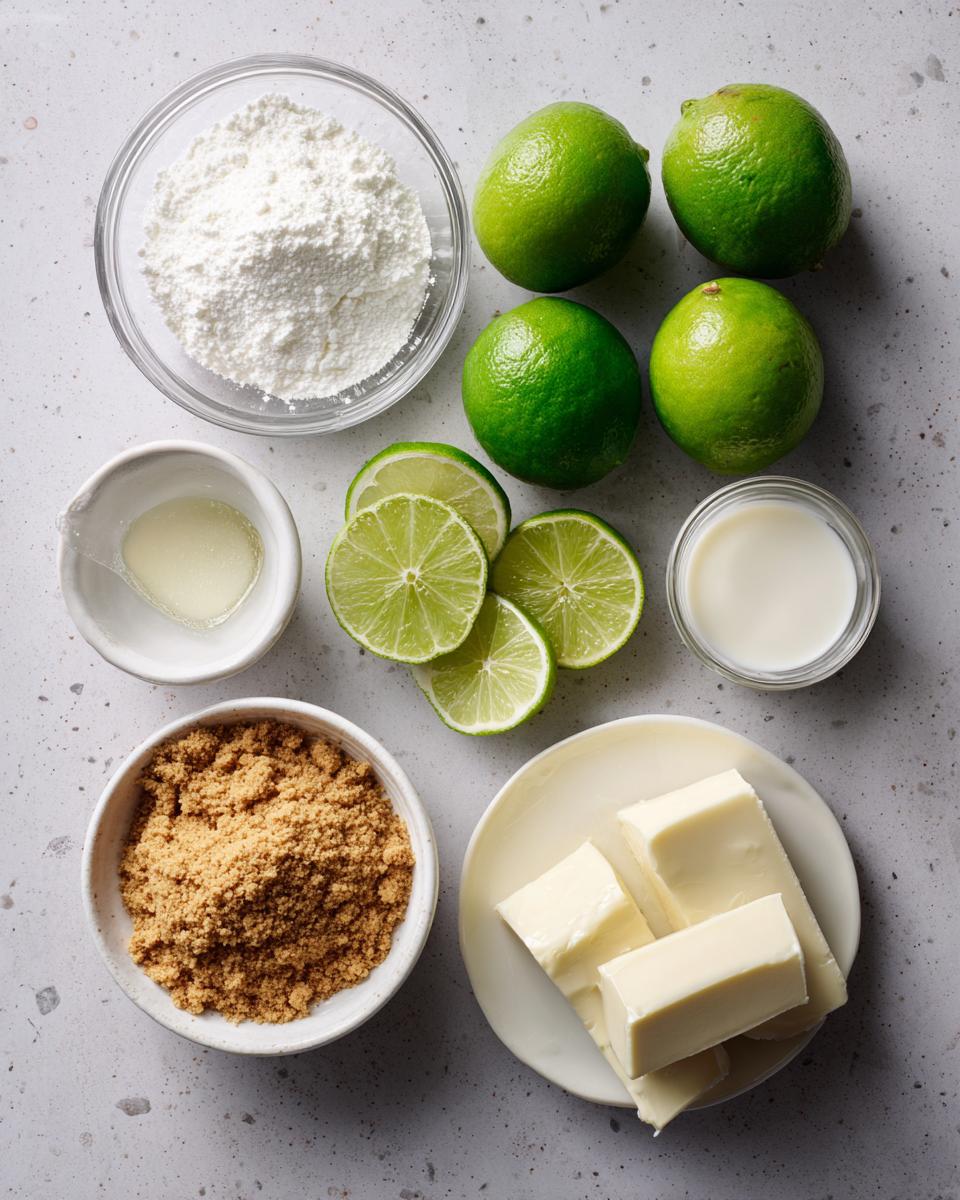
This filling is where that incredible flavor explosion comes from. When you gather these, please—and I mean *please*—make sure that cream cheese is truly softened so you don’t end up with lumps. Also, the star here is the lime. You absolutely need fresh juice for that intense, tangy citrus cheesecake experience. For the filling, you will need:
- Two 8-ounce packages of cream cheese, softened (this is key!)
- One 14-ounce can of sweetened condensed milk
- 1/2 cup of fresh key lime juice—that’s usually about 6 to 8 limes, depending on how juicy yours are.
- 1 tablespoon of fresh key lime zest
- 1 teaspoon of vanilla extract
Crust Components for Your Key Lime Cheesecake
For the base, we are keeping it classic with a sweet, buttery crunch. You’ll want to have these things measured out and ready to go before you even touch the mixer:
- 1 1/2 cups of graham cracker crumbs
- 1/4 cup of granulated sugar, mixed right in with those crumbs
- 6 tablespoons of unsalted butter, melted until it’s liquid gold
How to Prepare the Best Key Lime Cheesecake
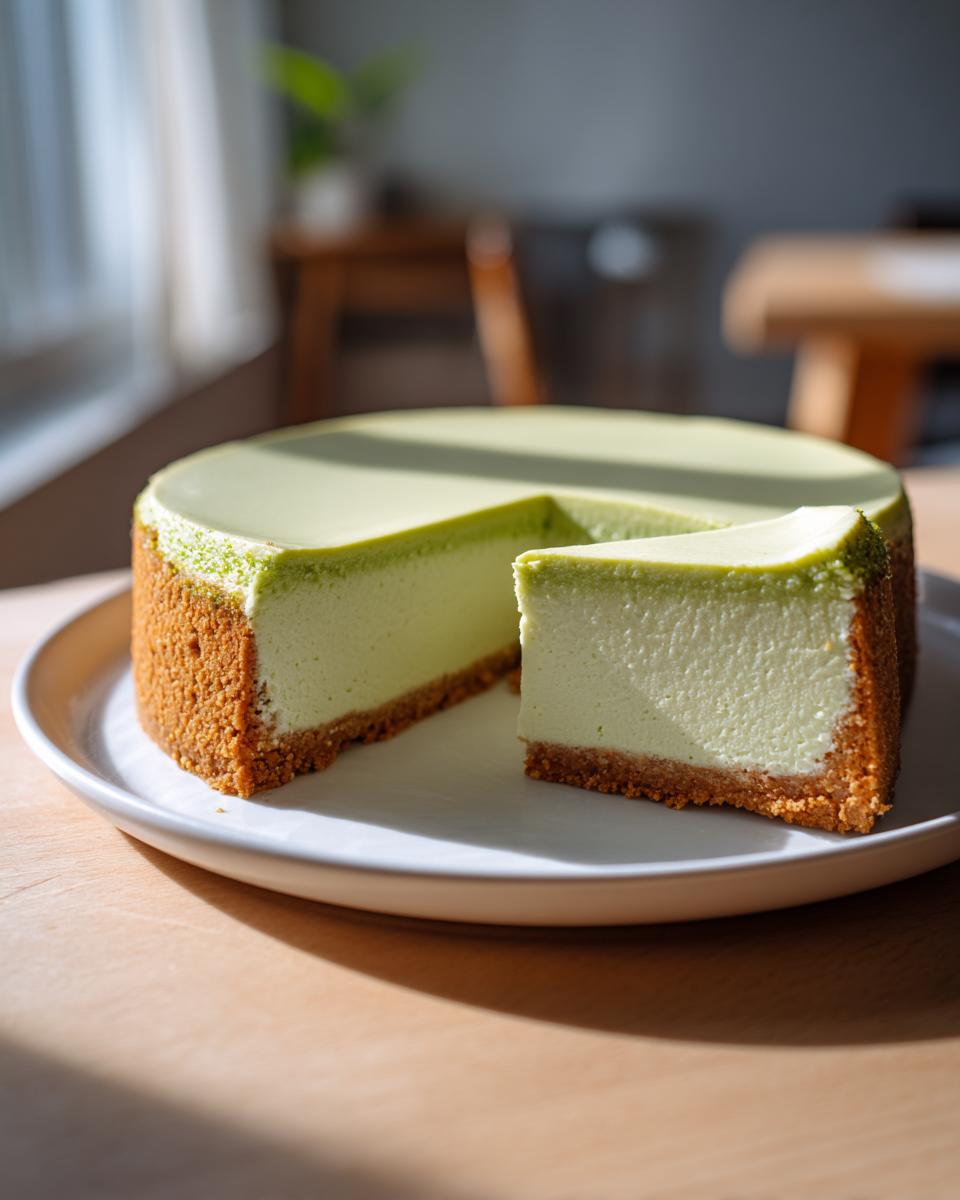
Alright, let’s get this gorgeous, tangy treat assembled! Since this is a no-bake recipe, the key is organization—getting everything ready before you start mixing means everything goes smoothly. We are building the ultimate key lime cheesecake right here, starting right at the bottom. Don’t rush the chilling steps; that’s where the structure sets itself up perfectly.
Step-by-Step Guide to the Graham Cracker Crust Cheesecake
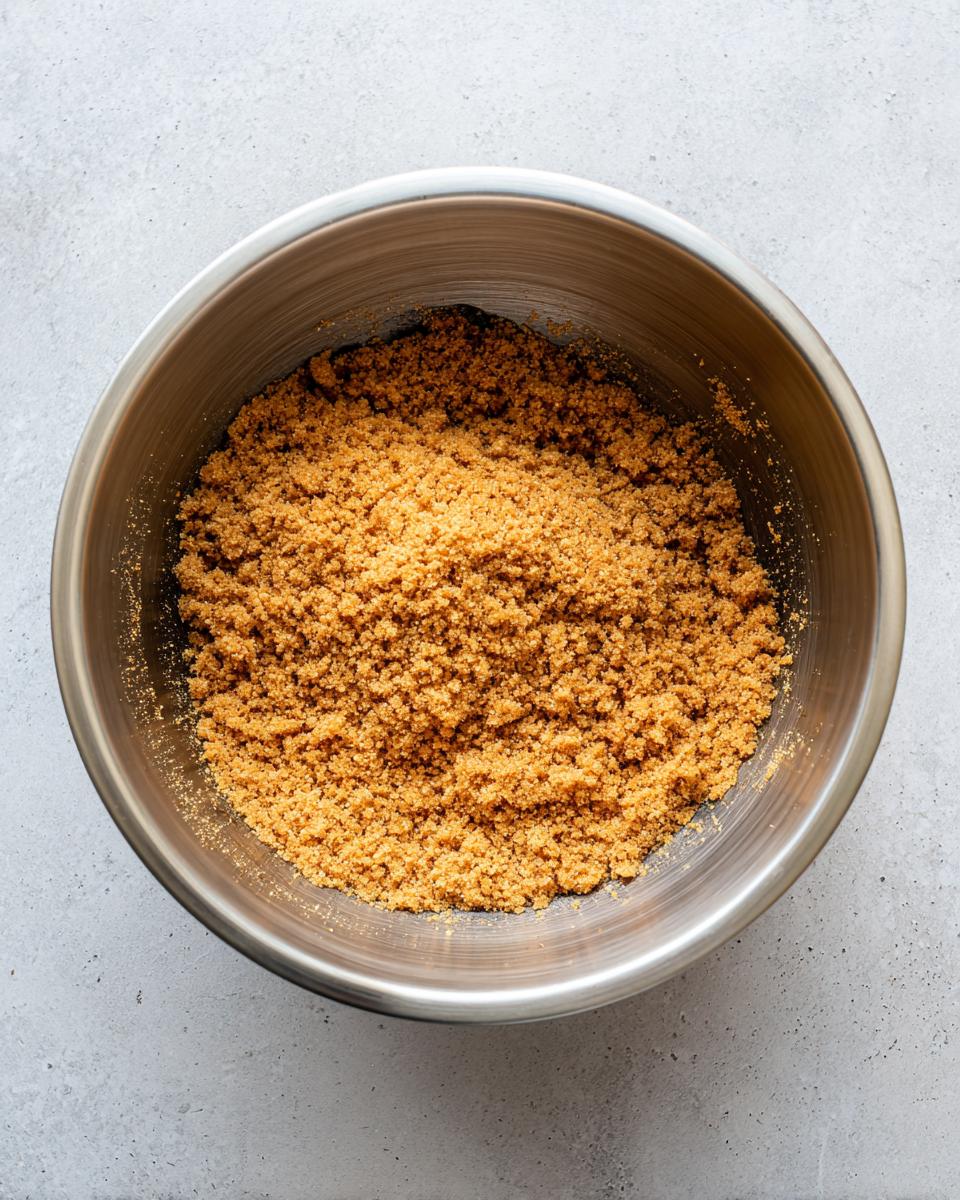
First up, we tackle that foundation—our buttery graham cracker crust cheesecake! In a medium bowl, combine those crumbs and the 1/4 cup of sugar. Pour in your melted butter and stir it through until every crumb looks evenly moistened—it should look like wet sand. Press this mixture *firmly* into the bottom of your 9-inch springform pan. Don’t be shy with the pressing! Then, pop that pan into the freezer for just 15 minutes while we whip up the filling. This quick chill really sets it up well.
Mixing the Homemade Key Lime Pie Filling
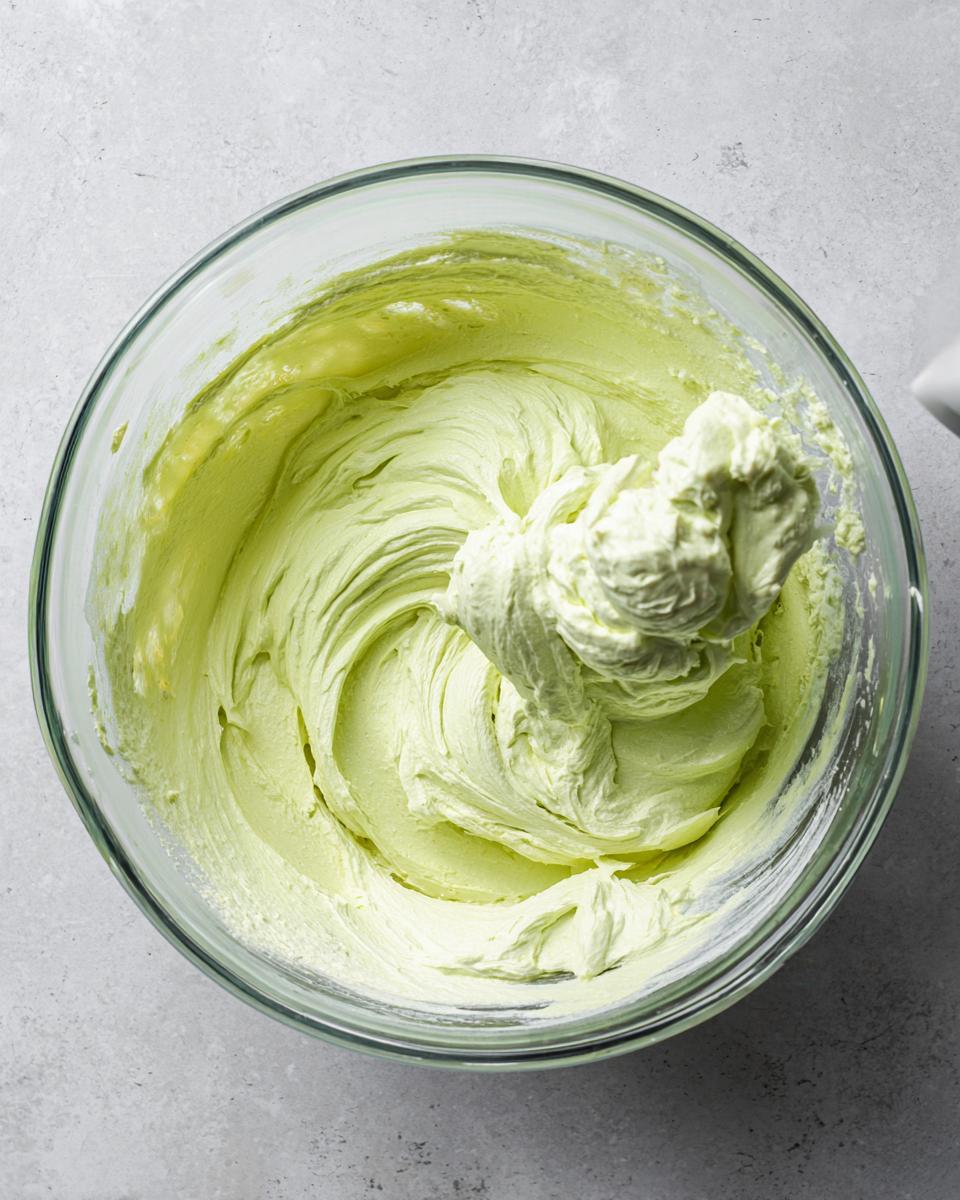
Now for the main event! Grab a large bowl and beat that softened cream cheese with your electric mixer until it’s totally smooth—we’re talking two full minutes here so there are zero tiny lumps. Next, slowly beat in the sweetened condensed milk until everything looks uniform and just blended. Now comes the important part for our homemade key lime pie filling: gently mix in your fresh juice, zest, and vanilla. Stop mixing as soon as it comes together! Seriously, once that lime hits the dairy, overmixing can mess with the setting process, so keep it low and quick!
Chilling and Serving Your Key Lime Cheesecake Dessert
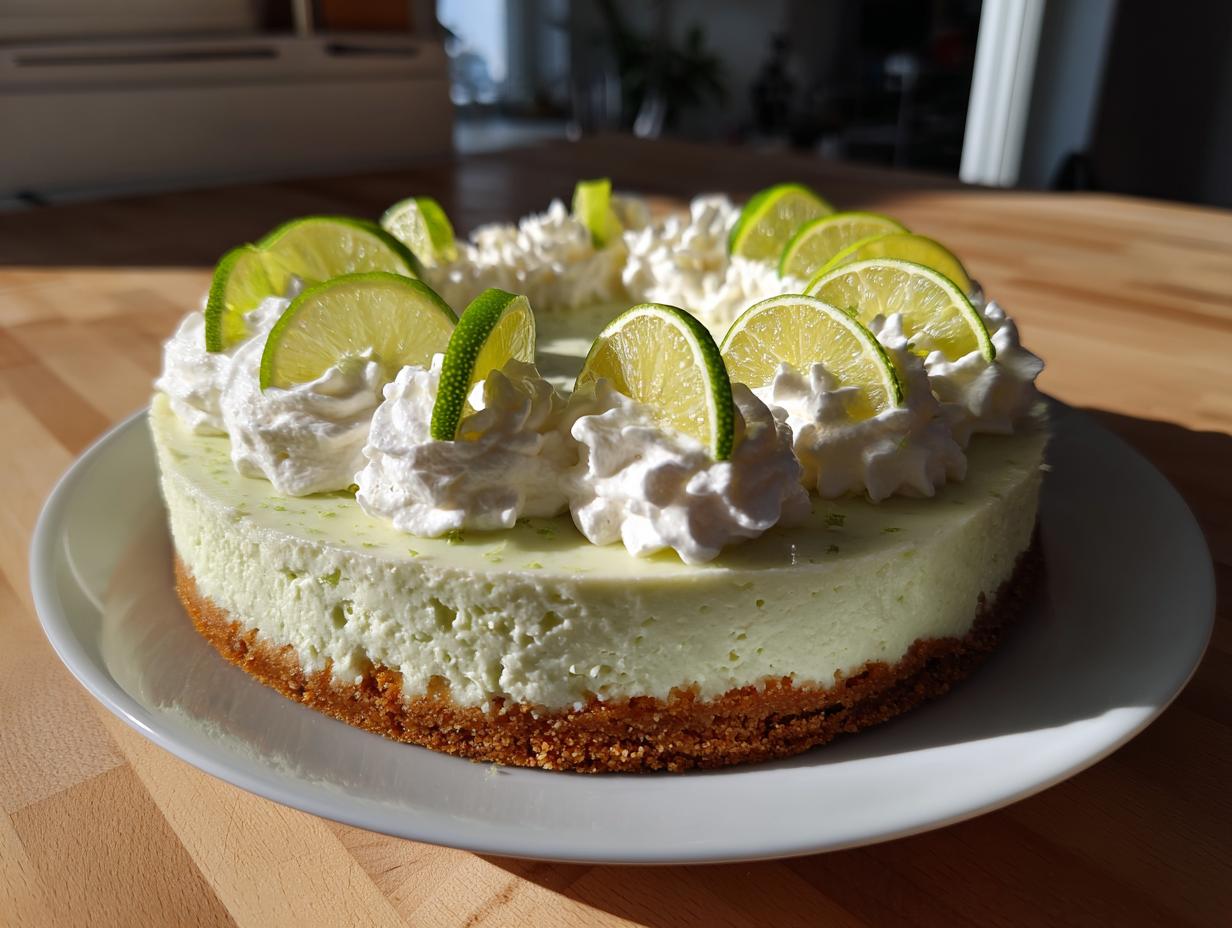
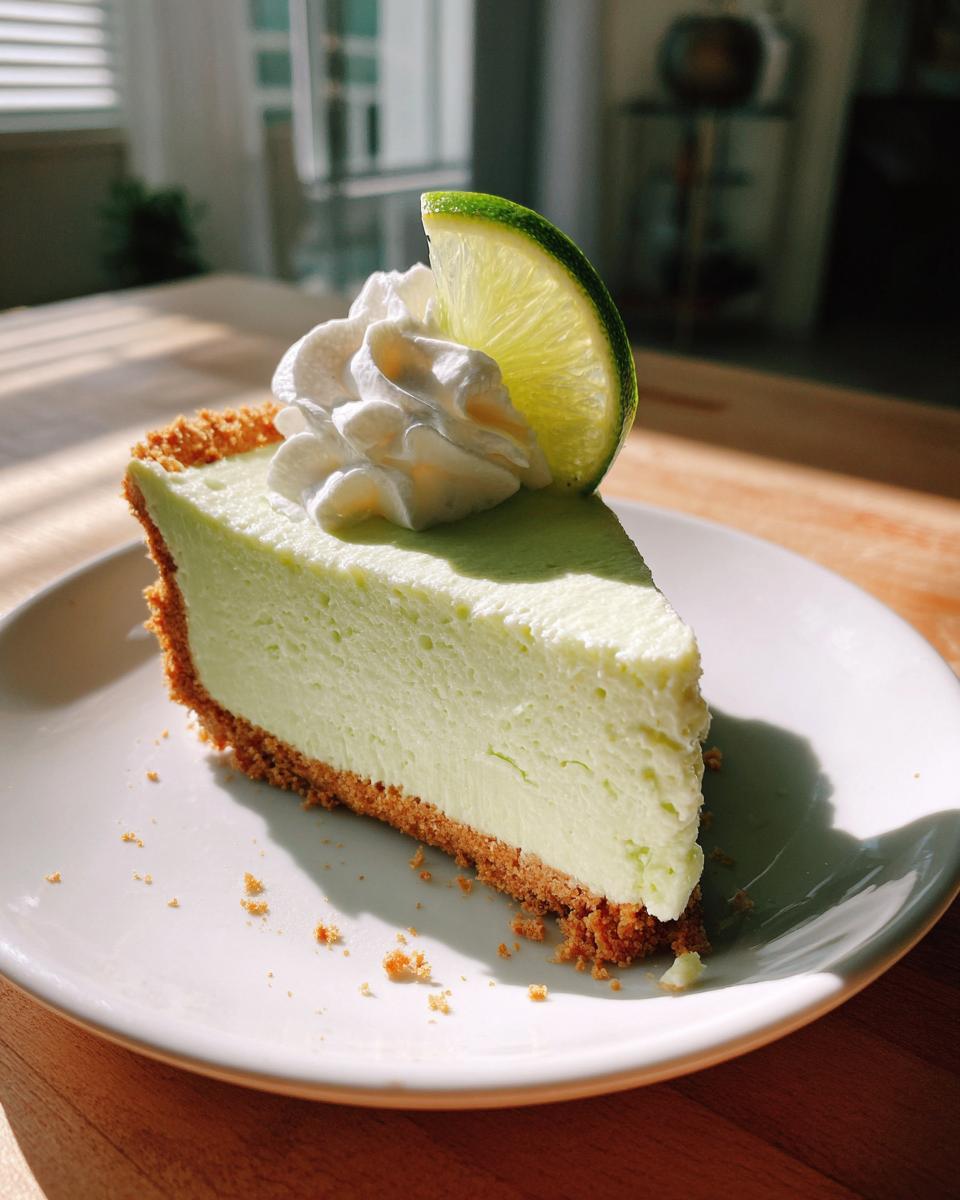
Carefully pour that lovely, vibrant filling right over your chilled crust. Use a spatula to smooth out the top—we want it looking beautiful for when the guests arrive! Cover the pan loosely with plastic wrap so nothing falls in, and then transfer it to the fridge. This isn’t a quick dessert; you need at least 6 hours, but honestly, overnight is far better for the absolute firmest set. Once it’s solid, carefully release the springform sides. Top with whipped cream and a few extra lime slices if you want that extra flair. Enjoy serving this key lime cheesecake dessert!
Tips for Success Making a Perfect Key Lime Cheesecake
I know how frustrating it is when you follow a recipe perfectly, and it *still* doesn’t turn out quite right. Since this key lime cheesecake relies on time rather than heat to set, these little tips—gathered from my own messy kitchen experiences—will ensure you get that impressive, perfectly tangy result every single time.
Achieving Bright Flavor in Your Key Lime Cheesecake Recipe
If you try to substitute bottled juice here, you’re going to miss the mark entirely. The whole joy of this key lime cheesecake recipe is that vibrant, slightly floral punch only fresh key limes provide. Bottled juice often has preservatives that mute that brightness and can sometimes spoil the final texture. When you zest and juice the limes yourself, you unlock the maximum zesty goodness!
Making Individual Mini Key Lime Cheesecakes
Sometimes, you just don’t need a huge dessert hanging around, or maybe you want an easy grab-and-go treat for a party. That’s where making individual mini key lime cheesecakes comes in handy! I simply line standard muffin tins with paper liners, press the crust mix into the bottom of those, and pour the filling right on top. They chill faster, too! You can serve these adorable bites without ever cutting a slice, which is always impressive.
Variations for Your Tangy Citrus Cheesecake
Now that you’ve got the basic, foolproof recipe for this incredible key lime cheesecake locked down, let’s talk about kicking things up a notch for future gatherings. Sometimes I get bored doing the same thing twice, even if it’s amazing! My goal for any dessert is to make it look like I spent days fussing over it, when really, it took 20 minutes of mixing. This base recipe is perfect for small, creative additions that really make it an impressive party dessert.
One of my absolute favorite ways to elevate the look without adding any extra time to the hardening process is by creating a beautiful swirl. Before you chill the poured filling, take a small jar of good quality lime curd—you can buy this or make your own, but store-bought is my secret weapon here—and dollop about half a cup gently over the surface of the cheesecake filling. Then, take a butter knife or a skewer and gently swirl it through the top layer. You get these gorgeous ribbons of extra tangy flavor throughout your tangy citrus cheesecake!
If you want to lean into the tropical side even more, skip the plain whipped cream topping sometimes. Instead, try folding a splash of coconut milk or even a tiny bit of finely shredded, toasted coconut into your final layer of whipped topping before spreading it on. It just gives that little extra dimension. Also, don’t forget the zest! Always garnish heavily with fresh lime zest right before serving. That bright green color pops against the white filling, and the fresh aroma is just incredible!
Storage and Reheating Instructions for Key Lime Cheesecake
This is a fantastic thing about a no-bake dessert: it keeps beautifully! Since we aren’t dealing with eggs that might change texture when frozen, this key lime cheesecake holds up really well. The main goal when storing it is just to keep that wonderfully creamy lime cheesecake dessert texture intact, which is surprisingly easy.
In the refrigerator, this cheesecake is happy for about four to five days, provided you cover it properly. I always use a slightly loose piece of plastic wrap, just tall enough not to touch the top surface if you’ve added whipped cream. This lets it breathe just a tiny bit while still keeping airborne odors out—no one wants their cheesecake tasting like last night’s garlic!
Now, can you freeze it? Yes! For longer storage, this key lime cheesecake freezes like a charm. For the best results, I highly recommend slicing it first before freezing. Freeze the individual slices on a baking sheet until they are solid, then transfer those hard slices into an airtight, freezer-safe bag or container. This prevents any freezer burn on the sides.
When you’re ready to enjoy it, pull out just the slices you need. Thawing is simple: move the frozen slices to the refrigerator for about 3 to 4 hours. Let them come to temp slowly. If you try to eat it straight from the freezer, it will be too hard; letting it soften even a little bit restores that luscious, creamy feel we worked so hard to achieve!
Frequently Asked Questions About This Creamy Lime Cheesecake Dessert
I completely understand! When you are making something special like this to serve guests, you always have questions swimming around. I gathered the ones that pop up most often about this specific key lime cheesecake. We want to make sure you feel super confident when you decide to tackle this!
Can I substitute regular lime juice for key lime juice in this key lime cheesecake recipe?
Oh, that’s a great question! You certainly *can* use regular Persian limes if that’s what you can find easily, but the flavor profile will definitely change. Key limes are smaller, much tarter, and have this wonderfully delicate, aromatic floral note that standard limes just don’t carry. If you convert over, you might need a little extra zest to boost that impact, or you might find it tastes more like a standard lime pie than the authentic, bright flavor we are chasing in this key lime cheesecake recipe.
How long does this no bake key lime cheesecake need to set?
This is crucial for a successful no bake lime dessert! Since there is no heat hardening the mixture, time is your best friend here. The absolute minimum chilling time I recommend is six hours. I’ve done it when I was really pressed for time, and it was firm enough to cut. However, for that truly magnificent, sliceable, and perfectly structured texture—the one that doesn’t immediately slump when you pull the springform ring off—you need to let it chill overnight. That extra time lets the lime juice fully work its chemical magic on the dairy!
Is this recipe considered a rich creamy dessert?
Absolutely! Even though it’s no-bake, I would definitely put this in the category of a rich creamy dessert. The combination we use—full-fat cream cheese blended seamlessly with the thick sweetened condensed milk—creates a density and mouthfeel that is incredibly luxurious. It’s lighter on the palate than a baked traditional cheesecake because it doesn’t have the heaviness of baked egg custard, but it is certainly decadent and satisfying in every single bite.
Nutritional Estimates for Your Key Lime Cheesecake
Now, I know some of you are watching macros, and others just like to know what you’re putting into your body. Listen, I’m a home cook, not a certified nutritionist, so treat these numbers as fun estimates—not gospel! Since this is a no-bake recipe loaded with cream cheese and condensed milk, it is definitely a luxurious treat, not a diet snack. But hey, everything in moderation, right? These figures are based on dividing the recipe into 10 generous slices. If you cut smaller, the numbers adjust!
Here is a rough breakdown of what you’re looking at per slice for this delicious key lime cheesecake:
- Serving Size: 1 slice
- Calories: Around 380 Cals
- Fat: About 24g (and yes, that’s including the good butter in the crust!)
- Saturated Fat: Approximately 14g
- Carbohydrates: Roughly 35g
- Sugar: That’s where you see the impact of the condensed milk, coming in around 32g
- Protein: A modest 6g
Because we aren’t baking, we skip out on any changes that heat might cause to the fats, but this recipe certainly leans into being a wonderful, rich creamy dessert. Enjoy every bite of that tangy, bright flavor!
Share Your Key Lime Cheesecake Creations
Well, you’ve made it to the end! Now the real fun begins—sharing this incredible flavor with the world, or at least with your friends and family. I really, truly hope this became your new favorite way to make a stunning dessert without ever touching the oven. It’s meant to be easy, but it tastes like you spent hours crafting something truly special.
When you whip up this amazing key lime cheesecake, please come back and tell me how it went! Drop a rating—five stars if it blew your mind, obviously—and leave a comment telling me which part was your favorite. Did the graham cracker crust hold up perfectly? Did everyone rave about that zingy, tangy citrus flavor?
I especially want to hear from those of you who used it for a gathering. Did you manage to create that beautiful lime curd swirl, or did you serve them up as adorable mini versions? Tag me in your photos or let me know in the comments how this recipe quickly became your go-to choice for truly impressive party desserts. Happy baking—or, well, happy chilling!
PrintEasy No-Bake Key Lime Cheesecake with Graham Cracker Crust

Make this creamy, tangy no-bake key lime cheesecake for a refreshing summer dessert. It features a buttery graham cracker crust and bright citrus filling that impresses guests.
- Prep Time: 20 min
- Cook Time: 0 min
- Total Time: 6 hr 20 min
- Yield: 10 servings 1x
- Category: Dessert
- Method: No-Bake
- Cuisine: American
- Diet: Vegetarian
Ingredients
- 1 1/2 cups graham cracker crumbs
- 1/4 cup granulated sugar (for crust)
- 6 tablespoons unsalted butter, melted
- 2 (8 ounce) packages cream cheese, softened
- 1 (14 ounce) can sweetened condensed milk
- 1/2 cup fresh key lime juice (about 6–8 limes)
- 1 tablespoon key lime zest
- 1 teaspoon vanilla extract
- Optional: Whipped cream and extra lime slices for topping
Instructions
- Prepare the crust: Mix graham cracker crumbs and 1/4 cup sugar in a medium bowl. Pour in melted butter and stir until the crumbs are evenly moistened. Press the mixture firmly into the bottom of a 9-inch springform pan. Chill the crust in the freezer for 15 minutes while you prepare the filling.
- Make the filling: In a large bowl, beat the softened cream cheese with an electric mixer until smooth and creamy, about 2 minutes. Scrape down the sides of the bowl.
- Gradually beat in the sweetened condensed milk until fully combined and smooth.
- Add the key lime juice, lime zest, and vanilla extract. Mix on low speed until just combined. Do not overmix once the lime juice is added.
- Pour the key lime filling over the chilled graham cracker crust. Smooth the top with a spatula.
- Chill the cheesecake: Cover the pan loosely with plastic wrap and refrigerate for at least 6 hours, or preferably overnight, until the cheesecake is firm.
- To serve, carefully remove the sides of the springform pan. Top with whipped cream and extra lime slices if desired. Slice and serve this refreshing cheesecake dessert.
Notes
- Use fresh key lime juice for the best, brightest citrus flavor. Bottled juice changes the texture slightly.
- If you want individual servings, press the crust mixture into the bottoms of lined muffin tins to make mini key lime cheesecakes.
- For an extra impressive party dessert, use a handheld electric mixer to swirl a thin layer of lime curd into the top of the filling before chilling.
Nutrition
- Serving Size: 1 slice
- Calories: 380
- Sugar: 32g
- Sodium: 250mg
- Fat: 24g
- Saturated Fat: 14g
- Unsaturated Fat: 10g
- Trans Fat: 0.5g
- Carbohydrates: 35g
- Fiber: 1g
- Protein: 6g
- Cholesterol: 75mg