
When life gets busy—and let’s be honest, it always seems to be busy—we need desserts that deliver maximum deliciousness with minimum fuss. I’m Aria, and I know that feeling well, especially when you suddenly realize you need a showstopper for a gathering tonight. That’s why I’m thrilled to share what I truly believe is the best oreo pie recipe out there. This isn’t some fussy dessert that requires an hour of baking; this is pure, creamy, chocolatey magic that relies entirely on your freezer to set up. Forget the oven; this is the ultimate no-bake treat designed for real life. It’s the kind of dessert that becomes your secret weapon when you need something both decadent and unbelievably simple.
It’s so reliable, I’ve made it countless times for last-minute potlucks and weekend family drops. You simply won’t use any other cookies and cream recipe once you try this one. You can find more of my favorite quick fixes here: easy dessert recipes.
- Why This No Bake Oreo Pie Is Your New Go-To Easy Oreo Dessert
- Gathering Ingredients for Your Creamy Oreo Pie
- Step-by-Step Instructions for the Perfect Oreo Pie
- Tips for Making the Best Cookies and Cream Pie
- Ingredient Notes and Substitutions for Your Oreo Pie
- Storage and Make Ahead Dessert Tips for Your Oreo Pie
- Serving Suggestions: What Pairs Well with Oreo Pie
- Frequently Asked Questions About This Easy Oreo Dessert
- Finding Joy in Your Kitchen with This Oreo Pie Recipe
Why This No Bake Oreo Pie Is Your New Go-To Easy Oreo Dessert
When you need a dessert on the table fast, you need reliability, and that’s exactly what this pie delivers. Trust me, this version cuts out all the complicated steps without sacrificing the rich, indulgent flavor we all crave. It’s designed for the moments when you need impressive results without the heat.
Here is why this No Bake Oreo Pie will live rent-free in your dessert rotation:
- It’s incredibly fast. You are looking at maybe 20 minutes of hands-on time before it heads to the fridge. That’s huge!
- Zero oven time! Seriously, this is a lifesaver when summer hits or when your oven is already full of dinner.
- That texture? It’s everything. We’re talking about a perfectly crunchy crust holding the fluffiest, creamiest cookies and cream filling you can imagine.
- It pleases everyone. Seriously, who doesn’t love Oreos? This is my favorite oreo dirt cake recipe sibling.
Gathering Ingredients for Your Creamy Oreo Pie
Okay, let’s talk about what you need to grab! The beauty of this oreo pie is that you likely have most of this tucked away already. There are no strange ingredients here, just simple pantry staples that come together to make something seriously decadent. Pay close attention to the condition of a couple of items, though; that’s where the creamy texture magic happens!
I always double-check the state of my dairy before starting. If the cream cheese is too hard, you’ll end up with lumps, and trust me, nobody wants a lumpy cloud of happiness in their pie.
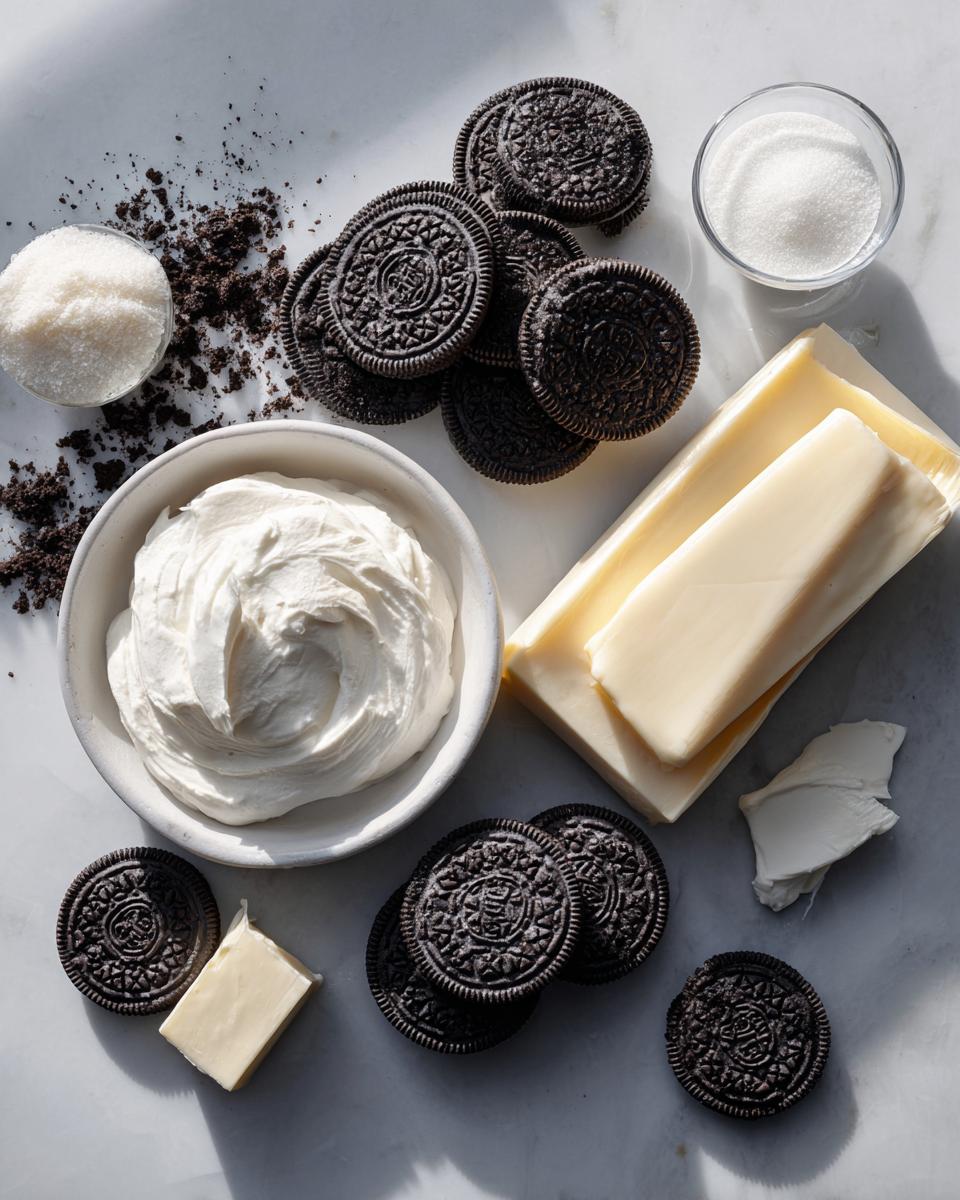
For the Homemade Oreo Crust
This crust is so much better than anything you buy in a box, and it takes about two minutes. Don’t skip this part!
- Oreo cookies: You’ll need one whole package (that’s 14.3 ounces) of those amazing chocolate sandwich cookies, and we’re using them ALL, but we divide them later!
- Unsalted butter: Six tablespoons, and make sure it’s melted down and ready to go.
For the Fluffy Oreo Filling
This is where we create that signature light, pillow-soft texture that makes this pie legendary. Precision matters here, especially with temperature!
- Cream cheese: One standard 8-ounce block. It absolutely must be *fully softened to room temperature*—I mean, spreadable soft.
- Powdered sugar: One cup of this fine white magic.
- Vanilla extract: Just one little teaspoon to give it that classic comforting flavor.
- Frozen whipped topping: One 8-ounce carton. This needs to be *thawed completely but still cold* when you fold it in—don’t let it melt into liquid!
- Oreo cookies: Remember those cookies we set aside? We need about 8 more cookies for this part, and they need to be *coarsely chopped* so you get those lovely little crunch surprises in every bite.
Step-by-Step Instructions for the Perfect Oreo Pie
This is the fun part, and honestly, it moves quickly! Setting up the crust first gives it a head start chilling, which makes our lives so much easier later on. Don’t rush the mixing, but keep your eye on the clock because we don’t want this oreo pie to feel like a mountain climb. It’s meant to be simple, remember?
If you don’t have a food processor, don’t panic! I’ve done this dozens of times using the old-fashioned technique. Toss those cookies into a heavy-duty zip-top bag—the good, sturdy kind, not the flimsy ones! Then, grab a rolling pin or even the bottom of a sturdy mug and just bash away until you get fine crumbs. It sounds a little aggressive, but it works like a charm and makes satisfying noise!
Creating the No Bake Oreo Crust Base
First things first: we need to get those cookies broken down. Pulse 14 of your Oreos in the food processor until they are fine crumbs—look for a texture like wet sand. Take out just 2 tablespoons of those crumbs and set them aside in a small bowl; these are for the grand finale topping.
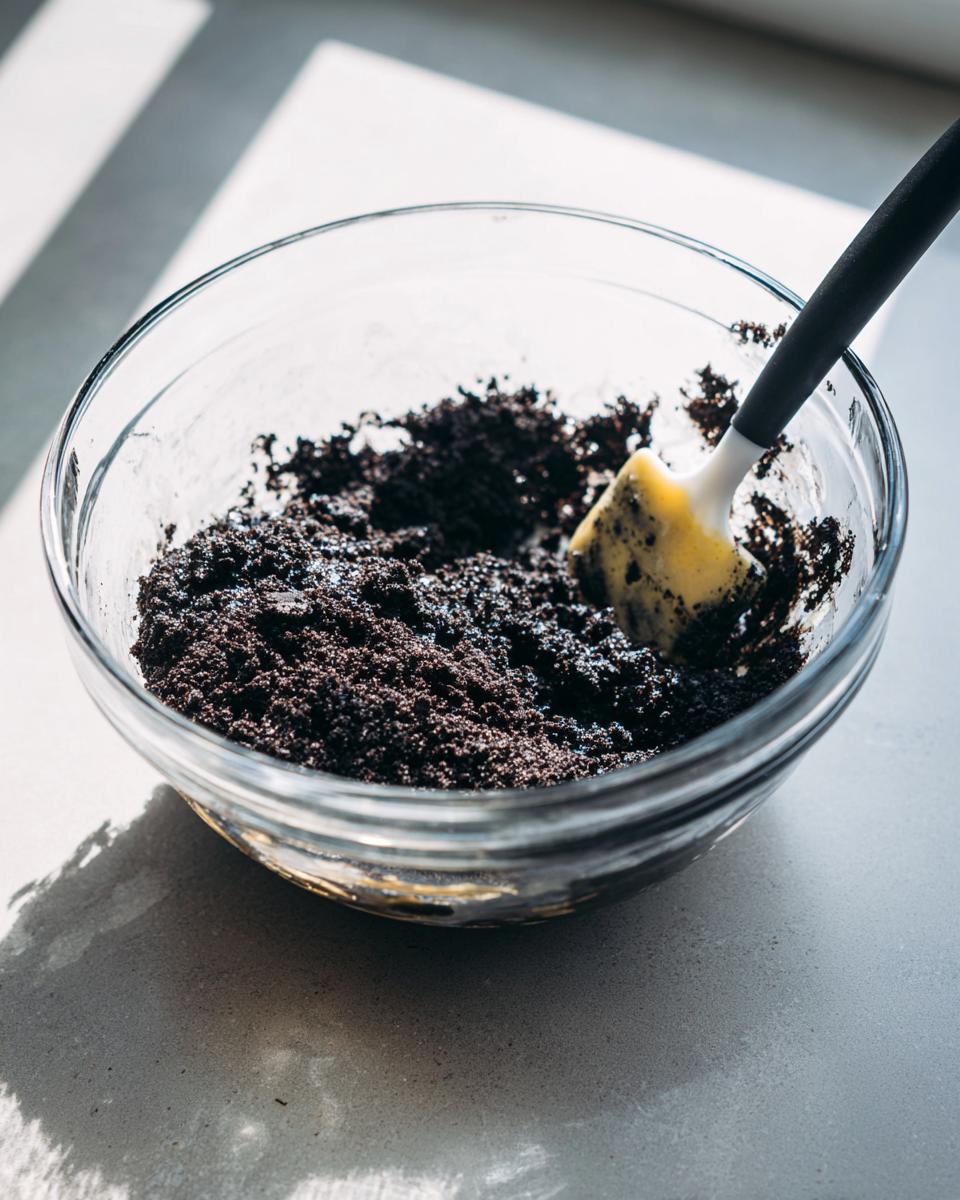
Now, drizzle the 6 tablespoons of melted butter over the rest of the crumbs in the processor and pulse just until everything looks evenly damp. It should hold together when you squeeze a little bit between your fingers. Gently press this buttery mixture firmly into the bottom and up the sides of your 9-inch pie plate. I use the flat bottom of a measuring cup to really pack it down tight so it doesn’t crumble when serving. Get it nice and snug, then slide that crust straight into the freezer while you tackle the filling!
Whipping Up the Creamy Oreo Pie Filling
Grab your mixing bowl for the filling. The absolute most important thing here is the cream cheese: beat that 8 ounces of softened cream cheese on its own until it is absolutely velvety smooth. I mean, no lumps allowed! Only once it’s buttery smooth do you begin slowly adding in the cup of powdered sugar and the vanilla extract. Beat those together until they are fully incorporated and look pale and airy.
Next, take your fully thawed but still cold whipped topping. You have to fold this in, not beat it! Use a spatula and gently scoop from the bottom up, turning the material over the topping. If you mix too aggressively, you’ll knock all the air out, and we want this filling fluffy, not dense. As soon as those white streaks are mostly gone, stop mixing.
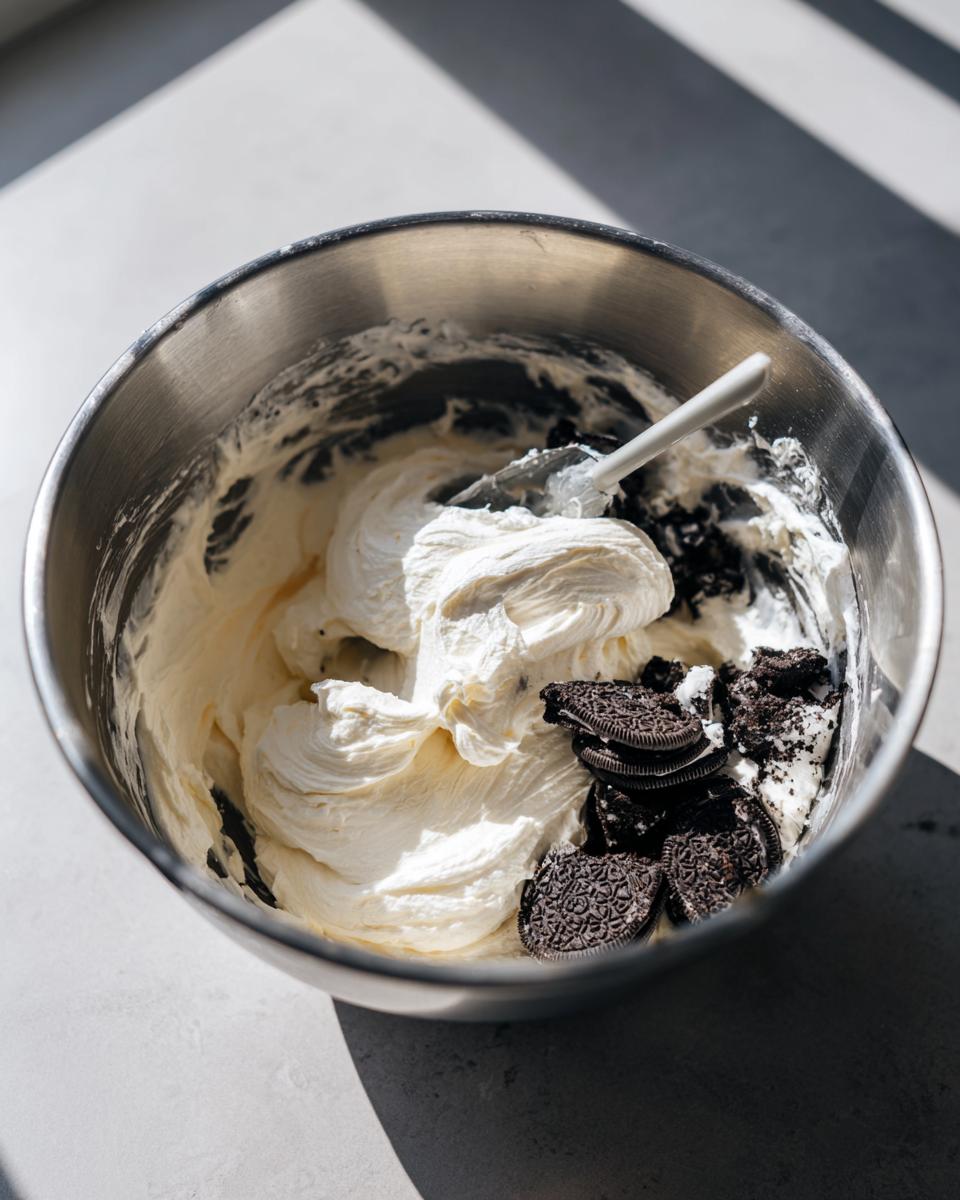
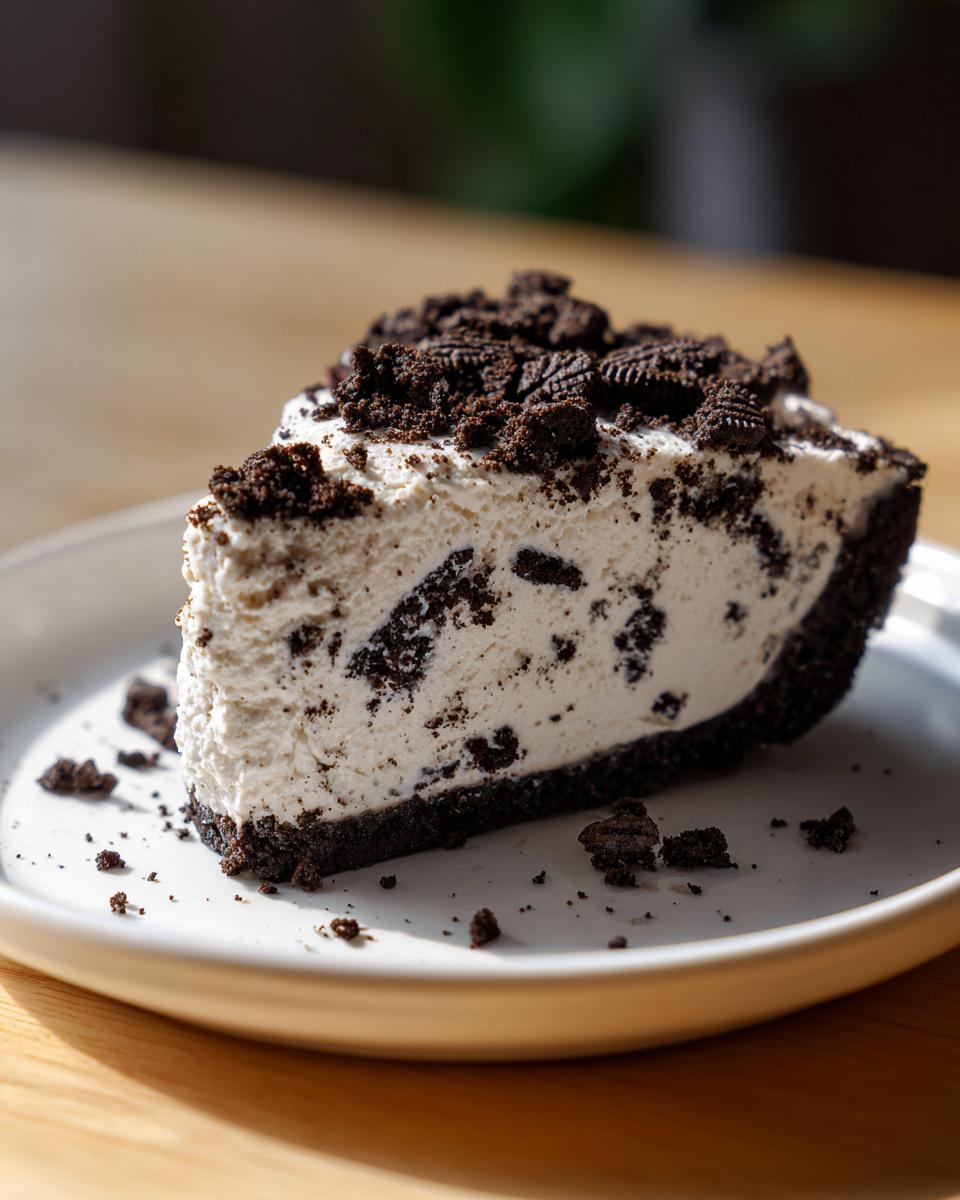
Finally, add about 8 coarsely chopped Oreo cookies—remember, the bigger the chunks, the better the surprise! Fold those in quickly. Stop the minute they are distributed.
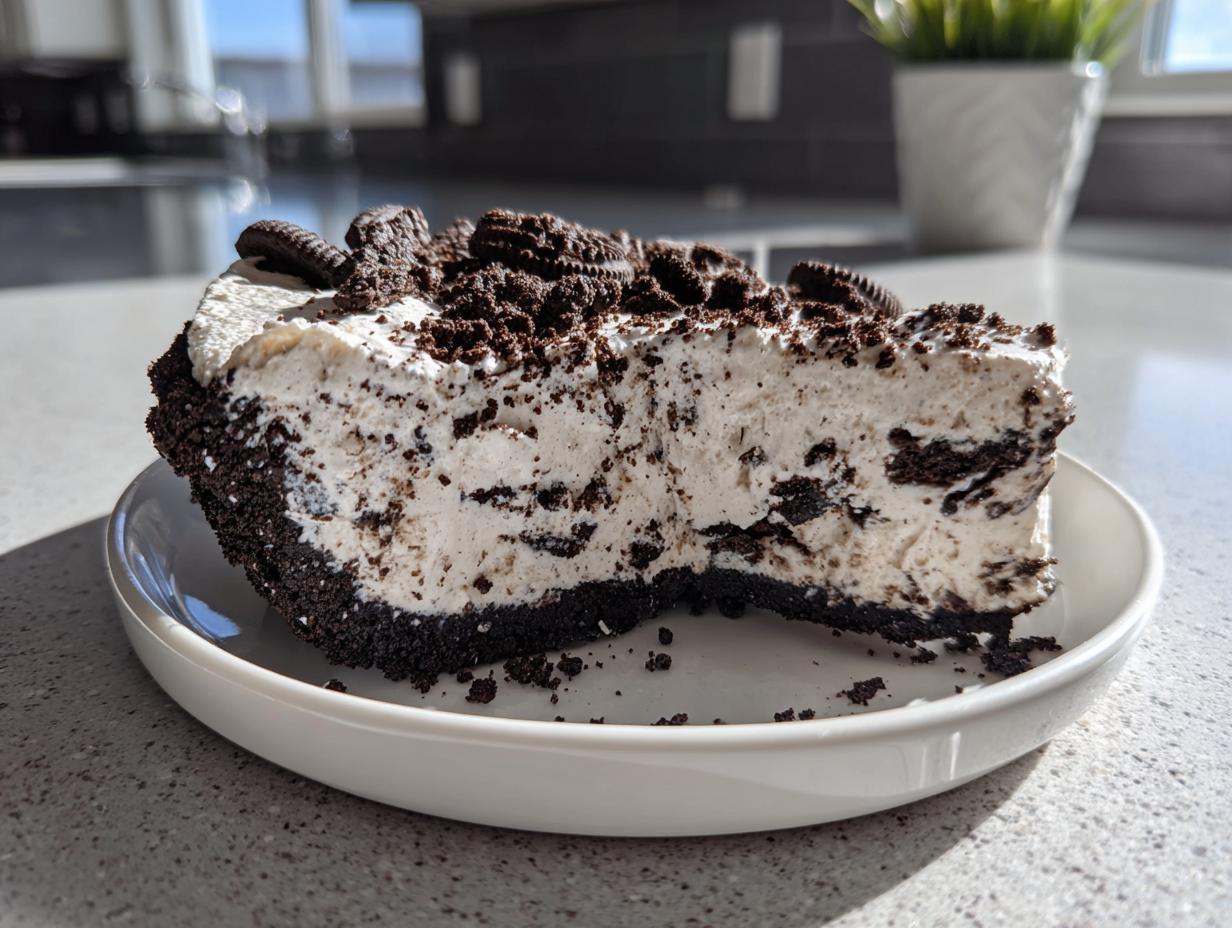
Assembling and Chilling Your Oreo Pie
Time to bring the crust back out of the freezer! Carefully spoon all that lovely, fluffy filling right into your chilled crust. Use your offset spatula or the back of a spoon to smooth out the top uniformly. Take those 2 tablespoons of reserved crumbs you set aside way back at the beginning and sprinkle them evenly across the top for that finished look.
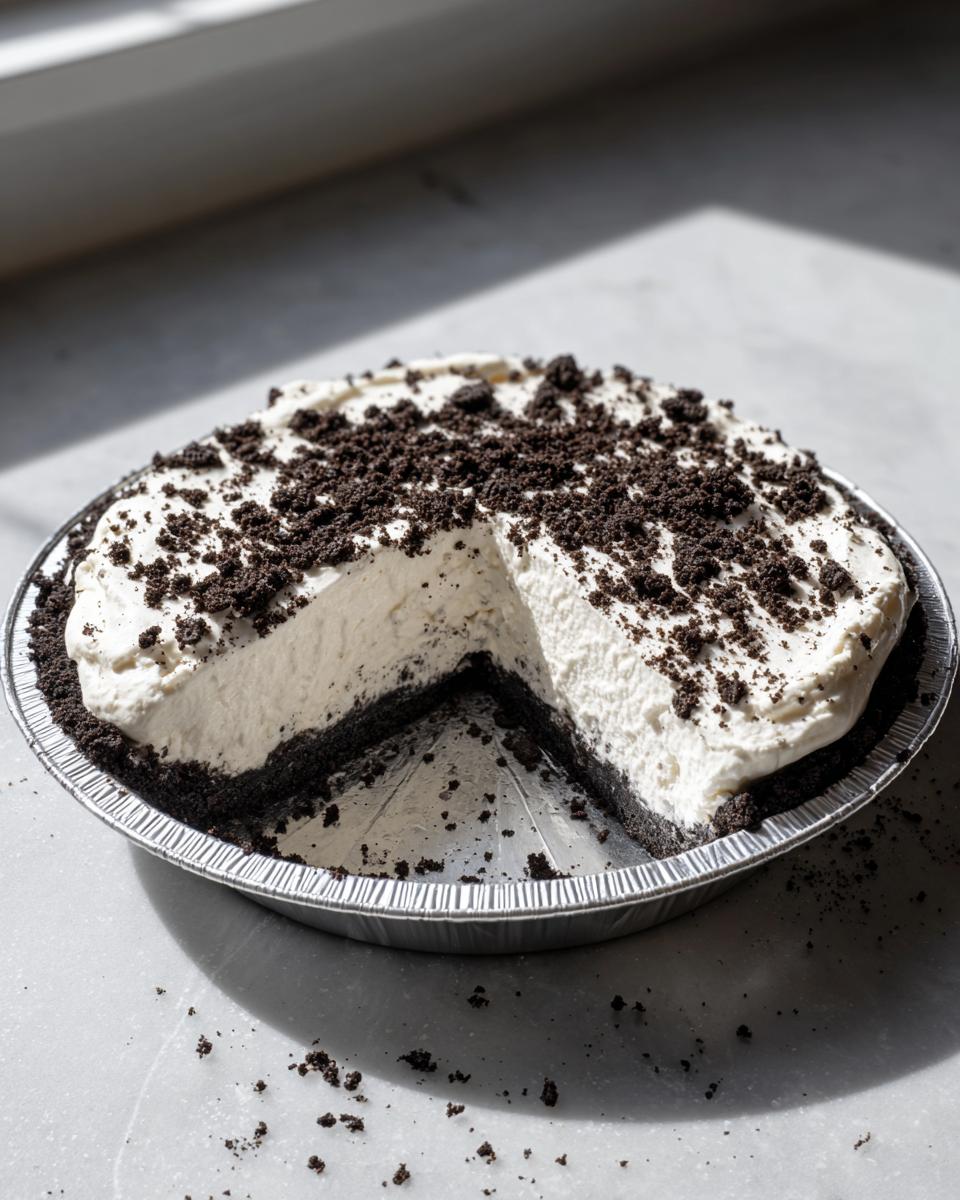
Now comes the hardest part: waiting. This oreo pie needs time for that filling to firm up properly. Pop it straight into the refrigerator and let it chill for a minimum of 4 hours. But honestly? If you can hold off until 6 hours, or even overnight—do it! That extra chilling time ensures that you get those clean slices, and that’s crucial for a perfect presentation.
If you’re interested in exploring another fantastic easy recipe that’s perfect for making ahead, check out my guide on easy homemade mayonnaise recipe—it shows how simple foundational components can be!
Tips for Making the Best Cookies and Cream Pie
I’ve made this dessert until my hands knew the steps by heart, and over the years, I’ve learned a few non-negotiables that turn a good Cookies and Cream Pie into the absolute best. These aren’t complicated things, just little details that make the difference between soft-set and perfectly firm.
First, let’s talk temperature again, because this is the key to a lump-free, airy filling. Your cream cheese has to be truly room temperature. If you try to cream it when it’s even slightly cool, the powdered sugar will clump up, and you’ll fight that mixer the whole time. It needs to be the consistency where it just yields gently under light pressure.
But here’s the secret for the whipped topping: while it needs to be fully thawed so it incorporates, you want it *cold* when you fold it in. If it gets too warm, it starts to deflate, and that translates directly into a flat, sad pie filling. I often put the carton in the fridge while I’m making the crust, just to be safe.
My biggest tip revolves around the final chill time. The recipe calls for four hours, and yes, you *can* slice it then. But if you want those picture-perfect, bakery-style slices where the crust doesn’t shatter when you cut through it, you need to lean into patience. Give it six hours, or better yet, make it the day before. That extra time lets all those dairy fats solidify beautifully, resulting in a truly stable, creamy texture right down to the base of that buttery crust. Sometimes, the best baking advice I can give is simply to wait a little longer!
Ingredient Notes and Substitutions for Your Oreo Pie
I know every kitchen pantry is a little different, so let’s talk about wiggle room with this oreo pie recipe. While I stand by the ingredient list above—it’s what yields that specific, light, cloud-like filling—I’ve played around with it enough to know where you can safely swap things out and where you absolutely shouldn’t.
The biggest area for substitution is the cookie itself. If you can’t find Oreos, or maybe you’re feeling adventurous, you can absolutely use a different chocolate sandwich cookie. Just make sure they have that similar dark crunchiness. I’ve seen people successfully use mint Oreos, which makes this recipe a fantastic make ahead dessert for holidays like St. Patrick’s Day!
Now for the filling components—this is where we need to be a little more careful. The combination of cream cheese and that thawed whipped topping is what creates that signature fluffy texture specific to this easy no bake dessert. If you absolutely cannot find the frozen whipped topping (like Cool Whip), you can try whipping heavy cream that has been chilled overnight. You’d need about a cup and a half of heavy cream, whipped to stiff peaks with a tablespoon of powdered sugar added in while whipping. Fold that in gently!
However, I must warn you: when you substitute the whipped topping with homemade whipped cream, the texture changes slightly. It becomes less stable and more mousse-like, and it might soften faster if left out too long at a party. If you are striving for the exact dessert listed in the instructions, stick to the traditional whipped topping. Butter is non-negotiable for the crust—margarine doesn’t have the same rich flavor, so use real butter if you can manage it.
Lastly, while I listed vanilla extract, sometimes I sneak in a tiny drop of almond extract for a different, deeper flavor note. Just a drop or two will do! It changes the character of the pie, but it’s a fun play on this classic cookies and cream pie.
Storage and Make Ahead Dessert Tips for Your Oreo Pie
One of the reasons I absolutely adore this dessert is that it fits perfectly into a busy schedule. Since this oreo pie involves zero baking, it’s already halfway to being the ideal make-ahead party savior! You can certainly plan to make this dessert well in advance, which takes so much pressure off the day you need to serve it.
Generally, I prefer to make these types of chilled pies the day before serving. Give it a full overnight rest in the refrigerator—at least 8 to 10 hours if you can swing it. This extra time ensures that the filling is perfectly firm and that the buttery crust has fully set up and absorbed just the right amount of moisture from the layers above it, making for that fantastic contrast in texture.
When we talk about storing leftovers—and there usually aren’t many!—you need to wrap it up tight. Place the pie plate inside a large, airtight container or cover the whole thing very tightly with plastic wrap. The refrigerator is its only home now; this is not a pie that likes sitting out on the counter once it’s set.
Will it last? Yes! A properly covered chilled oreo dessert like this will stay tasting fresh and creamy for a solid three to four days in the fridge. The texture might soften just a tiny bit toward day four as the crust starts to fully integrate with the filling, but it’s still perfectly delicious. Just don’t even think about reheating it! Once it’s chilled, it needs to stay chilled. It truly shines when served cold. For more awesome recipes you can get ready ahead of time, take a look at my tips for make ahead dessert planning!
Serving Suggestions: What Pairs Well with Oreo Pie
Once you pull that gorgeous, chilled oreo pie out of the fridge, the presentation is almost as fun as the eating! Because this pie is so rich and intensely chocolatey, I find the best pairings are things that offer a little brightness or a clean contrast to cut through all that creaminess. You don’t need much, because this pie is the star of the show!
I always keep it simple. A little pop of color makes everyone excited to dig in, and honestly, the natural sweetness of this pie doesn’t need much fuss. If you’re looking to elevate it slightly without adding any extra cooking time, here are my top three go-to methods for serving this cookies and cream pie.
- Fresh Red Berries: Nothing screams summer elegance like fresh raspberries or sliced strawberries scattered artfully around the edge of the slice or piled right on top. The slight tartness of the fruit is the absolute perfect foil for the sweet cream. Plus, the red against the black and white looks stunning!
- A Simple Dusting: If you decided against using the reserved crumbs on top (maybe you wanted a super smooth look), you can dust the whole pie lightly with unsweetened cocoa powder right before serving. It deepens the chocolate flavor profile without adding more sugar. This is an easy trick that looks very professional, I promise you.
- A Little Bit of Zest: If you’re feeling fancy, grate a tiny bit of fresh orange or lemon zest right over the top of the whole pie once it’s set. You won’t taste the citrus strongly, but it adds the brightest aromatic note, making the whole experience feel lighter.
My absolute favorite non-pie addition? If you’re serving a crowd and want something extra, pairing a slice with a light, fresh dip is perfect. I have a fantastic guide for an easy fruit dip recipe with no marshmallow that is wonderful alongside a rich slice of this pie for your guests who might want something fruitier!
Frequently Asked Questions About This Easy Oreo Dessert
I know you might have a few little questions buzzing around before you dive into making this spectacular No Bake Oreo Pie. That’s totally normal! People always ask me about speeding up the process or extending the freshness. I’ve tried to answer the most common things right here so you can bake (or, well, *no-bake*) with complete confidence. This recipe is simple, but knowing these little tricks makes it foolproof!
Can I use a store-bought Oreo crust for this No Bake Oreo Pie?
Oh, you absolutely can! If you are in a true rush, that’s a totally valid shortcut. If you use a pre-made 9-inch crust, you save yourself those initial 10 minutes of crushing and pressing—which is great! However, I have to tell you, the homemade crust using melted butter tastes worlds better. It just has a richer, more buttery flavor that complements the filling so nicely. If you go store-bought, you might notice the filling seems a little looser than when made with our homemade base, simply because the homemade one firms up so well in the freezer. Also, use just enough filling to fill that pre-made shell; you might have a tiny bit left over.
How long does this Creamy Oreo Pie stay fresh in the refrigerator?
This is an excellent question, especially for party planning! As a Chilled Oreo Dessert, it holds up really well, provided you keep it tightly covered. I find that this pie is at its absolute peak texture on day one and day two after chilling. You can safely keep it in the refrigerator for up to four days. After day three, you might notice the crust edges softening up a little bit—that buttery crunch starts to give way to moisture, which some people actually prefer! But if you’re looking for that distinct crust texture, aim to enjoy this pie within 72 hours for the best results.
Finding Joy in Your Kitchen with This Oreo Pie Recipe
Look, at the end of the day, we aren’t just making food; we’re crafting little moments of happiness, right? That’s what Seventh Flavour is all about—chasing that profound, quiet feeling you get when you share something you made with your own hands. This oreo pie recipe, simple as it is, is bursting with that joy because it comes together so easily, leaving you more time to actually enjoy the gathering.
It proves you don’t need complicated techniques or hours of effort to create something truly unforgettable. That cold, creamy bite is pure connection shared amongst friends and family. I hope you get a chance to make this soon!
Once you’ve made it and taken that first incredible bite, I would absolutely love to hear about it! Did you add strawberries on top? Did you sneak a piece late at night? Don’t be shy—come say hello and tell me all about your experience! You can always drop me a line via my contact page. Happy swirling and chilling!
PrintEasy No Bake Oreo Pie

Make this simple, creamy No Bake Oreo Pie. It features a crunchy chocolate cookie crust and a light, fluffy cookies and cream filling. This chilled dessert requires no oven and is perfect for parties or quick treats.
- Prep Time: 20 min
- Cook Time: 0 min
- Total Time: 4 hr 20 min
- Yield: 8 servings 1x
- Category: Dessert
- Method: No Bake
- Cuisine: American
- Diet: Vegetarian
Ingredients
- 1 package (14.3 ounces) Oreo cookies, divided
- 6 tablespoons unsalted butter, melted
- 1 package (8 ounces) cream cheese, softened
- 1 cup powdered sugar
- 1 teaspoon vanilla extract
- 1 carton (8 ounces) frozen whipped topping, thawed
Instructions
- Prepare the crust: Place 14 Oreo cookies in a food processor and pulse until fine crumbs form. Set aside 2 tablespoons of crumbs for topping.
- Mix the remaining cookie crumbs with the melted butter until combined. Press the mixture firmly into the bottom and up the sides of a 9-inch pie plate. Place the crust in the freezer while you prepare the filling.
- Make the filling: In a large bowl, beat the softened cream cheese until smooth. Gradually beat in the powdered sugar and vanilla extract until fully incorporated.
- Gently fold in the thawed whipped topping until no streaks remain.
- Fold in 1 cup of coarsely chopped Oreo cookies (about 8 cookies).
- Spoon the filling evenly into the chilled Oreo crust.
- Sprinkle the reserved 2 tablespoons of cookie crumbs over the top of the pie.
- Chill the Oreo pie for at least 4 hours, or until firm, before slicing and serving.
Notes
- For an even richer crust, use 1.5 sleeves of Oreos instead of 14 cookies.
- If you do not have a food processor, place the cookies in a large zip-top bag and crush them using a rolling pin.
- This pie sets best when chilled for a minimum of 6 hours.
Nutrition
- Serving Size: 1 slice
- Calories: 380
- Sugar: 30g
- Sodium: 280mg
- Fat: 24g
- Saturated Fat: 13g
- Unsaturated Fat: 11g
- Trans Fat: 0g
- Carbohydrates: 39g
- Fiber: 1g
- Protein: 4g
- Cholesterol: 45mg